This tutorial uses the Kiali Travel Demo to teach Kiali and Istio features.
This is the multi-page printable view of this section. Click here to print.
Travel Demo Tutorial
Learn how to use Kiali to configure, observe and manage Istio.
- 1: Prerequisites
- 2: Install Travel Demo
- 3: Join the Mesh
- 4: Observe the Mesh
- 5: Control the Mesh
- 6: Secure the Mesh
- 7: Uninstall Travel Demo
1 - Prerequisites
How to prepare for running the tutorial.
Platform Setup
This tutorial assumes you have access to a Kubernetes cluster with Istio installed.
This tutorial is being updated and qualified using:
- a Kind (Kubernetes in Docker) cluster with Helm-based Kiali install.
- an OpenShift cluster with Kiali Operator install (qualification pending).
Tip
Platform-dependent tasks will be indicated with a special note like this.
Version pins will be recorded here as the tutorial is re-qualified. Use current stable releases of Kind, Istio, and Kiali unless noted otherwise.
Set up a Kind Cluster
Kind runs a local Kubernetes cluster using Docker. Istio and this tutorial also require a way to assign external IPs to LoadBalancer services (for the Istio ingress gateway).
Prerequisites
Install the following tools:
The Istio install script in the next section downloads Istio (including istioctl) if it is not already present.
Create the cluster
The Kiali project provides a script that creates a Kind cluster with MetalLB configured for LoadBalancer services. If you have the Kiali source repository, run:
./hack/start-kind.sh --name travels-tutorial
This creates a two-node Kind cluster named travels-tutorial with a MetalLB load balancer. Verify the cluster context:
kubectl config use-context kind-travels-tutorial
kubectl cluster-info
Kind
If you prefer not to use the Kiali script, follow the Kind load balancer guide to enableLoadBalancer services before installing Istio.
Install Istio
Kind
The Kiali project provides a script that installs Istio with the demo profile and telemetry addons (Prometheus, Grafana, Jaeger). From the Kiali source repository, run:
./hack/istio/install-istio-via-istioctl.sh -c kubectl -cp demo
This downloads Istio (if needed), installs the control plane and ingress gateway, and deploys the addons used later in this tutorial.
Verify the installation:
kubectl get pods -n istio-system
kubectl get svc istio-ingressgateway -n istio-system
The istio-ingressgateway service should show an EXTERNAL-IP (MetalLB assigns this on Kind). Join the Mesh uses that address for ingress.
Kind
Ifistio-ingressgateway stays <pending>, confirm MetalLB is running: kubectl get pods -n metallb-system
Prefer to install Istio yourself? Follow the Istio Getting Started guide using the demo profile, and install the Prometheus and Jaeger addons from
${ISTIO_HOME}/samples/addons/.
OpenShift
Follow the Istio OpenShift platform setup to install Istio on your cluster.
Alternatively, from the Kiali source repository, the install script defaults to the openshift profile when using oc:
./hack/istio/install-istio-via-istioctl.sh -c oc
Verify the control plane is running:
oc get pods -n istio-system
Join the Mesh uses an OpenShift route to expose the ingress gateway.
Install Kiali
Remove any Kiali installed from the Istio addons bundle before proceeding (set ISTIO_HOME to your Istio install directory, or the path under kiali/_output/ if you used the hack script):
kubectl delete -f ${ISTIO_HOME}/samples/addons/kiali.yaml --ignore-not-found
This tutorial uses different install methods depending on the platform. On Kind, a standalone Helm install keeps setup minimal. On OpenShift, install via the Kiali Operator — the recommended production method.
Kind
Install the Kiali server using the Quick Start Helm instructions. The Istio install above deploys Jaeger, but Kiali does not enable tracing integration by default — enable it explicitly:
helm install \
  --namespace istio-system \
  --set auth.strategy="anonymous" \
  --set external_services.tracing.enabled=true \
  --set external_services.tracing.internal_url="http://tracing.istio-system:16685/jaeger" \
  --repo https://kiali.org/helm-charts \
  kiali-server \
  kiali-server
Wait for the Kiali deployment to become ready:
kubectl rollout status deployment/kiali -n istio-system --timeout=300s
kubectl get pods,svc -n istio-system -l app.kubernetes.io/name=kiali
Confirm tracing is configured (the enabled field should be true):
kubectl get configmap kiali -n istio-system -o jsonpath='{.data.config\.yaml}' | grep -A2 'tracing:'
The
kiali-server Helm chart is intended for demo and evaluation. For production clusters, use the Kiali Operator.
OpenShift
Install the Kiali Operator from OperatorHub in the OpenShift console, then create a Kiali CR in the istio-system namespace.
For a minimal tutorial setup with anonymous login, you can install the operator and CR in one step using Helm:
helm repo add kiali https://kiali.org/helm-charts
helm install \
  --set cr.create=true \
  --set cr.namespace=istio-system \
  --set cr.spec.auth.strategy="anonymous" \
  --set cr.spec.external_services.tracing.enabled=true \
  --set cr.spec.external_services.tracing.internal_url="http://tracing.istio-system:16685/jaeger" \
  --namespace kiali-operator \
  --create-namespace \
  kiali-operator \
  kiali/kiali-operator
Wait for the operator to reconcile the Kiali CR:
kubectl wait --for=condition=Successful kiali kiali -n istio-system --timeout=300s
kubectl get pods,svc -n istio-system -l app.kubernetes.io/name=kiali
See Creating and updating the Kiali CR for customization options. Production OpenShift deployments typically use the openshift auth strategy instead of anonymous.
Access the Kiali UI
Kind
Port-forward the Kiali service to your local machine:
kubectl port-forward svc/kiali 20001:20001 -n istio-system
Open http://localhost:20001/ in your browser.
The Kiali repo also provides a convenience script: ./hack/kiali-port-forward.sh
OpenShift
The Kiali operator creates an OpenShift route by default. Get the URL:
oc get route kiali -n istio-system
Open the route host in your browser (for example, https://<route-host>/).
See Accessing Kiali for more options.
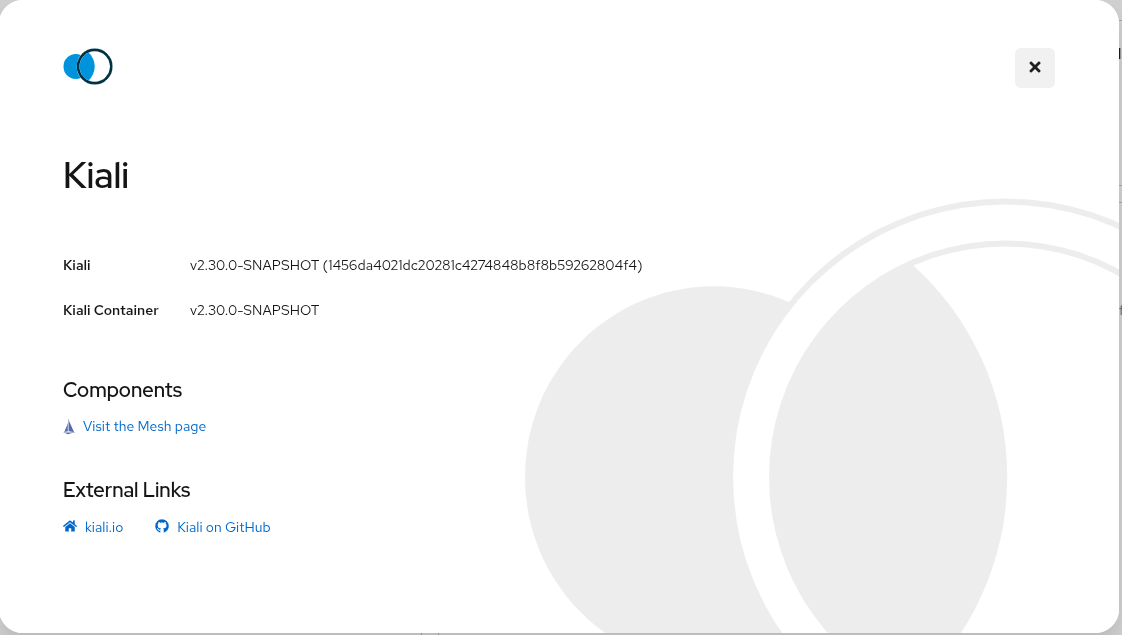
After the Prerequisites you should be able to access Kiali. Verify its version by clicking the “?” icon and selecting “About”:
2 - Install Travel Demo
Installing and understanding the tutorial demo.
Deploy the Travel Demo
This demo application deploys several services grouped into three namespaces:
- travel-control — business dashboard to configure traffic and view statistics
- travel-portal — shop simulators that generate traffic
- travel-agency — quote and pricing services
At this step, deploy the application without joining it to the service mesh. Sidecar injection is added in Join the Mesh.
Do not label the namespaces with istio-injection=enabled yet.
Kind
From the Kiali source repository, the Travel Demo install script creates the namespaces and deploys the manifests without enabling auto-injection:
./hack/istio/install-travel-agency-demo.sh -c kubectl -ai false
Alternatively, run the commands manually:
kubectl create namespace travel-agency
kubectl create namespace travel-portal
kubectl create namespace travel-control

kubectl apply -f <(curl -L https://raw.githubusercontent.com/kiali/demos/master/travels/travel_agency.yaml) -n travel-agency
kubectl apply -f <(curl -L https://raw.githubusercontent.com/kiali/demos/master/travels/travel_portal.yaml) -n travel-portal
kubectl apply -f <(curl -L https://raw.githubusercontent.com/kiali/demos/master/travels/travel_control.yaml) -n travel-control
If you have a local clone of the demos repository, you can apply the YAML files from
travels/ instead of downloading them.
OpenShift
The install script also handles OpenShift-specific setup (NetworkAttachmentDefinitions and SecurityContextConstraints):
./hack/istio/install-travel-agency-demo.sh -c oc -ai false
Alternatively, substitute oc for kubectl in the manual commands above and add the necessary NetworkAttachmentDefinition to each namespace, along with SecurityContextConstraints for the service accounts in those namespaces (minimally, default).
Verify the deployment
Confirm workloads are running
Check that all deployments rolled out. Pods should show 1/1 ready — there are no sidecars yet:
kubectl get deployments -n travel-control
NAME      READY   UP-TO-DATE   AVAILABLE   AGE
control   1/1     1            1           85s

kubectl get deployments -n travel-portal
NAME      READY   UP-TO-DATE   AVAILABLE   AGE
travels   1/1     1            1           91s
viaggi    1/1     1            1           91s
voyages   1/1     1            1           91s

kubectl get deployments -n travel-agency
NAME            READY   UP-TO-DATE   AVAILABLE   AGE
cars-v1         1/1     1            1           96s
discounts-v1    1/1     1            1           96s
flights-v1      1/1     1            1           96s
hotels-v1       1/1     1            1           96s
insurances-v1   1/1     1            1           96s
mysqldb-v1      1/1     1            1           96s
travels-v1      1/1     1            1           96s
The portal workloads generate traffic to the travel agency services automatically.
Confirm in Kiali
Open Kiali and select Overview. This page summarizes what is in the service mesh — control planes, data planes, applications, and services that participate in the mesh.
Because the Travel Demo was deployed without sidecars, it is not part of the mesh yet. The Overview page should look much the same as before the demo was installed. You should still see the Istio control plane, and mesh counts such as data plane namespaces should remain at 0.
To see the demo namespaces, open the Namespaces page. The three Travel Demo namespaces should be listed:
travel-controltravel-portaltravel-agency
In the Type column, each namespace shows a - badge. Hover over the badge to see the tooltip Not part of the mesh:
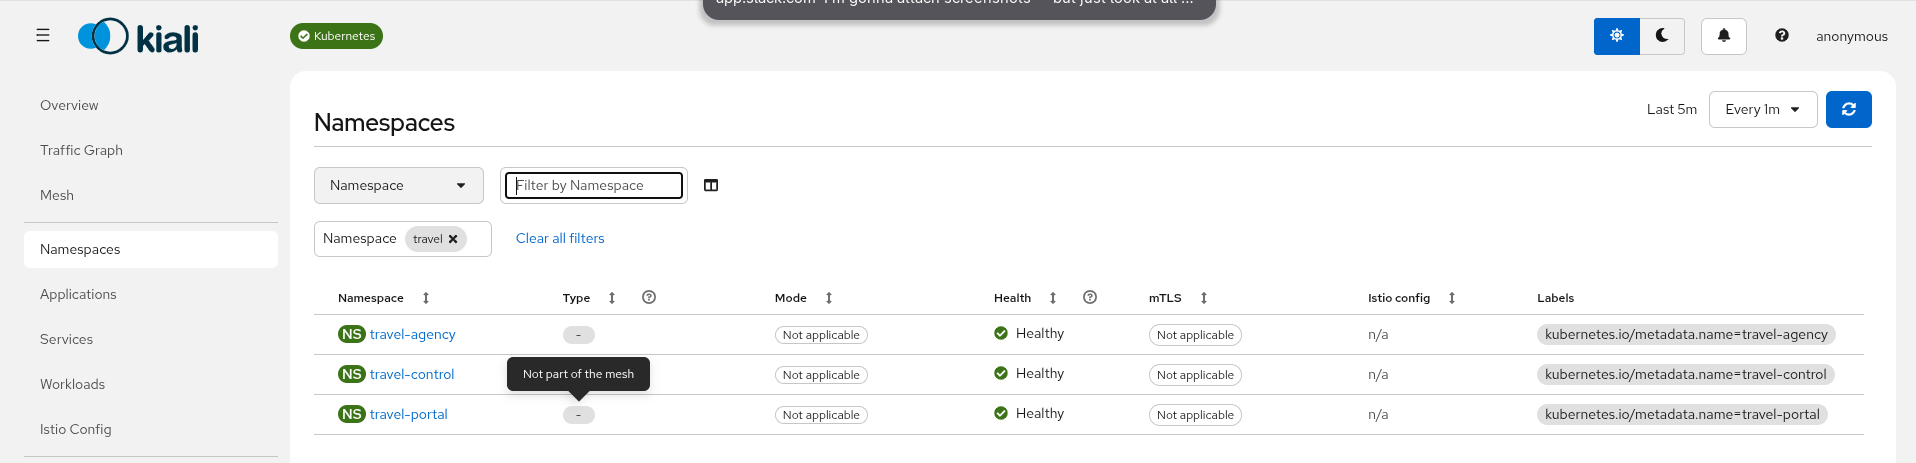
Sidecar injection is covered in Join the Mesh, when these namespaces begin to appear as part of the mesh.
Understanding the demo application
The Travel Demo simulates a travel booking scenario across three namespaces. Traffic flows in one direction:
travel-control → travel-portal → travel-agency
The control dashboard configures how each portal shop behaves. The portal shops generate requests. The agency services respond with travel quotes.
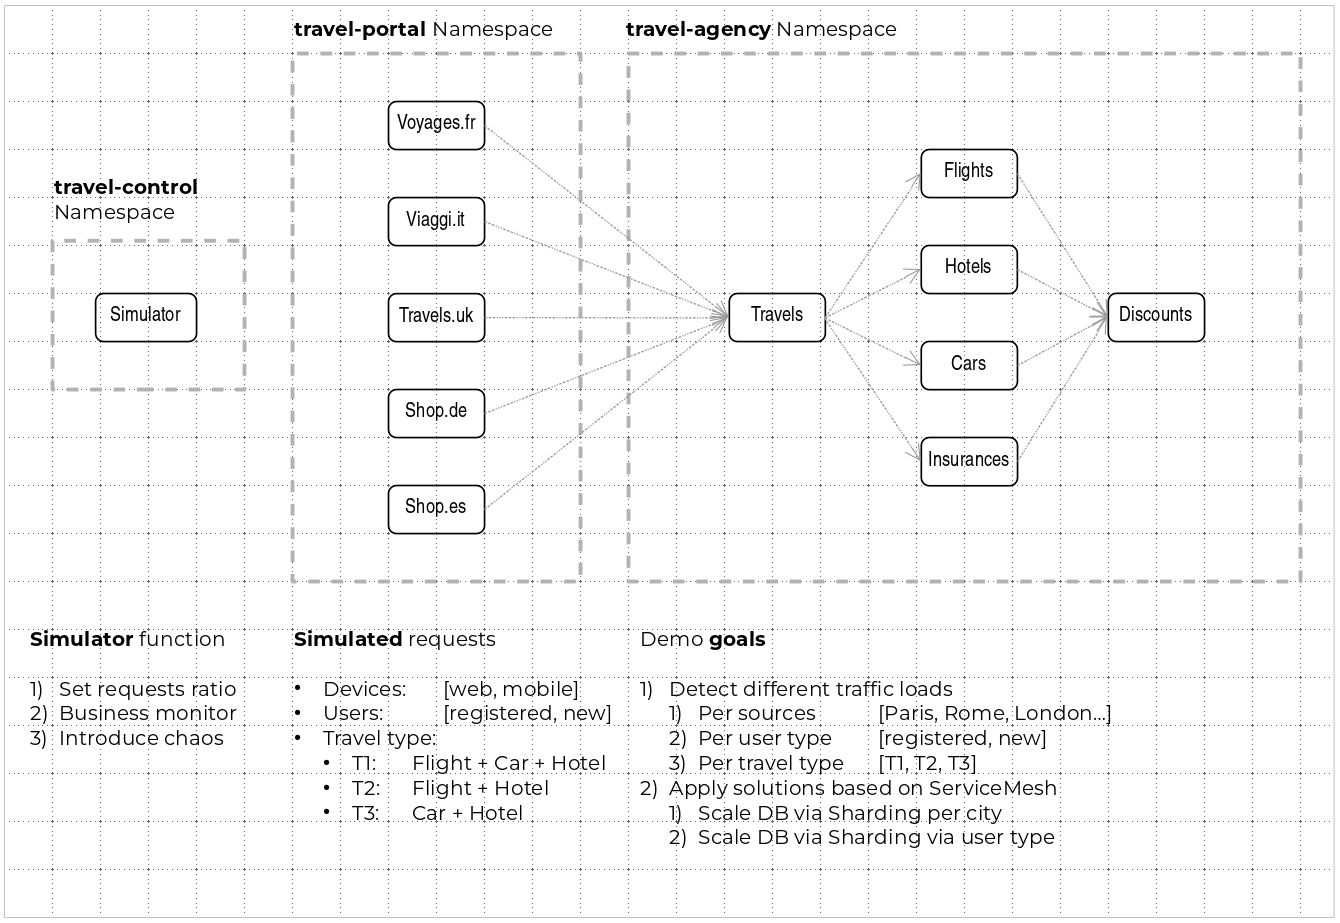
How traffic flows
A typical request path looks like this:
- Settings on the control dashboard determine how each portal shop sends traffic (device, user type, travel type, and volume).
- A portal shop in travel-portal queries the travels service in travel-agency for available destinations.
- The travels service queries hotels and returns destination options to the portal.
- When a destination and travel type are selected, travels aggregates quotes from flights, cars, hotels, insurances, and discounts.
- Cars, hotels, and flights may apply discounts depending on user type.
Travel Control namespace
The travel-control namespace hosts a business dashboard with two roles:
- Configure every travel shop simulator — traffic ratio, device, user, and type of travel.
- View a business summary of requests from travel-portal to travel-agency, grouped by shop, traffic type, and city.
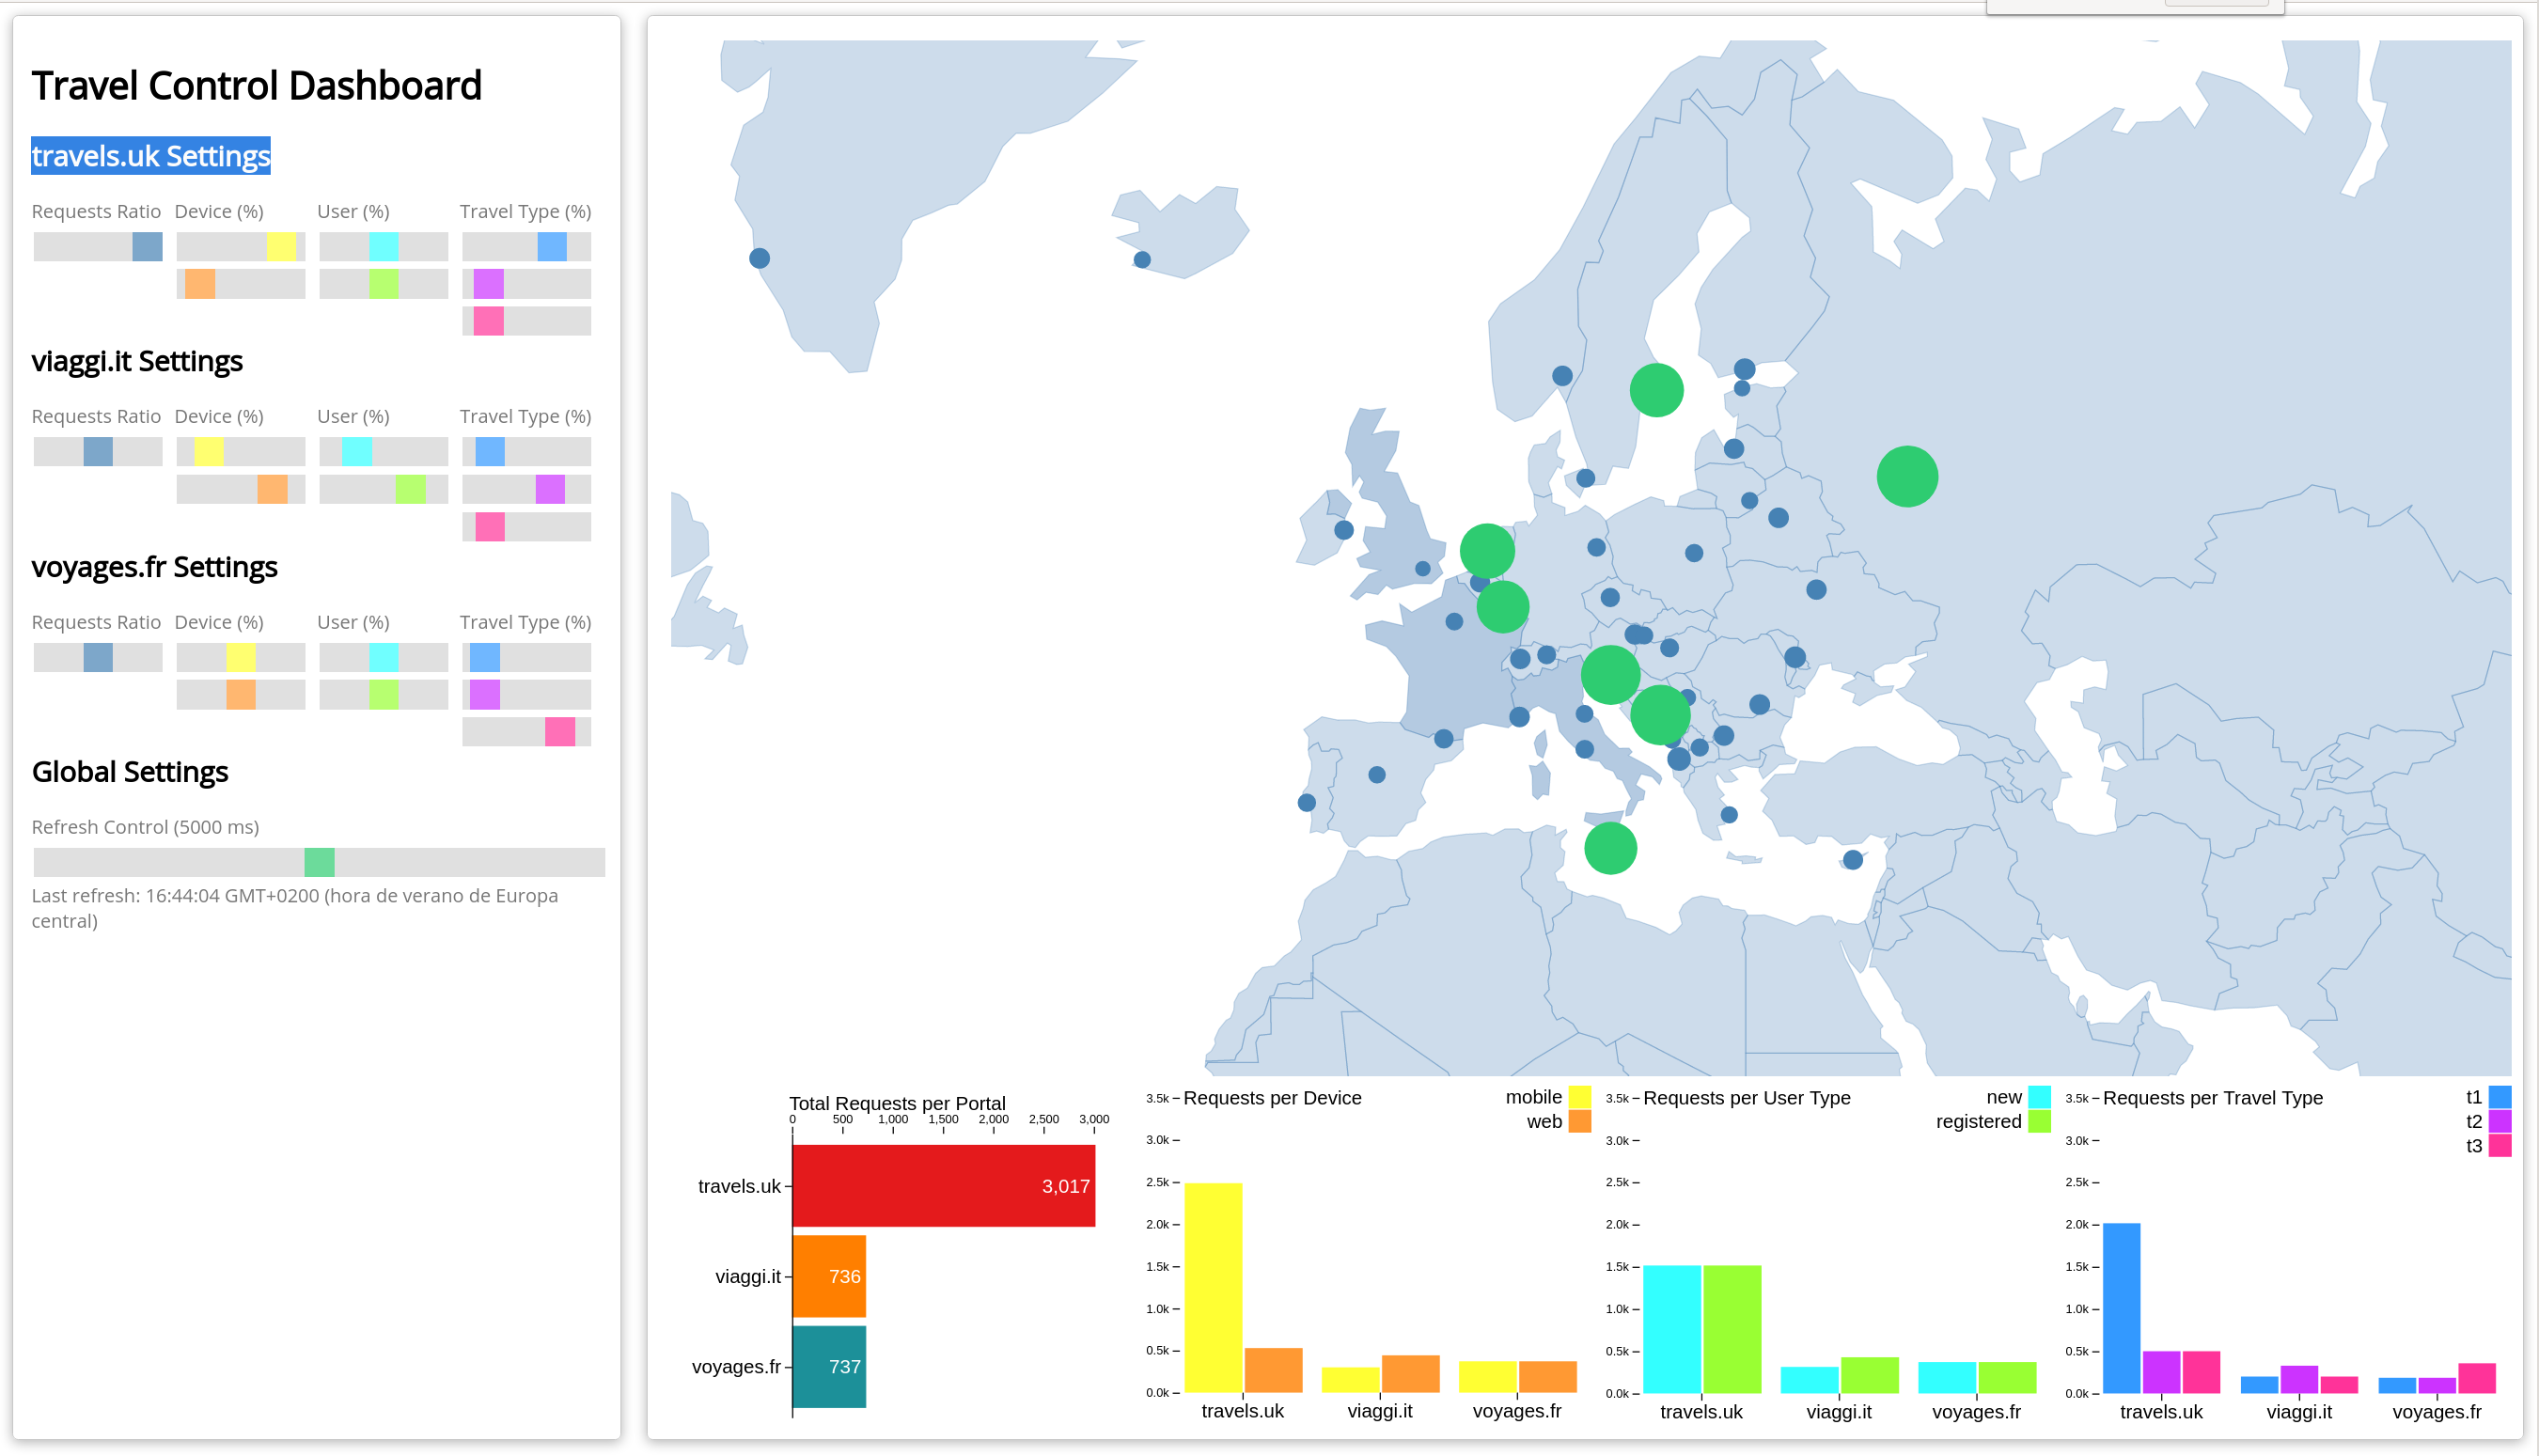
Preview the Travel Dashboard (optional)
The control service is not exposed outside the cluster yet — that happens in Join the Mesh. To preview the dashboard now:
kubectl port-forward svc/control 8080:8080 -n travel-control
Open http://localhost:8080/ in your browser.
Travel Portal namespace
The travel-portal namespace runs several travel shop simulators (for example travels, viaggi, and voyages). Each shop represents a different portal with its own traffic characteristics.
Shops differ by channel (web or mobile), user type (new or registered), and travel type. Together they produce varied traffic patterns so you can explore realistic mesh scenarios in Kiali.
All portal shops call the travels service in the travel-agency namespace.
Travel Agency namespace
The travel-agency namespace provides backend quote services. The travels service is the main entry point: it receives a destination city and user, then aggregates a full travel budget from the supporting services:
- hotels — lodging quotes
- flights — airfare quotes
- cars — car rental quotes
- insurances — travel insurance quotes
- discounts — special pricing for registered users
- mysqldb — persistent storage for the demo
Each service calculates its portion independently; travels combines them into a single response.
3 - Join the Mesh
Sidecar injection and ingress gateway.
Sidecar Proxies
The Travel Demo was deployed in the previous chapter without Istio sidecar proxies. These are Envoy proxies that can be injected into the application pods.
Without a sidecar, workloads do not connect to the Istio control plane and do not report mesh telemetry (metrics, access logs, or distributed traces).
Confirm in Kiali
As shown in Install Travel Demo, the demo namespaces appear on the Namespaces page with type - (Not part of the mesh):
The Overview page still summarizes only what is in the mesh — Istio control plane counts should remain unchanged and data plane namespaces should stay at 0.
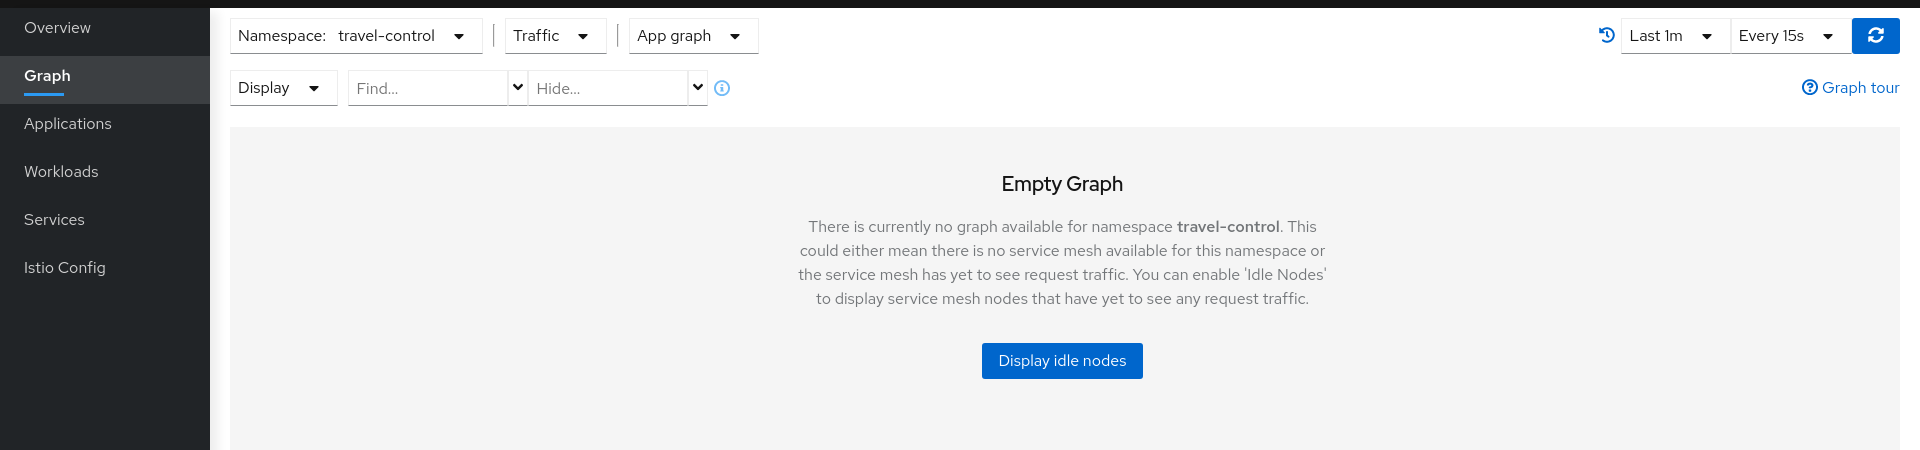
On the Graph page, select the Travel Demo namespaces (travel-control, travel-portal, and travel-agency) in the namespace dropdown. Without sidecar proxies there is no request telemetry, so Kiali reports an empty graph:
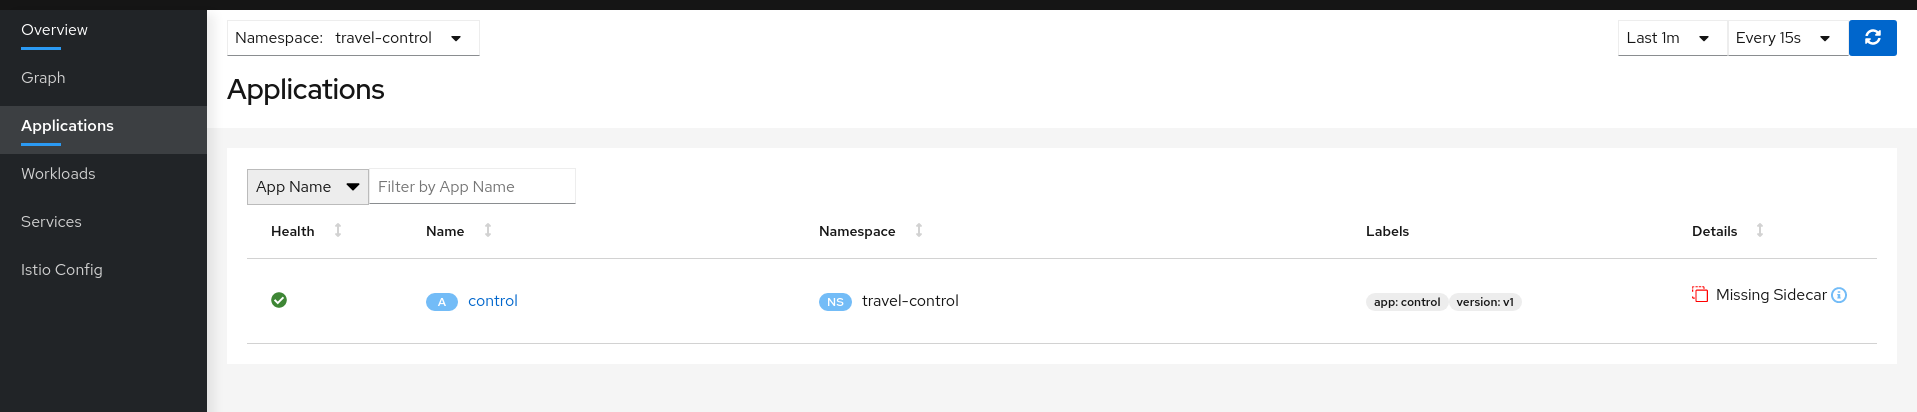
The Workloads and Applications pages make the missing sidecars explicit. Open Workloads, select the travel-control namespace, and look for the missing-sidecar badge on the control workload:
Enable Sidecars
In this tutorial we add namespaces and workloads to the service mesh one step at a time. That makes it easier to see how Istio sidecar injection works before the rest of the demo joins the mesh.
We start with the control workload in the travel-control namespace.
Step 1
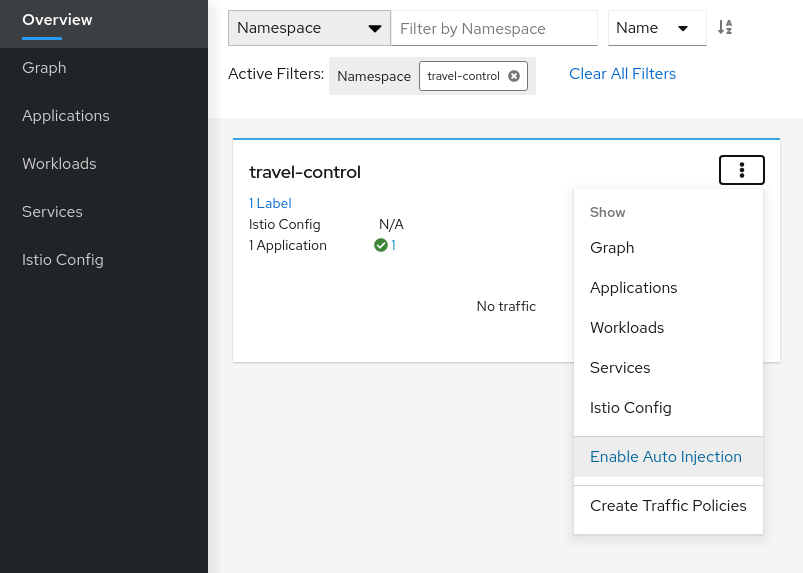
Enable Auto Injection on the travel-control namespace- Open Namespaces.
- Click the travel-control namespace name to open its detail page.
- Select Actions → Enable Auto Injection.
- Confirm in the dialog.
This adds the istio-injection=enabled label to the namespace. Existing pods are not restarted yet — only new pods created after injection is enabled receive a sidecar automatically.
Step 2
Enable Auto Injection for the control workload- Open Workloads.
- Select the travel-control namespace.
- Click the control workload.
- Select Actions → Enable Auto Injection.
Kiali updates the workload so the next pod receives an Istio sidecar. Kubernetes rolls out a new control pod; when it is ready you should see 2/2 containers (application + istio-proxy):
kubectl get pods -n travel-control
NAME                       READY   STATUS    RESTARTS   AGE
control-xxxxxxxxxx-xxxxx   2/2     Running   0          42s

Understanding what happened:
(ii) Automatic Sidecar Injection
Open Travel Demo to Outside Traffic
The control workload now has an Istio sidecar, but the application is still not reachable from outside the cluster.
In this section you expose the control service through an Istio Gateway and route external HTTP traffic to it with a VirtualService.
Step 1
Create a DNS entry for the control service using the external address of the Istio ingress gateway
There are several ways to provide a hostname for ingress depending on your platform. See Istio’s Determining the Ingress IP and Ports for general guidance.
Kind
If you created the cluster with./hack/start-kind.sh, MetalLB is already configured. LoadBalancer services such as istio-ingressgateway receive an external IP address.
For Kind, check the external IP of the ingress gateway:
kubectl get svc istio-ingressgateway -n istio-system
NAME                   TYPE           CLUSTER-IP     EXTERNAL-IP    PORT(S)                                                                      AGE
istio-ingressgateway   LoadBalancer   10.101.6.144   10.101.6.144   15021:30757/TCP,80:32647/TCP,443:30900/TCP,31400:30427/TCP,15443:31072/TCP   19h
Add an entry to /etc/hosts on the machine where you run the browser (use your cluster’s EXTERNAL-IP):
...
10.101.6.144 control.travel-control.istio-cluster.org
...
From that machine, control.travel-control.istio-cluster.org resolves to the Istio ingress gateway.
Kind
IfEXTERNAL-IP stays <pending>, confirm MetalLB is running: kubectl get pods -n metallb-system
OpenShift
OpenShift does not populate KubernetesEXTERNAL-IP for LoadBalancer services the same way. Expose the ingress gateway as a route instead.
For OpenShift, expose the ingress gateway as a route:
oc expose service istio-ingressgateway -n istio-system
oc get routes -n istio-system
NAME                   HOST/PORT                                  PATH   SERVICES               PORT    TERMINATION          WILDCARD
istio-ingressgateway   <YOUR_ROUTE_HOST>                                 istio-ingressgateway   http2                        None
Use <YOUR_ROUTE_HOST> wherever this chapter shows control.travel-control.istio-cluster.org (no /etc/hosts entry is required on OpenShift).
Step 2
Use the Request Routing wizard on the control service- Open Services.
- Select the travel-control namespace.
- Click the control service.
- Select Actions → Request Routing.
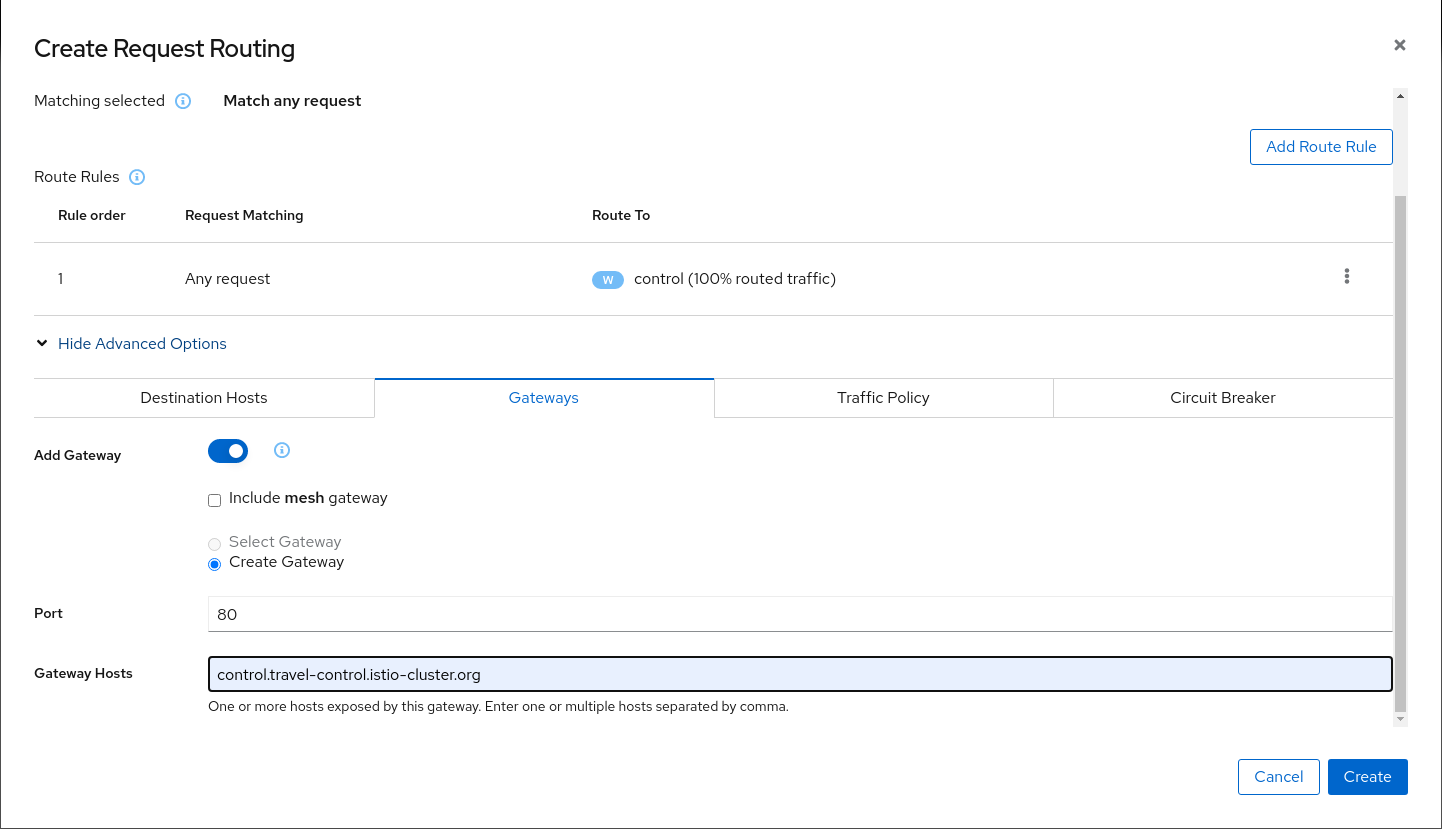
Use Add Route Rule to add a default rule that sends all requests to the control workload.

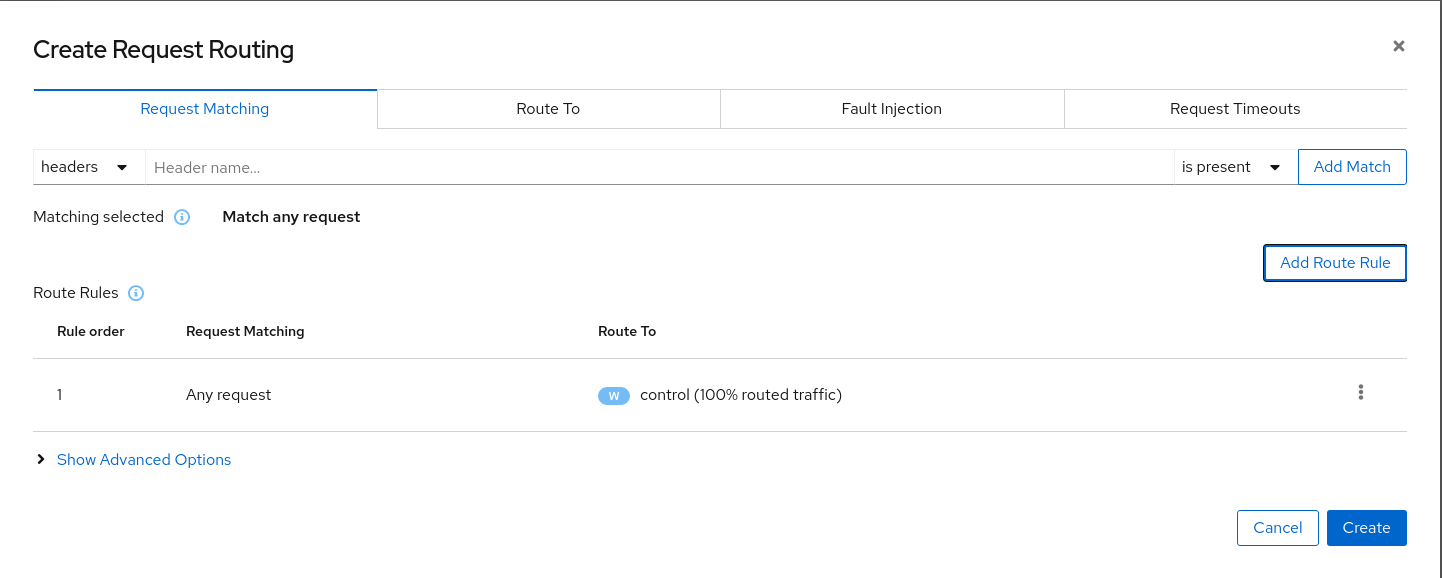
Open Show advanced options, select the Gateways tab, enable Add Gateway, choose Create Gateway, and set the gateway host to control.travel-control.istio-cluster.org (port 80).
Before clicking Create, review the DestinationRule, Gateway, and VirtualService generated by the wizard:
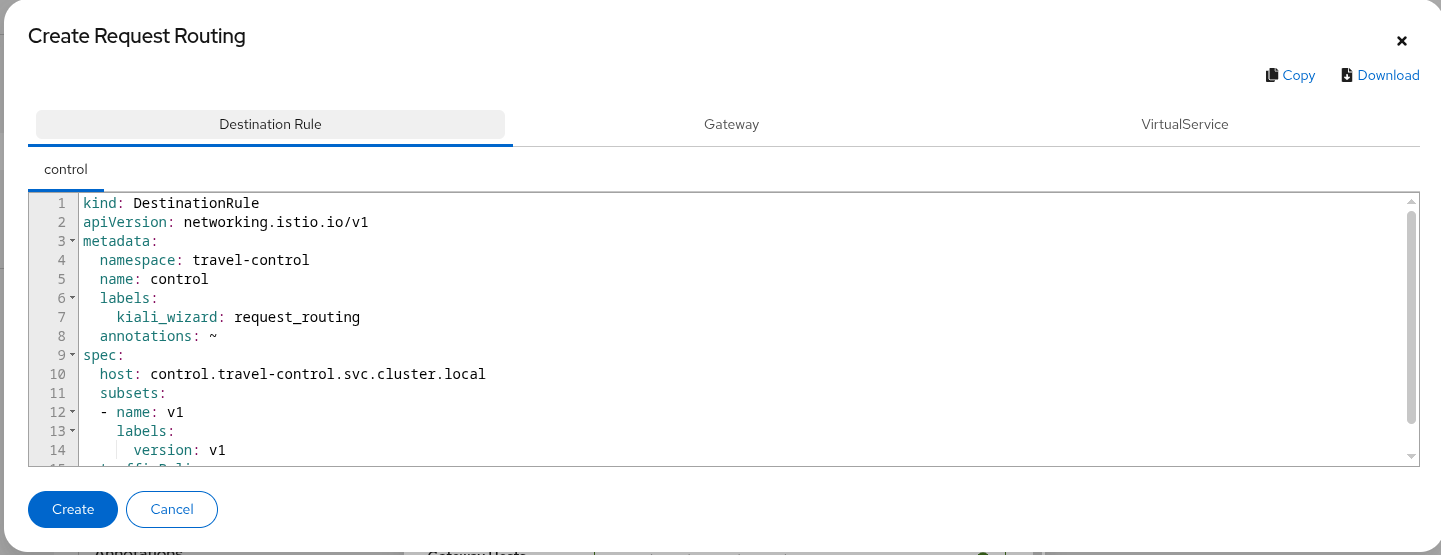
Click Create to apply the configuration.
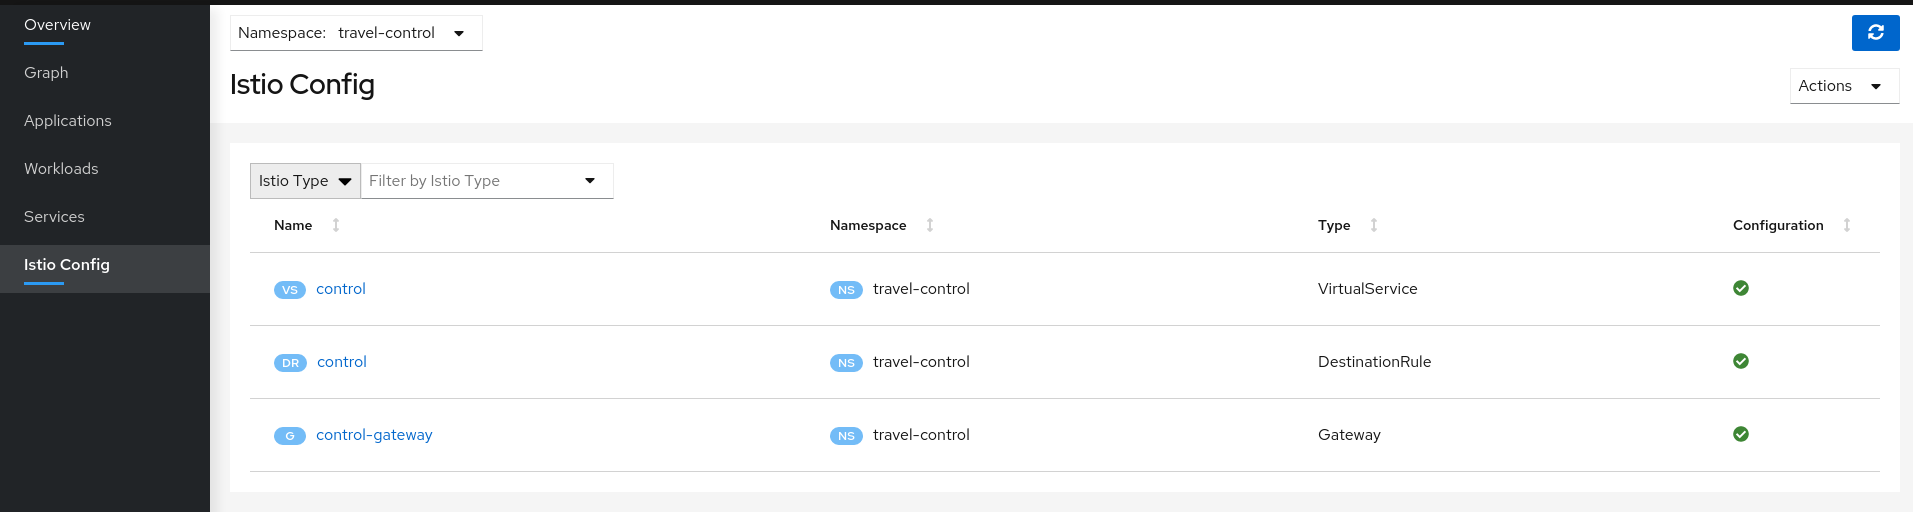
On the Istio Config page, confirm the new objects were created and validated in the travel-control namespace:
Step 3
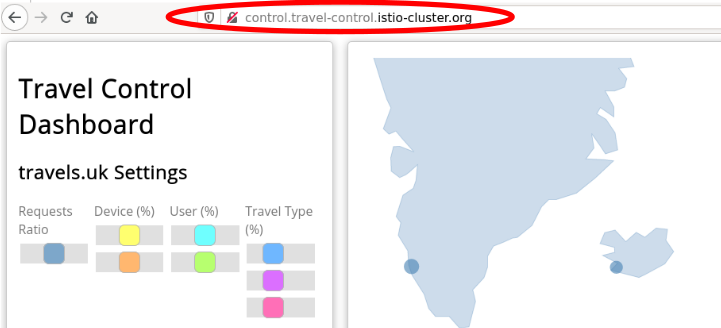
Test the control service in your browserOpen http://control.travel-control.istio-cluster.org/ (on OpenShift, use your route host instead).
You should see the Travel Demo business dashboard — the same UI you previewed with kubectl port-forward in the previous chapter, now reachable through the mesh ingress.
Step 4
Review the travel-control namespace in KialiOpen the Graph page, select the travel-control namespace, and refresh if needed. After browsing the dashboard, Kiali should show request telemetry from the ingress gateway through the control workload.
The graph may also show travel-portal services as destinations of outbound traffic from control. Only the control workload has a sidecar at this point — workloads in travel-portal and travel-agency still show missing sidecars on the Workloads page.
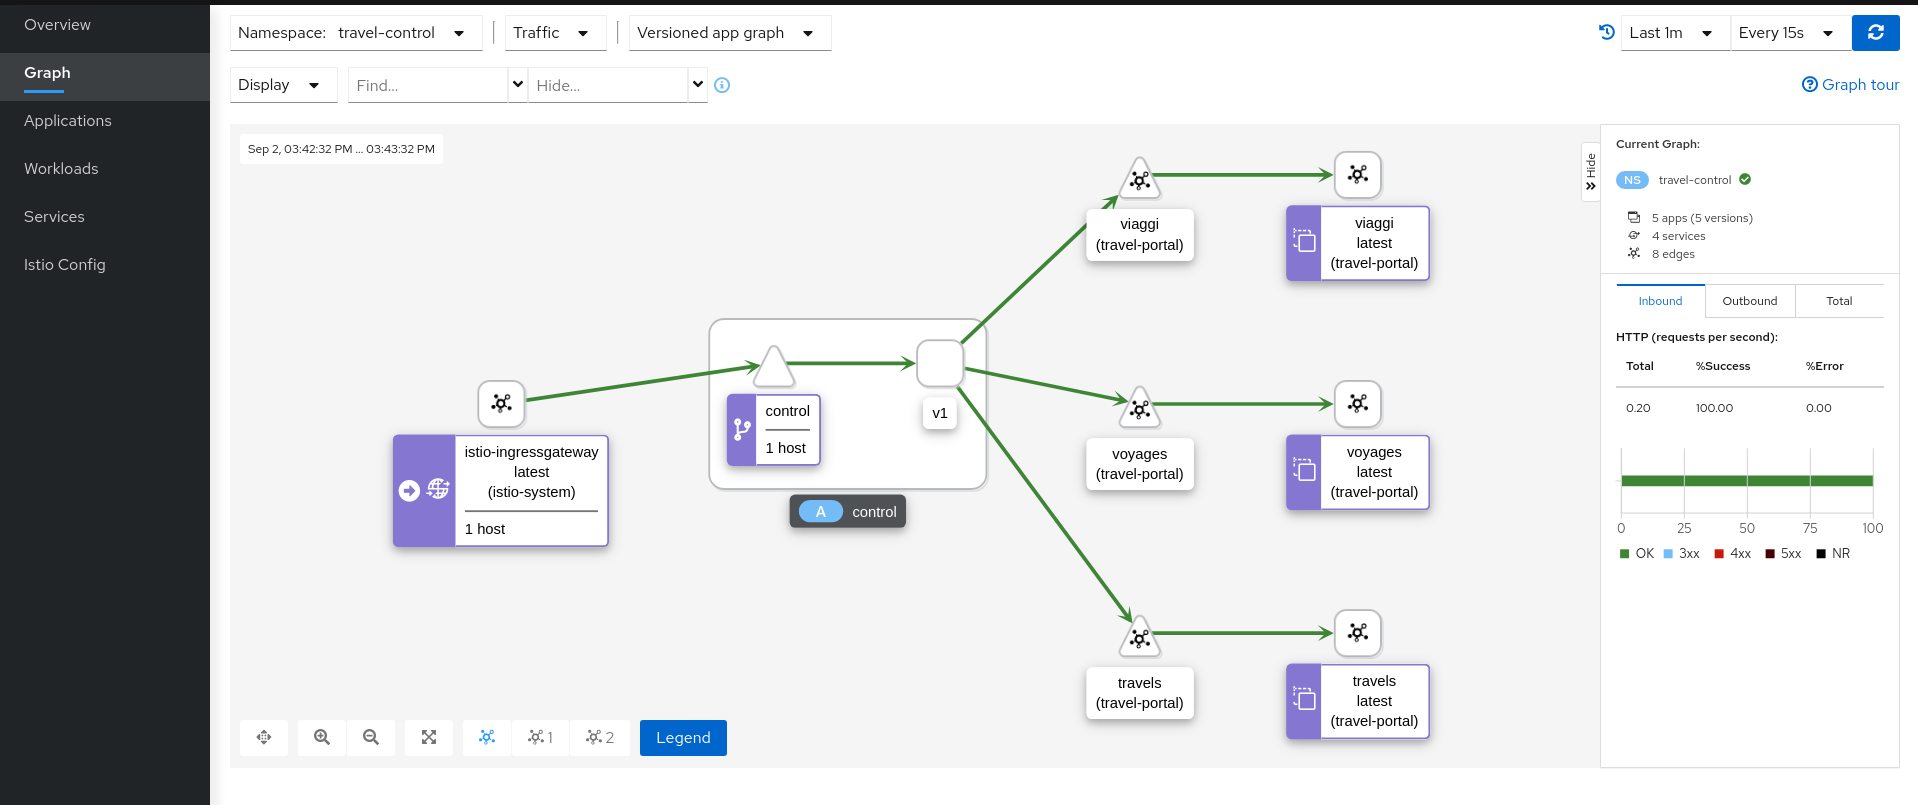
Understanding what happened:
- External traffic enters the cluster through an Istio Gateway bound to the ingress gateway.
- A VirtualService routes that traffic to the control service.
- The control sidecar reports telemetry that Kiali displays on the graph.
- Only the control workload participates in the mesh so far; the remaining demo workloads are added in Observe the Mesh.
4 - Observe the Mesh
Observability with Kiali: graphs, metrics, logs, tracing…
Enable Sidecars in All Workloads
An Istio sidecar proxy connects a workload to the control plane and enables service mesh functionality.
Sidecars automatically collect metrics, access logs, and distributed traces — a major observability benefit of the mesh.
In Join the Mesh we injected a sidecar only into the control workload. The rest of the Travel Demo still lacks full mesh visibility.
Step 1
Use the Traffic Graph to identify missing sidecars in the Travel Demo- Open Traffic Graph.
- Select all three Travel Demo namespaces (
travel-control,travel-portal, andtravel-agency). - Note the Graph Type menu → if necessary, set to the default: Versioned App graph.
- Note the Display menu → if necessary, enable Missing Sidecars (under Show Badges).
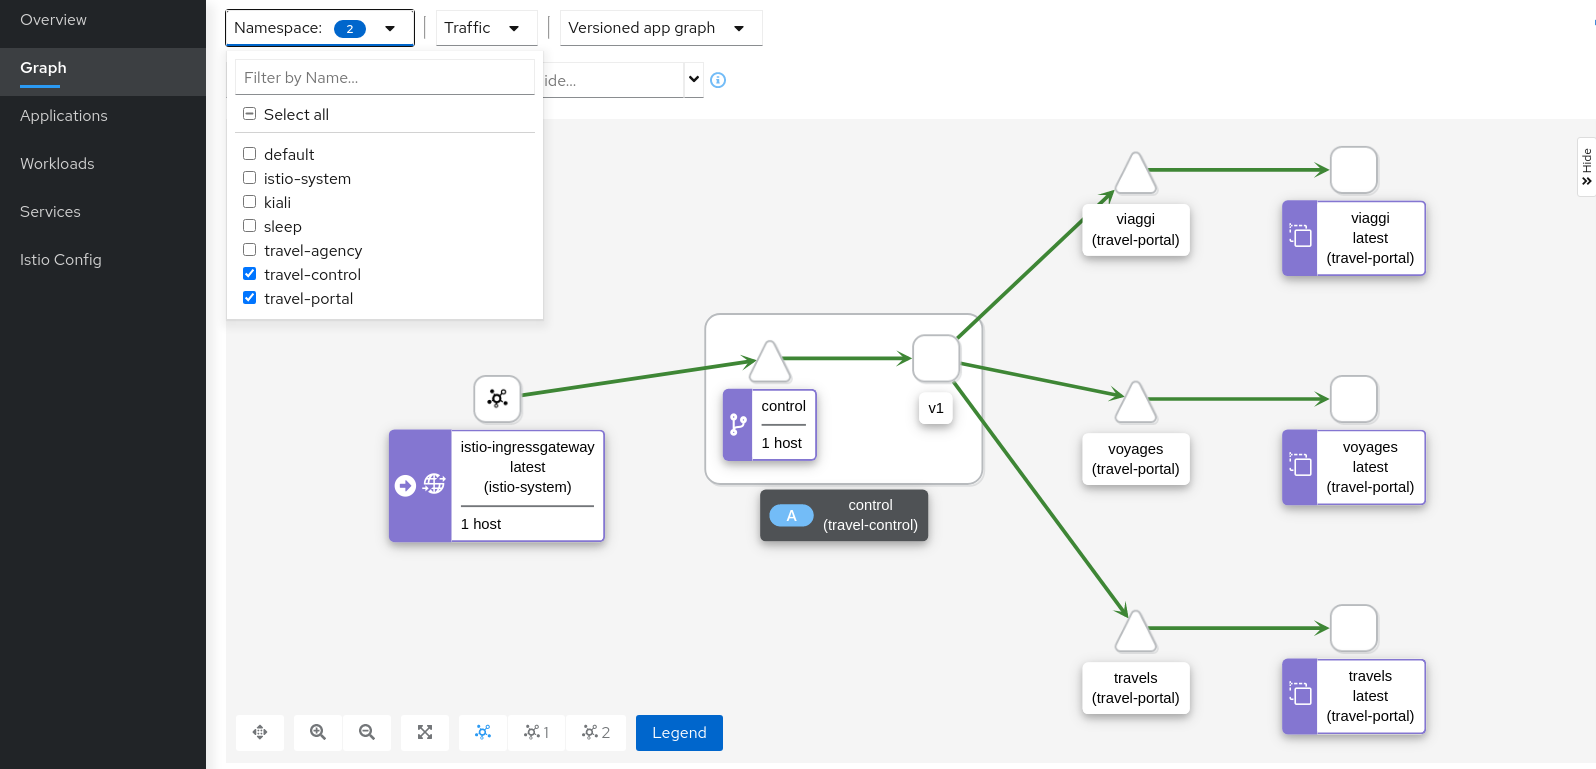
The control workload reports telemetry for its traffic, but visibility is incomplete because travel-portal and travel-agency workloads still lack sidecar proxies.
Step 2
Enable proxy injection in travel-portal and travel-agencyIn Join the Mesh we enabled injection for a single workload on purpose. For the remaining namespaces, a common pattern is to label namespaces before rollout so Istio injects sidecars automatically.
Label the namespaces and restart the deployments:
kubectl label namespace travel-agency istio-injection=enabled
kubectl label namespace travel-portal istio-injection=enabled

kubectl rollout restart deploy -n travel-portal
kubectl rollout restart deploy -n travel-agency
Kind
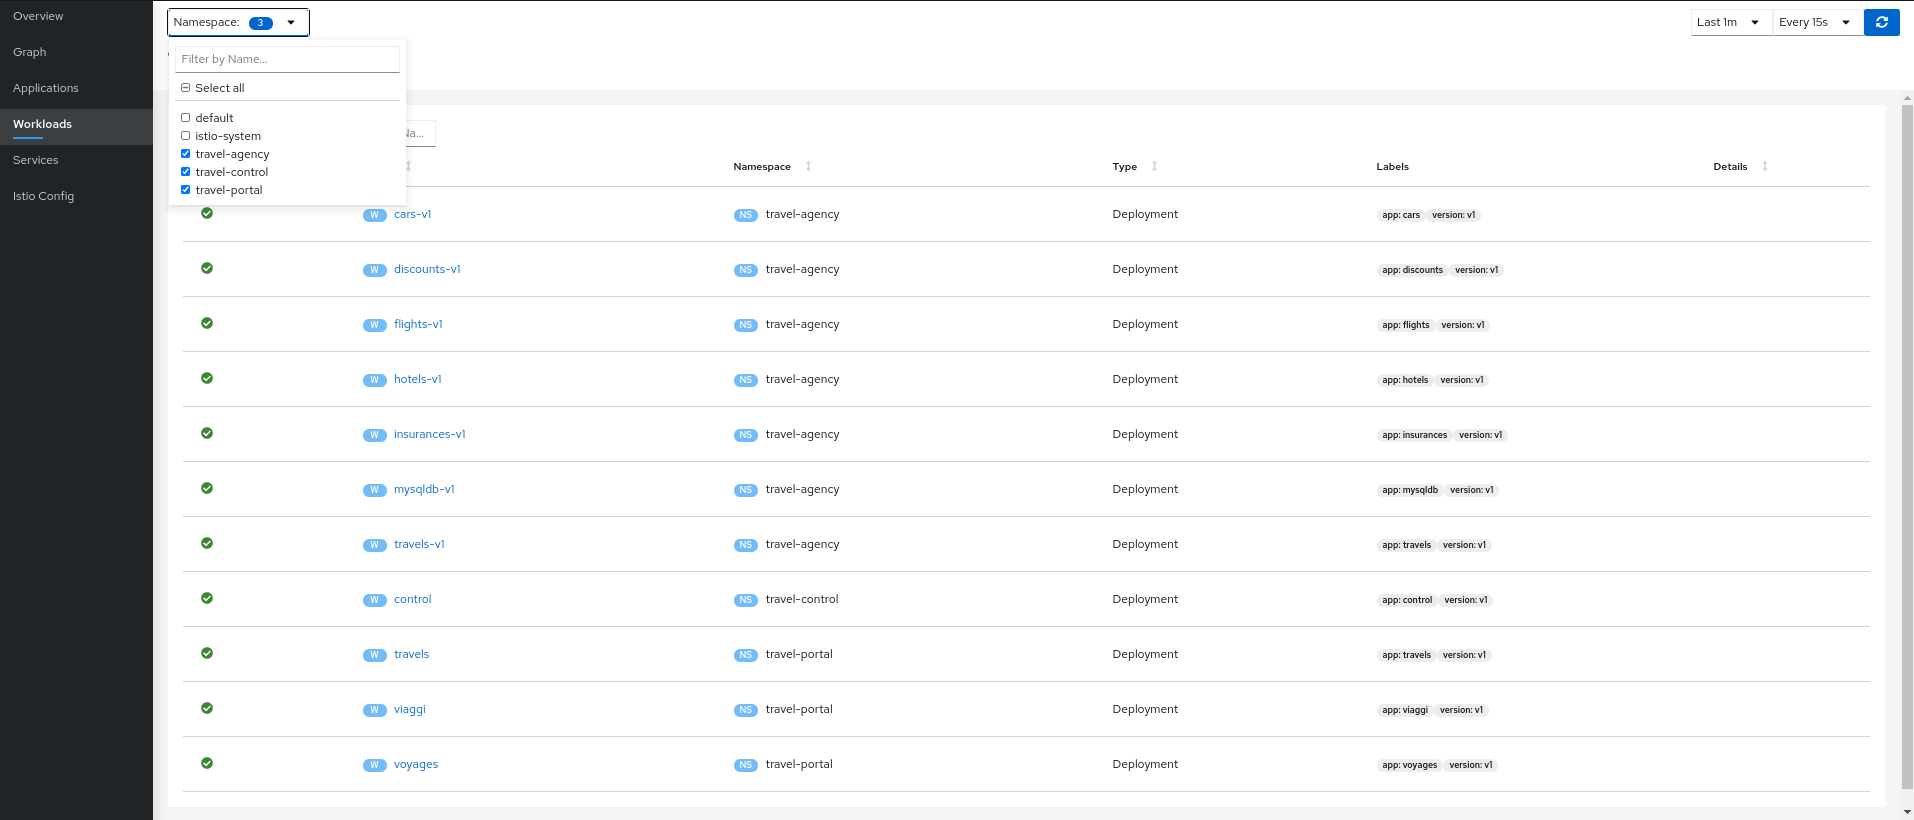
You can also enable injection from Kiali on each namespace (Namespaces → namespace detail → Actions → Enable Auto Injection), then restart workloads the same way.Verify that workloads in all three demo namespaces have sidecars. Pods should show 2/2 ready (application + istio-proxy):
kubectl get pods -n travel-portal
kubectl get pods -n travel-agency
On the Workloads page, missing-sidecar badges should be gone for the restarted pods.
Step 3
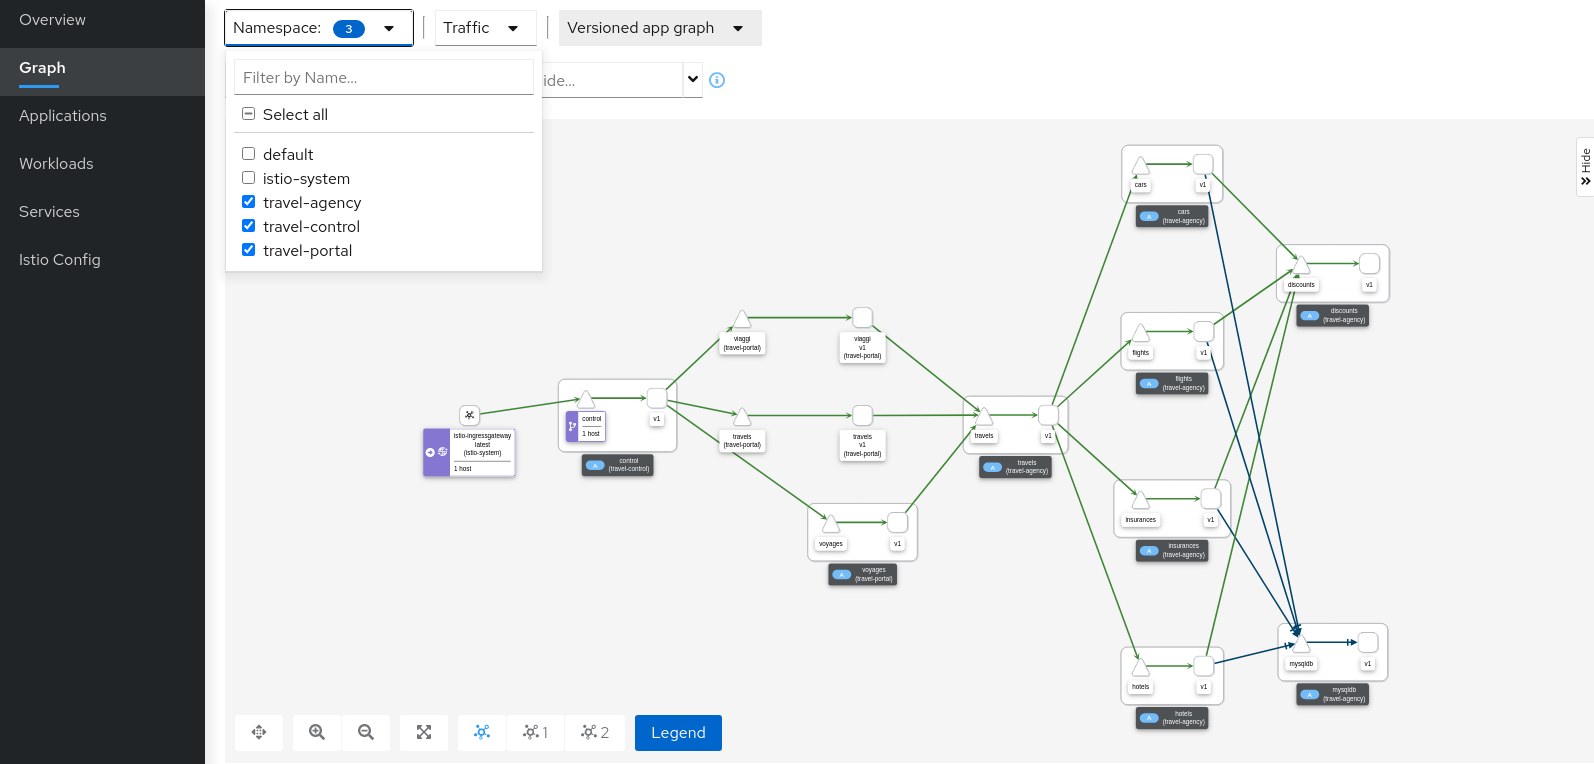
Verify updated telemetry for travel-portal and travel-agencyReturn to Traffic Graph, keep all three Travel Demo namespaces selected, and refresh if needed. You should now see traffic across the full demo topology.
Graph Walkthrough
The graph provides a powerful set of graph features to visualize service mesh traffic.
In this section we use the graph to explore the Travel Demo and identify the busiest services.
New to the Kiali graph? On the Traffic Graph page, click the Help icon in the toolbar to start the built-in graph tour. The tour introduces namespaces, display options, the summary panel, and other graph features.
Step 1
Select all travel- namespaces and enable Traffic Distribution edge labels- Open Traffic Graph.
- Select
travel-control,travel-portal, andtravel-agency. - Open Display → under Show Edge Labels, enable Traffic Distribution.
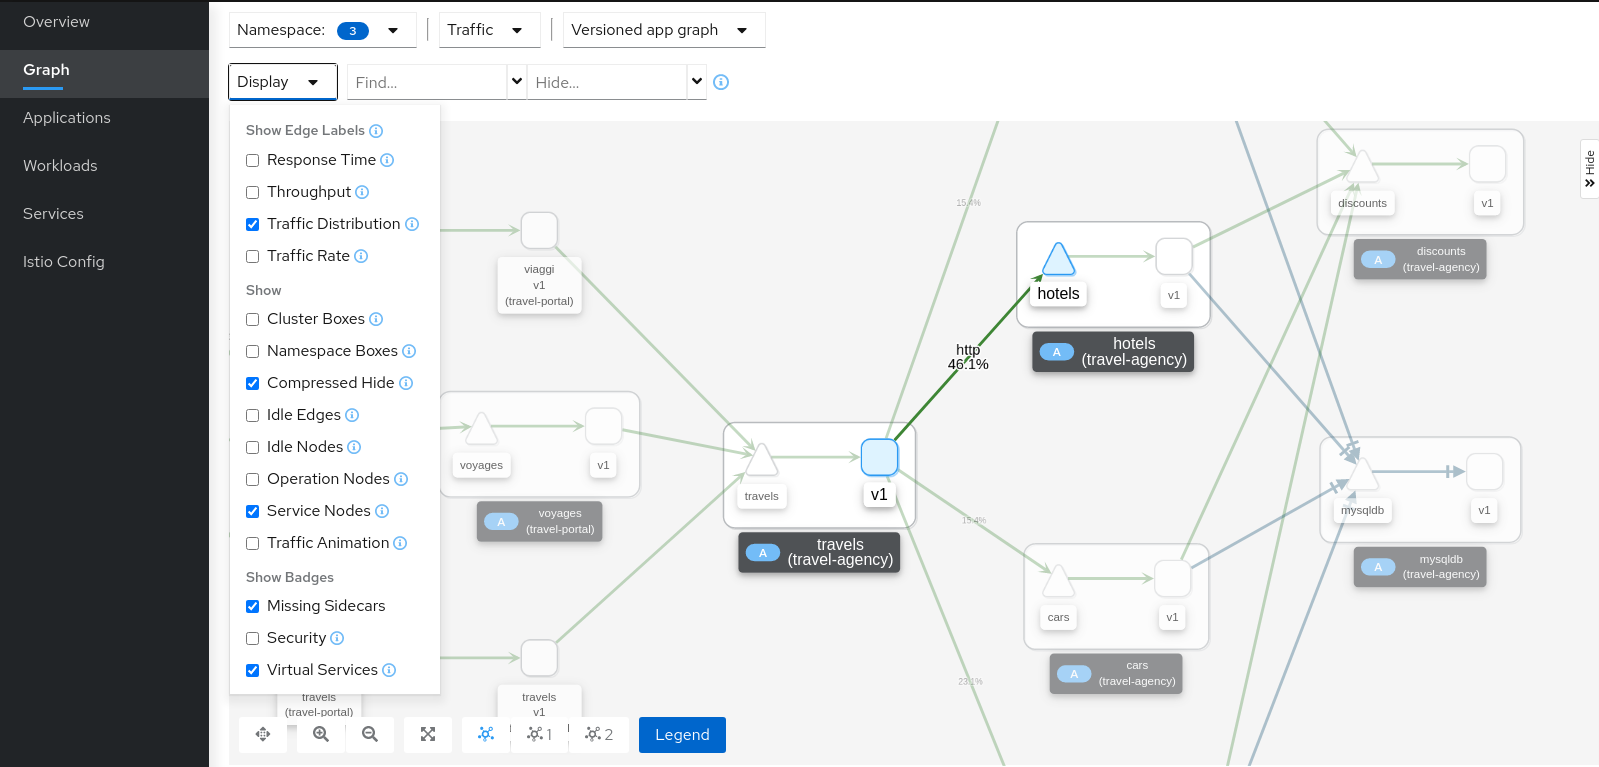
The mesh looks healthy, but note that the hotels service carries more load than other services in travel-agency.
Step 2
Select the hotels service and inspect a trace in the summary panel- Click the hotels service node.
- In the summary panel on the right, open the Traces tab.
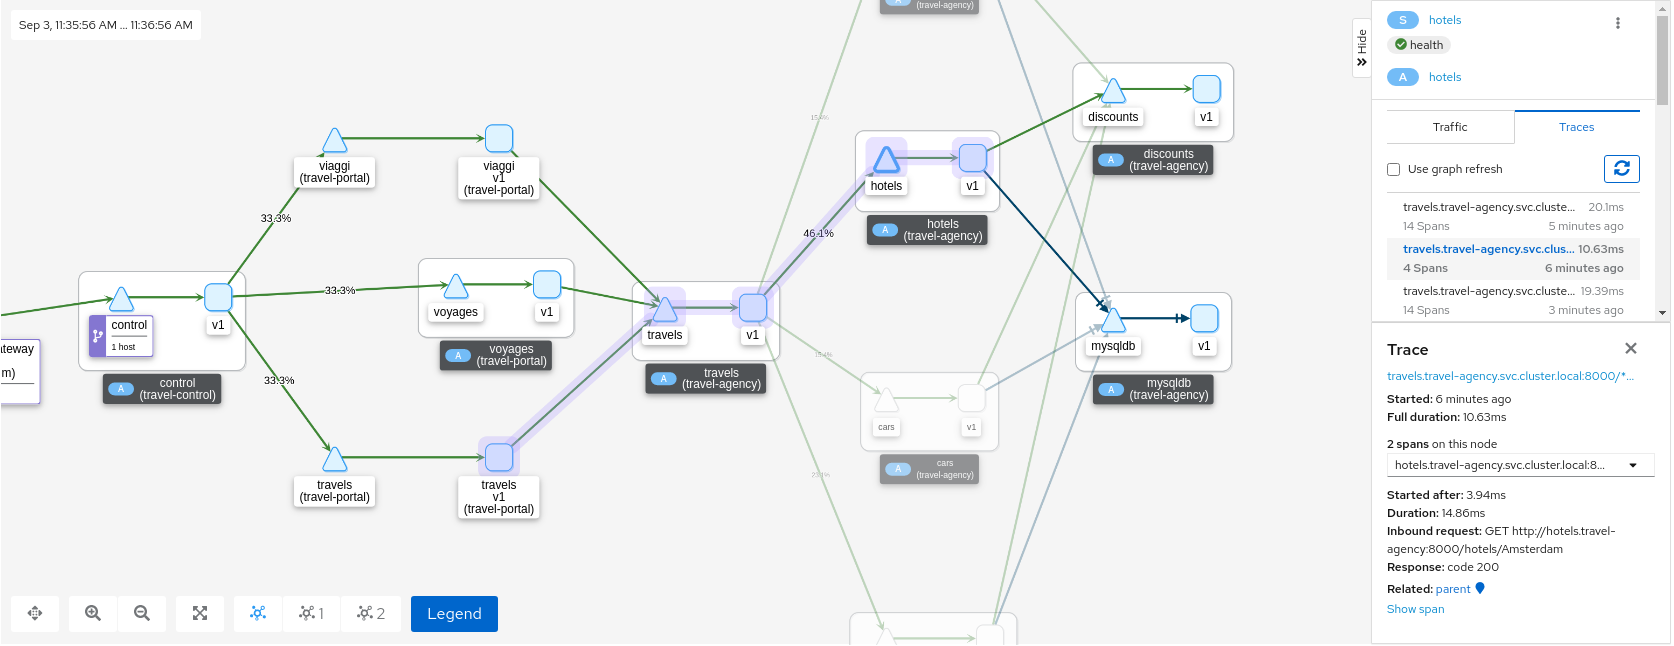
- Select a trace to inspect.
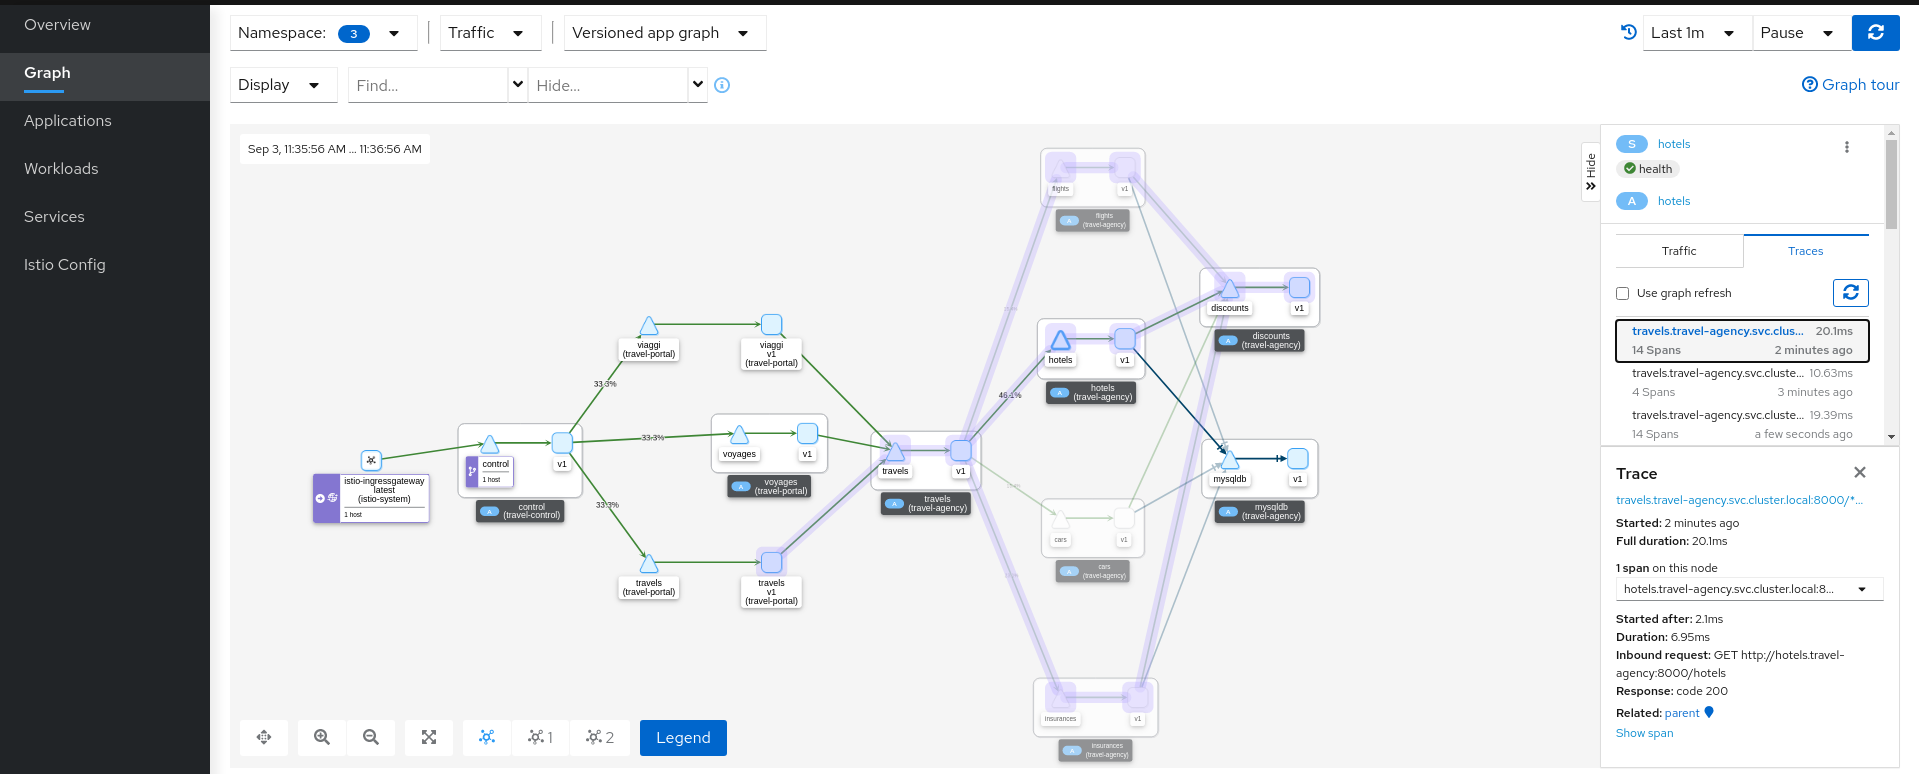
Combining telemetry and tracing shows traces that start from a portal and involve multiple services, and others that call only the hotels service.
Step 3
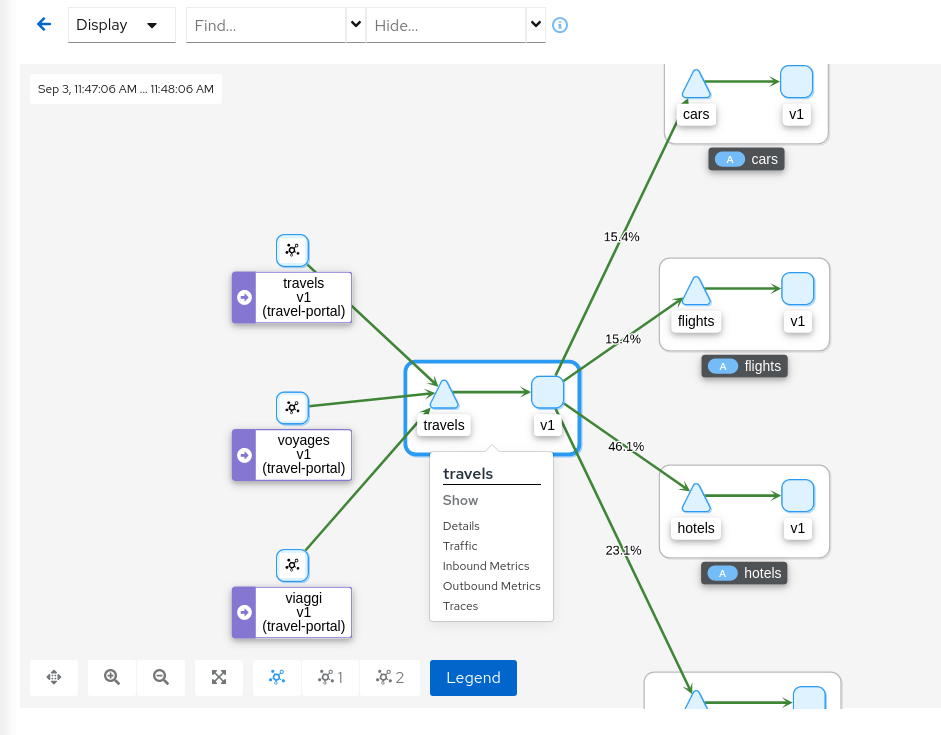
Drill into the main travels application graph- Right-click the travels application node. Right-click provides shortcuts to other Kiali pages.
- Select Node Graph.
The graph focuses on the selected element so you can study one part of the topology in detail.
Application Details
Kiali provides detail views for applications, workloads, and services.
These views show structure, health, metrics, logs, traces, and Istio configuration for each component.
In this section we examine the main travels application in travel-agency.
Step 1
Navigate to the travels application- Open Applications.
- Select the travel-agency namespace.
- Click the travels application.
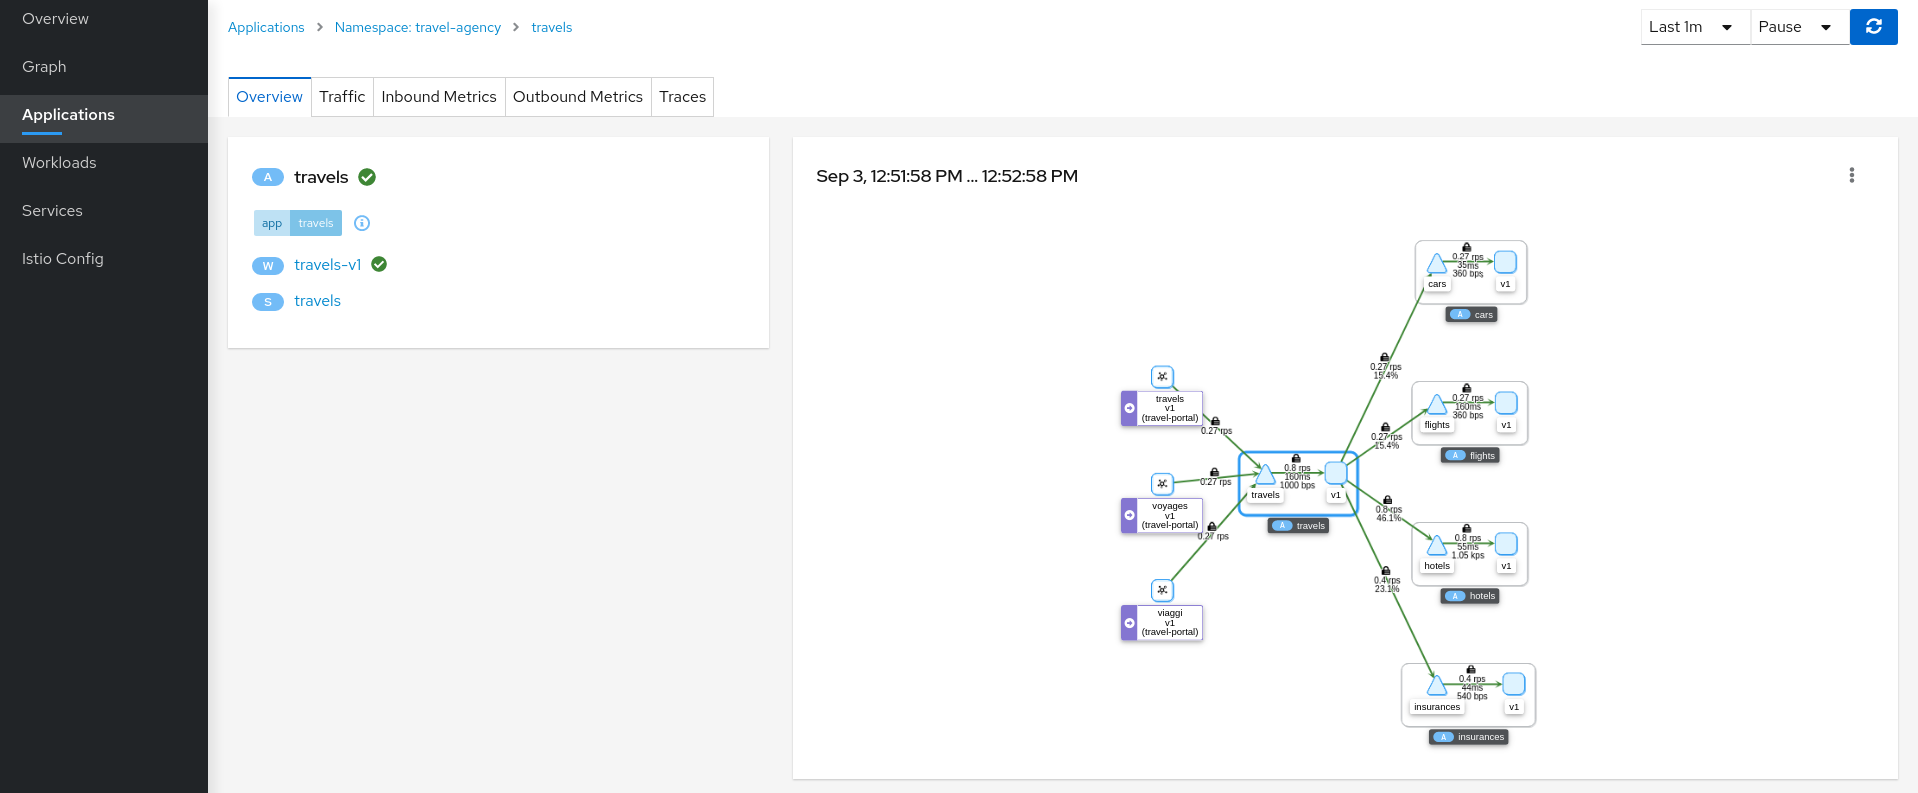
An application groups workloads and services that share the same application label. Telemetry and tracing signals are grouped by application even when multiple workloads are involved.
At this point the travels application consists of a travels-v1 workload exposed through the travels service. Click the travels-v1 workload link in the application overview.
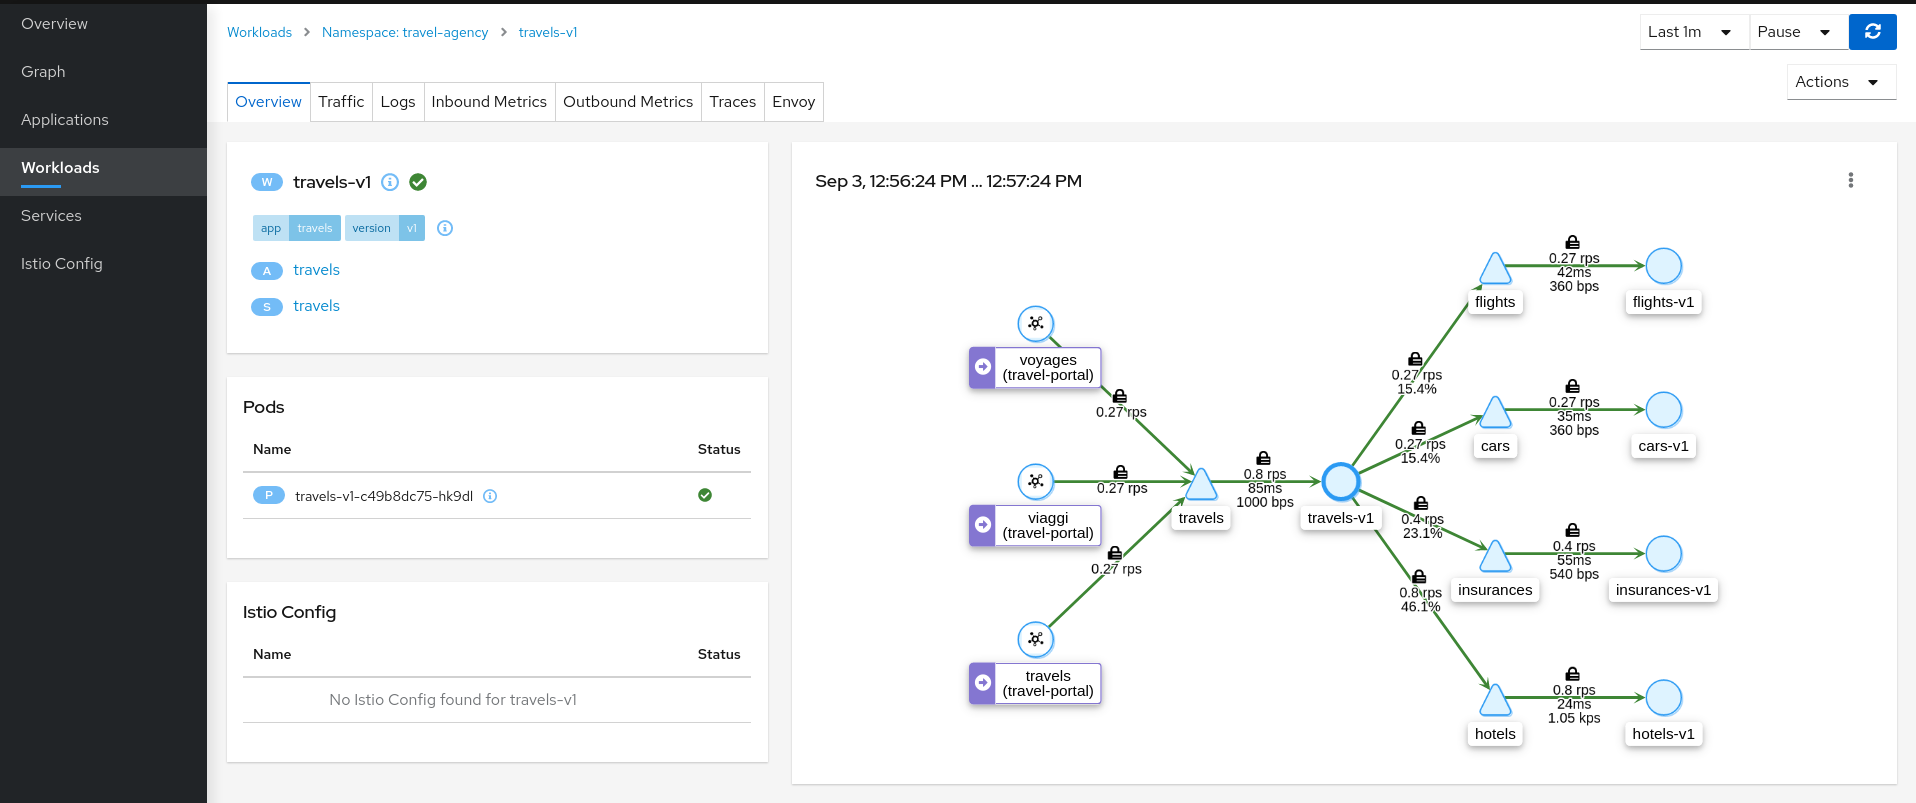
Step 2
Examine Outbound Metrics for travels-v1Open the Outbound Metrics tab on the travels-v1 workload.
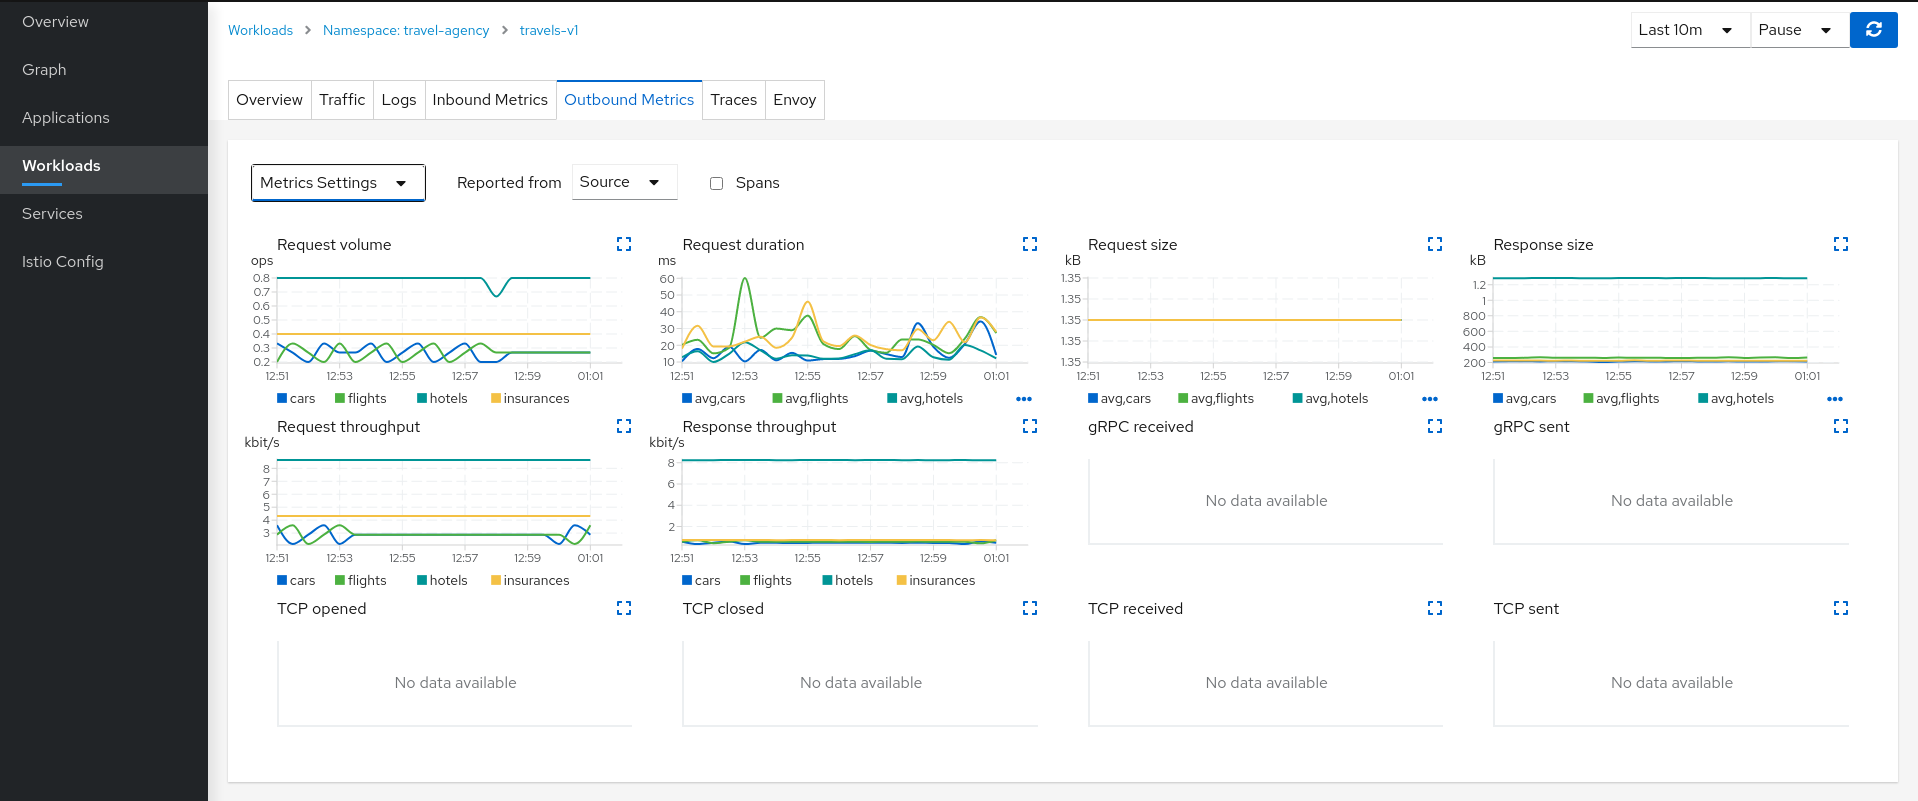
The metrics tab shows charts built from Istio proxy telemetry. Expand the Request volume chart for a closer look:
Use Metrics Settings to change grouping and aggregation. Enable the spans checkbox to correlate metrics with tracing spans in the same chart.
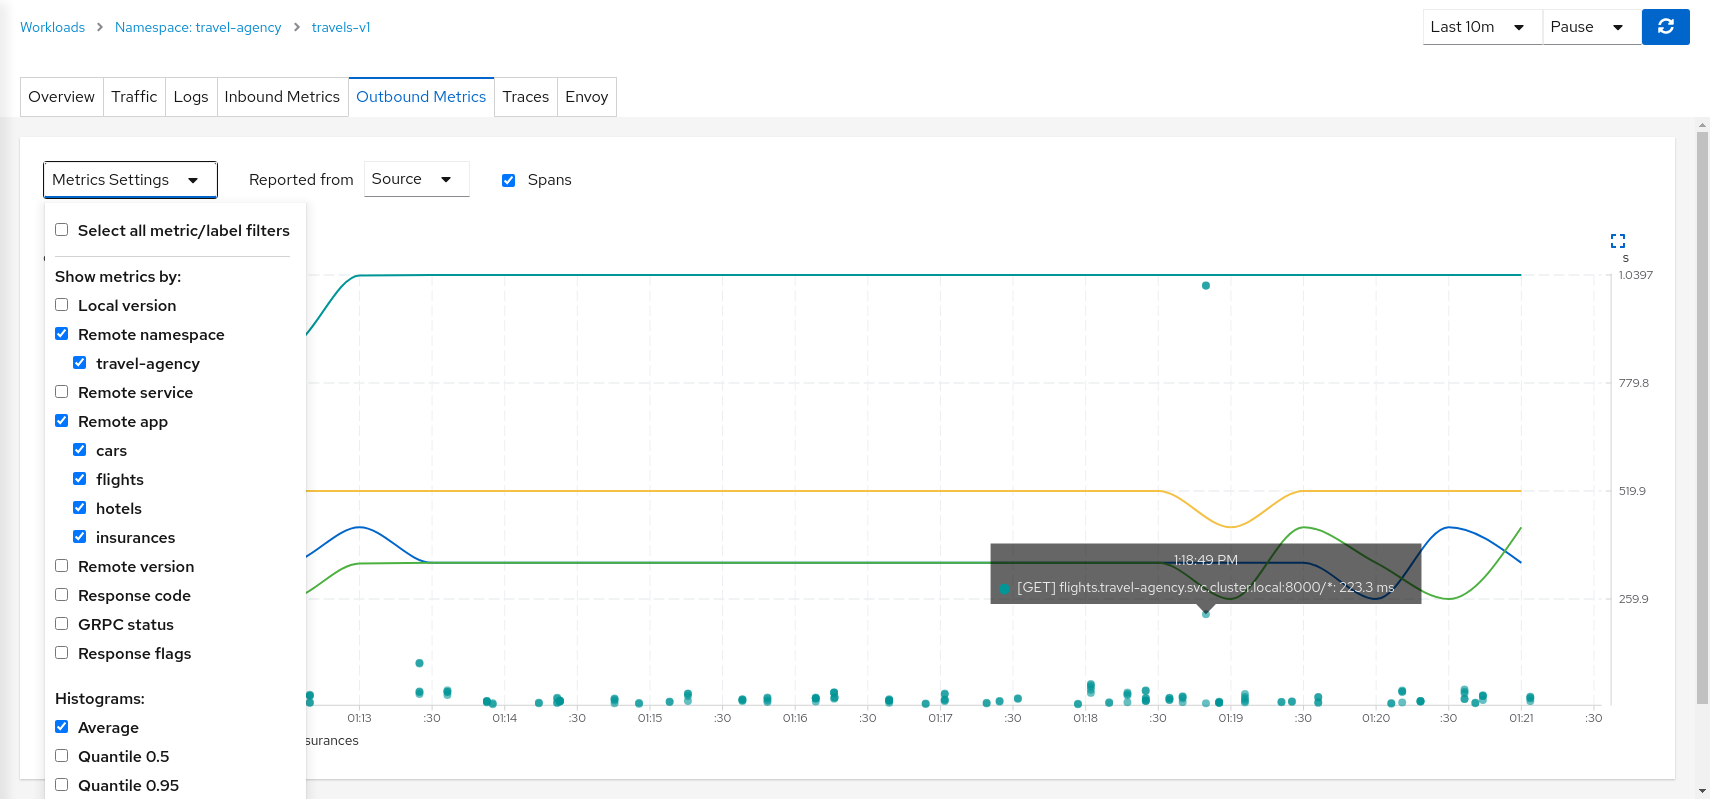
In the context of the travels application, hotels request volume is higher than the other travel-agency services. Request duration looks normal, so the asymmetry is likely part of the application business logic rather than a performance problem.
Step 3
Review Logs for travels-v1The Logs tab combines application container logs with Istio sidecar proxy logs. Enable spans for a correlated view of logs and traces.
Two main business methods appear in the application logs: GetDestinations and GetTravelQuote.
GetDestinations issues a GET /hotels request without parameters (visible in the sidecar proxy log):
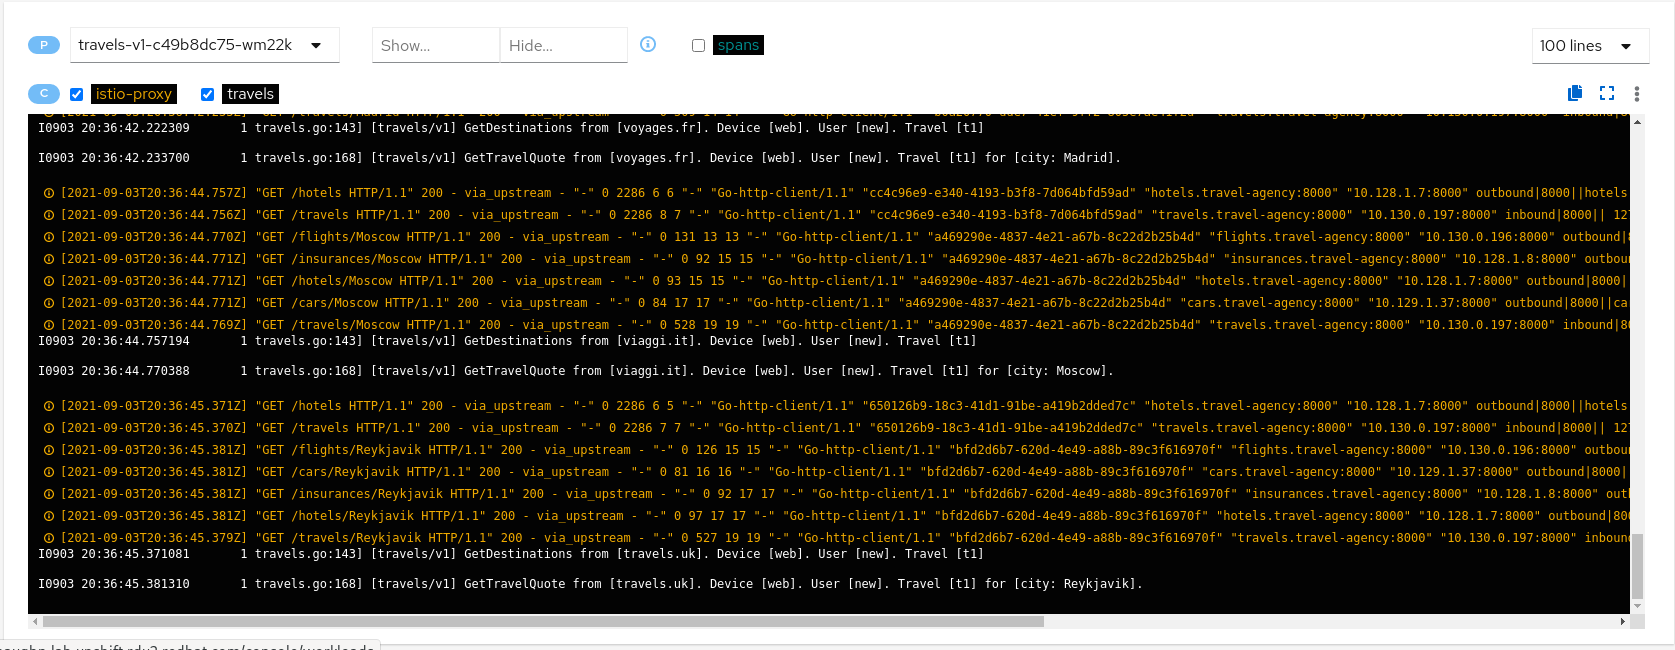
GetTravelQuote calls multiple downstream services with a specific city parameter:

As described in the Travel Demo design, an initial query returns available hotels before the user selects a destination and requests quotes from the other services — which explains the higher hotels utilization.
Step 4
Review Traces for travels-v1The hotels service handles more traffic than other travel-agency services. Next, use traces to see whether any step is slower than expected.
Open the Traces tab on travels-v1. Compare individual traces with the metrics histogram to judge whether a spike is unusual relative to average latency.
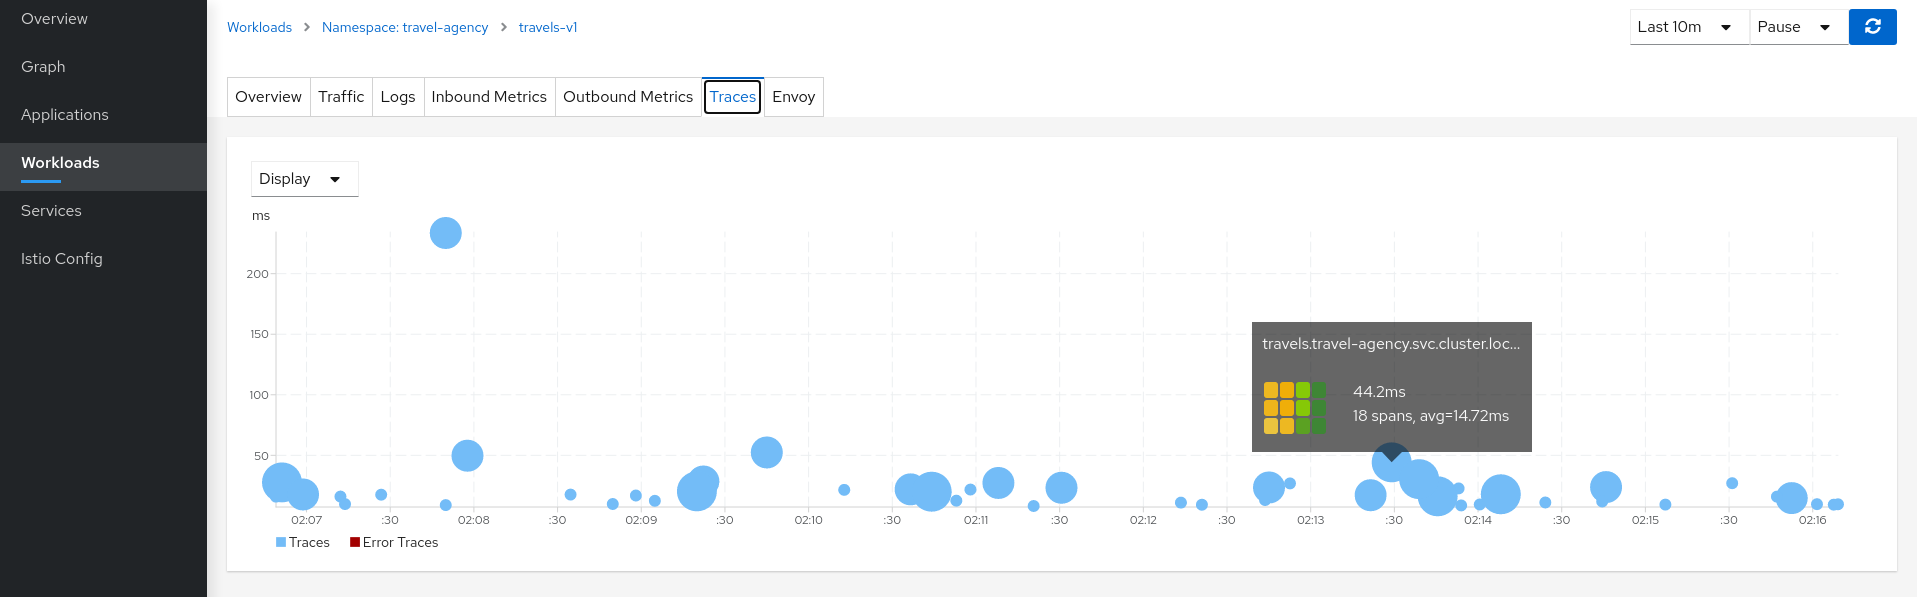
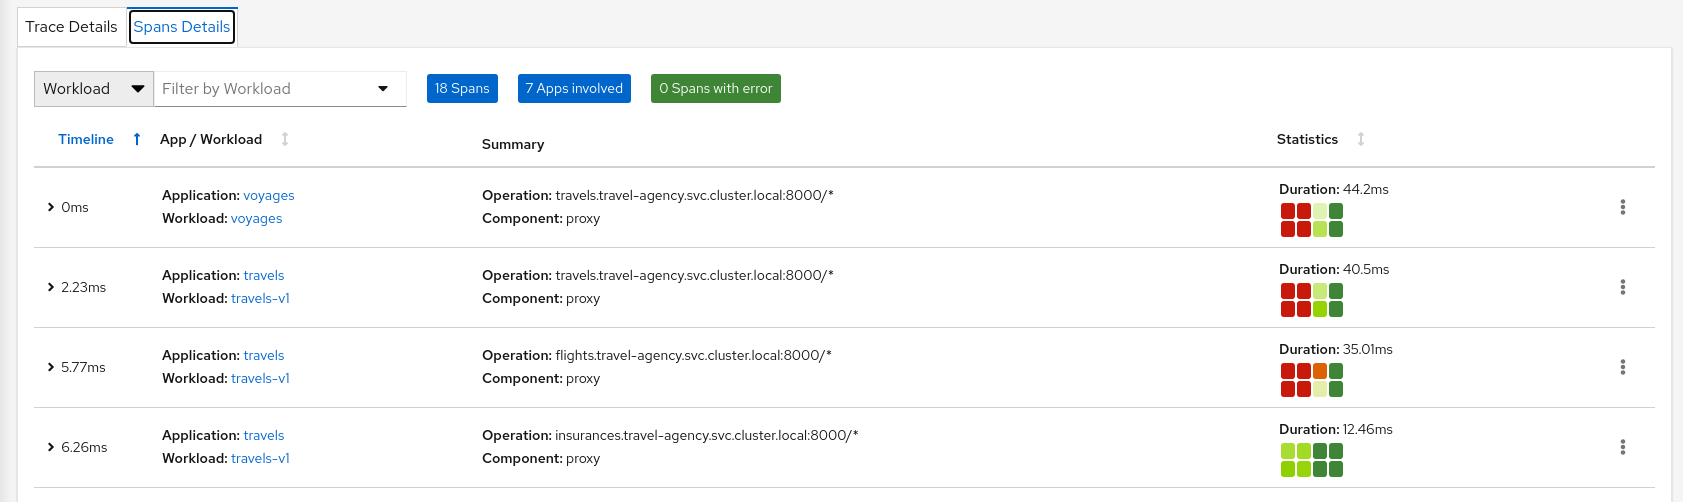
Click an interesting trace to see the trace details. Individual spans can be compared in more detail to pinpoint a slow step in a larger request flow.
Explore Further
This chapter focused on the graph and on the travels-v1 workload detail. The same observability tools are available throughout Kiali — browse the list pages and open any component to explore its detail view.
- Namespaces — open travel-portal or travel-agency for namespace health and shortcuts to filtered list views.
- Applications — compare travels in travel-agency with portal apps such as viaggi or voyages.
- Services — inspect hotels, which carried more load in the graph walkthrough.
- Workloads — open hotels-v1 or a portal workload and review the same tabs used here.
- Istio Config — browse VirtualServices, DestinationRules, and other Istio objects with validation and YAML.
Each detail page starts with an Overview tab (mini-graph, health, and links to related objects). Applications, services, and workloads also provide Traffic, Metrics, and Traces tabs. Workloads add Logs and Envoy, as you saw on travels-v1.
See Detail Views for a full description of each tab.
When you are ready to change mesh behavior — not only observe it — continue to Control the Mesh, where Kiali wizards help configure request routing and other traffic management scenarios.
5 - Control the Mesh
Using Kiali to configure Istio’s traffic management.
This chapter uses Kiali wizards to configure Istio traffic management on the Travel Demo. Each section introduces a scenario, walks through the wizard, verifies the result in Kiali, and ends with guidance to update or delete the generated configuration.
In Observe the Mesh you explored telemetry and tracing. Here you change how traffic flows through the mesh.
Request Routing
The Travel Demo application has several portals deployed on the travel-portal namespace consuming the travels service deployed on the travel-agency namespace.
The travels service is backed by a single workload called travels-v1 that receives requests from all portal workloads.
At some point in the lifecycle the business needs of the portals may differ and new versions of the travels service may be necessary.
This step will show how to route requests dynamically to multiple versions of the travels service.
Step 1
Deploy travels-v2 and travels-v3 workloadsDeploy the new versions of the travels service:
kubectl apply -f <(curl -L https://raw.githubusercontent.com/kiali/demos/master/travels/travels-v2.yaml) -n travel-agency
kubectl apply -f <(curl -L https://raw.githubusercontent.com/kiali/demos/master/travels/travels-v3.yaml) -n travel-agency
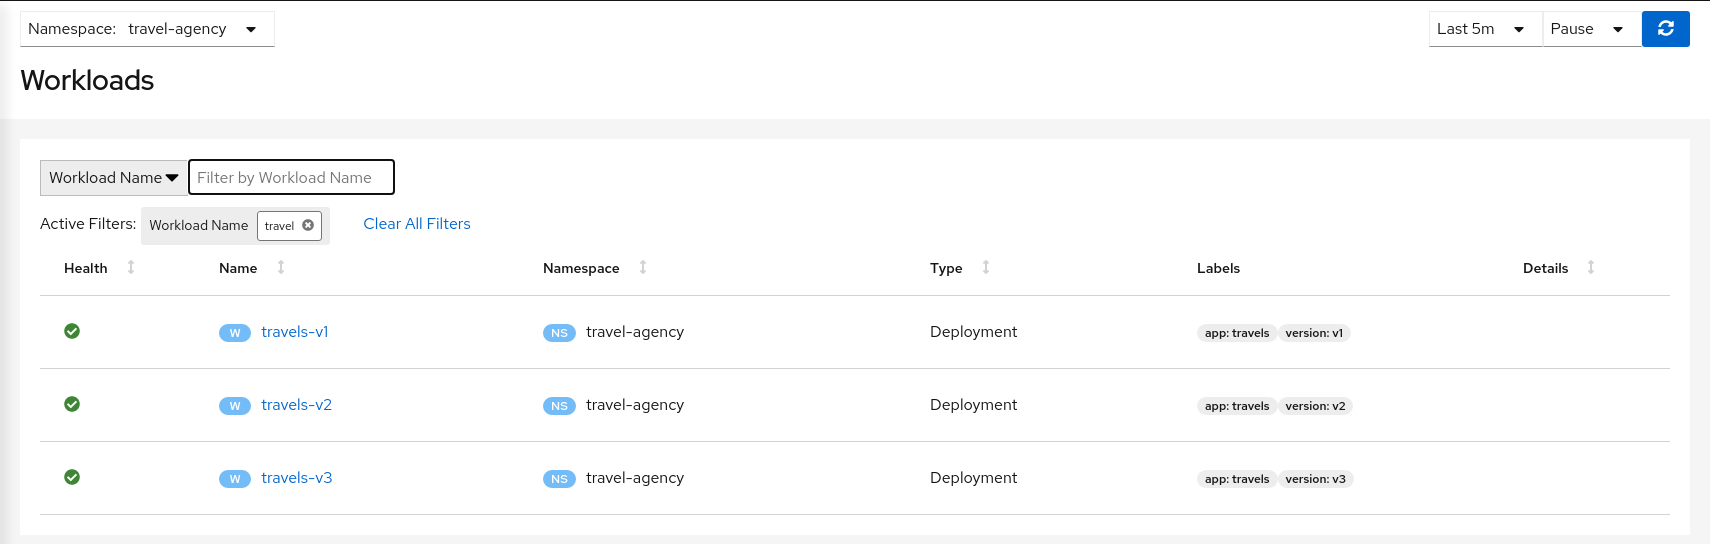
As there is no specific routing defined, when there are multiple workloads for the travels service the request distribution is fairly uniform.
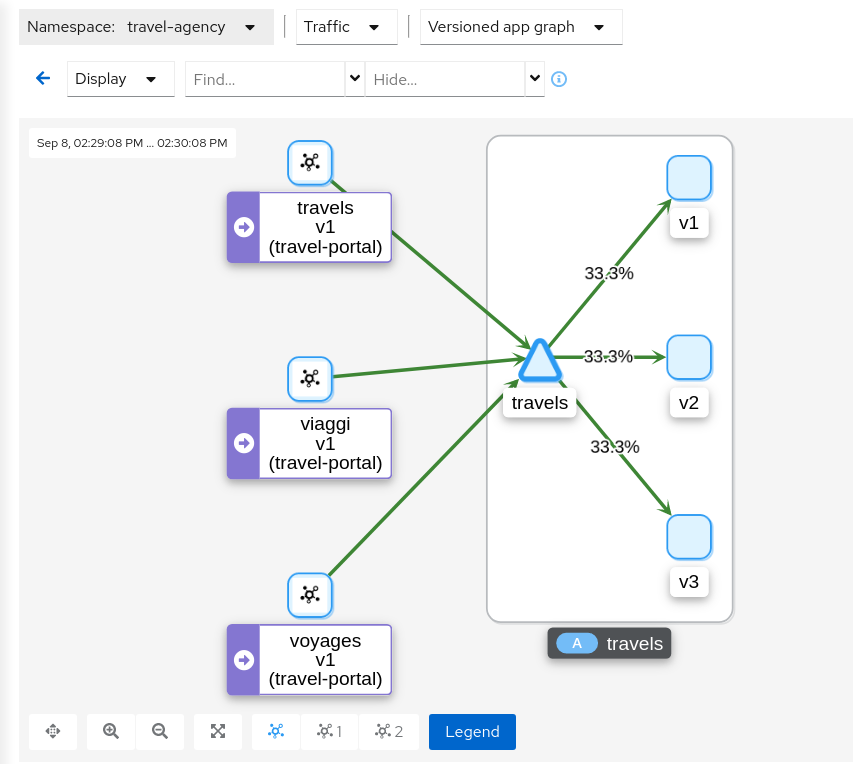
Step 2
Investigate the HTTP headers used by the Travel Demo applicationThe Traffic Management features of Istio allow you to define matching conditions for dynamic request routing.
In our scenario we would like to perform the following routing logic:
- All traffic from travels.uk routed to travels-v1
- All traffic from viaggi.it routed to travels-v2
- All traffic from voyages.fr routed to travels-v3
Portal workloads use HTTP/1.1 to call the travels service, so one strategy is to match on HTTP headers.
Where do those headers come from? That information belongs to the application domain — examine the code, documentation, or a live trace to see which headers are in use.
The Travel Demo uses an Istio annotation on the Deployment pod template to configure the proxy:
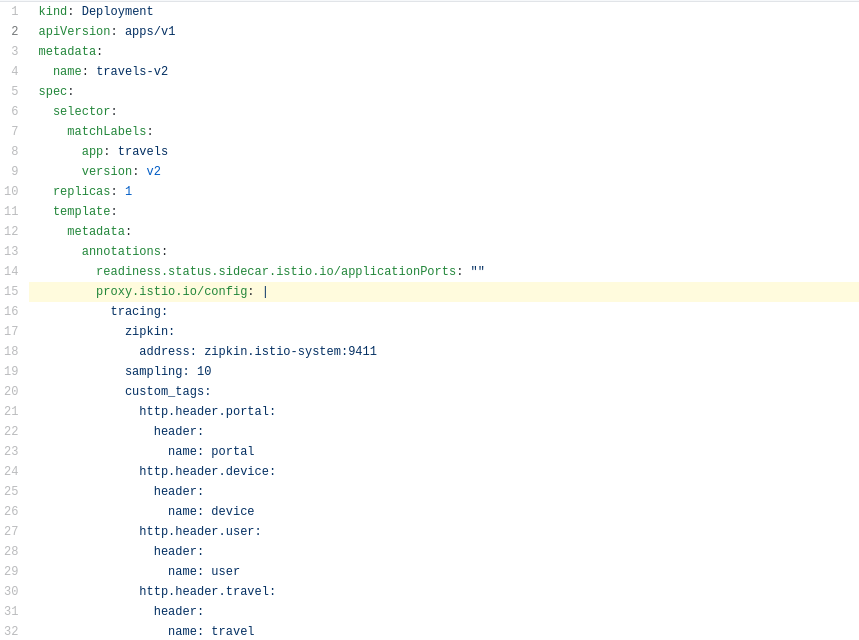
In our example the HTTP headers are added as part of the trace context. Tracing populates custom tags with the portal, device, user, and travel values.
Step 3
Use the Request Routing wizard on the travels service- Open Services.
- Select the travel-agency namespace.
- Click the travels service.
- Select Actions → Request Routing.
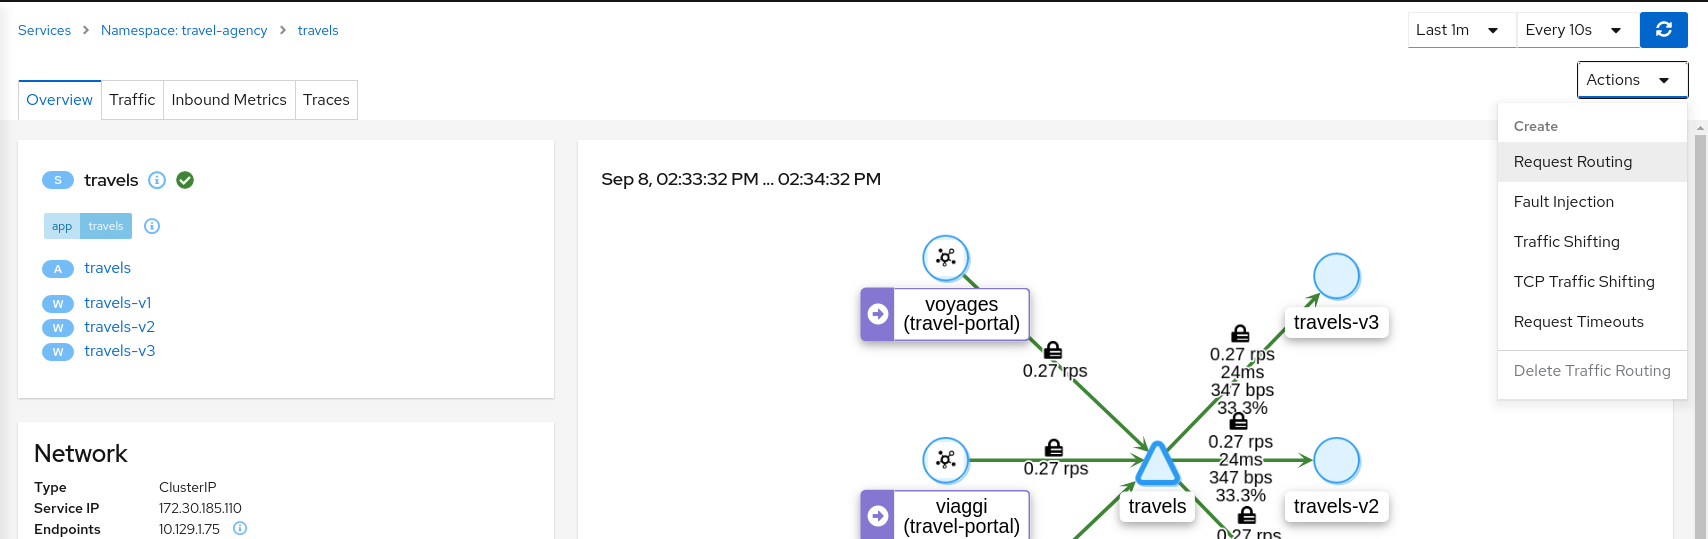
Define three request-matching rules before clicking Create.
For the first rule, match when the portal header equals travels.uk:
- Open the Request Matching tab.
- Add an exact match for the portal header with value travels.uk.
- Click Add Match to update Matching selected for this rule.

- Open the Route To tab and set the destination workload for this rule.
- Click Add Route Rule to save the first rule.
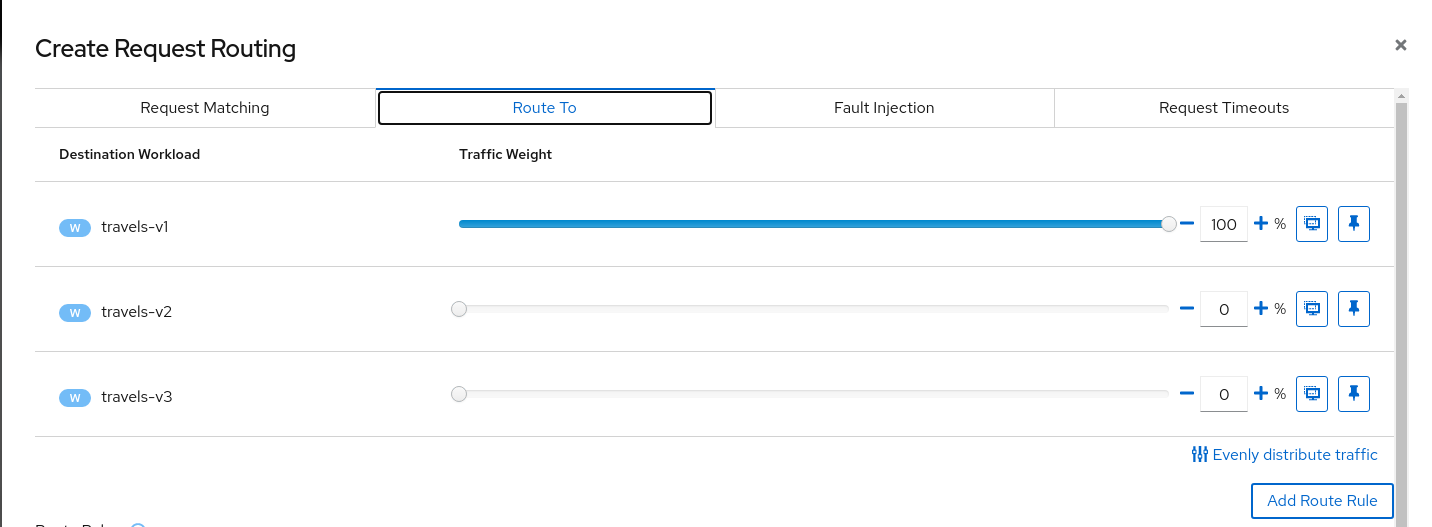
Return to the Request Matching tab and repeat the process, adding rules to route traffic from viaggi.it to travels-v2 and from voyages.fr to travels-v3.
When adding the additional rules make sure to clear the previous header match condition. If you make a mistake you can click Remove Rule from that rule’s kebab menu. The rule order does not matter.
When all three rules are defined, it should look like this:
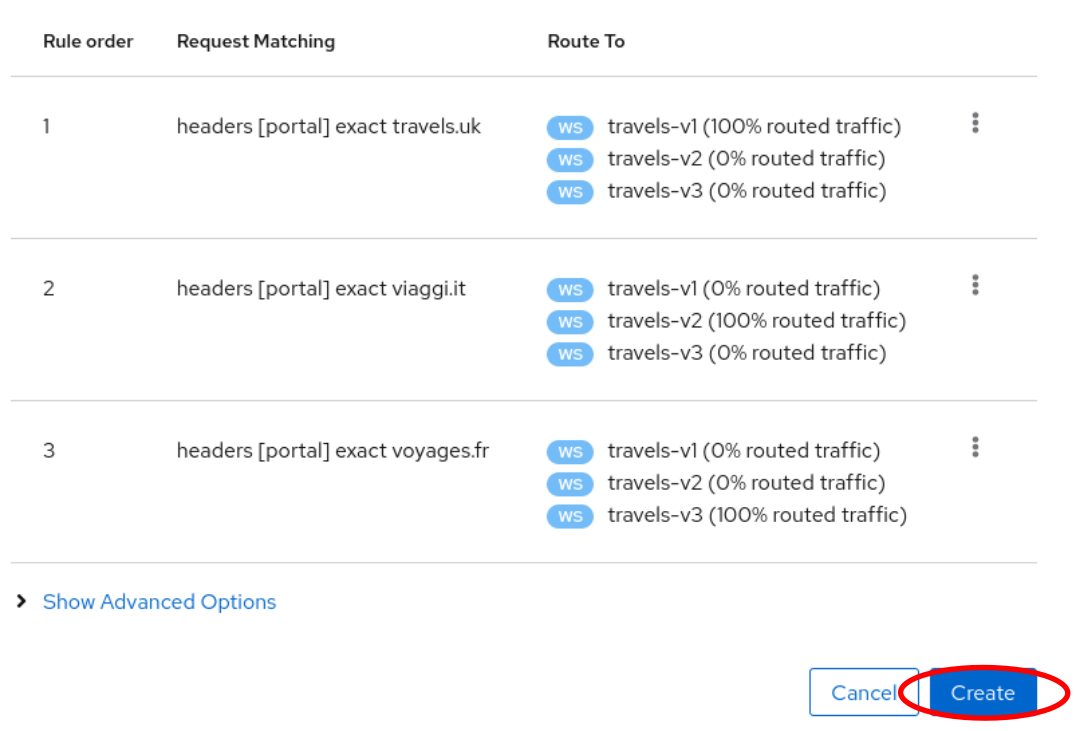
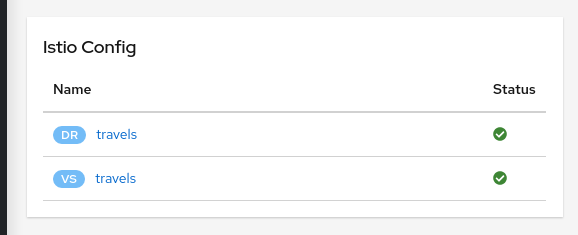
Click Create to generate the Istio configuration. Review the generated config, then confirm to apply it.
The generated Istio config appears on the Istio Config card on the service detail page.
Step 4
Verify request routing from the travel-portal graphOnce routing is in place, verify that each portal sends traffic to its assigned travels workload:
- Open Traffic Graph.
- Select only the travel-portal namespace.
- Set Graph Type to Workload graph.
- Open Display → under Show Edge Labels, enable Traffic Distribution.
- Open Display → disable Service Nodes.
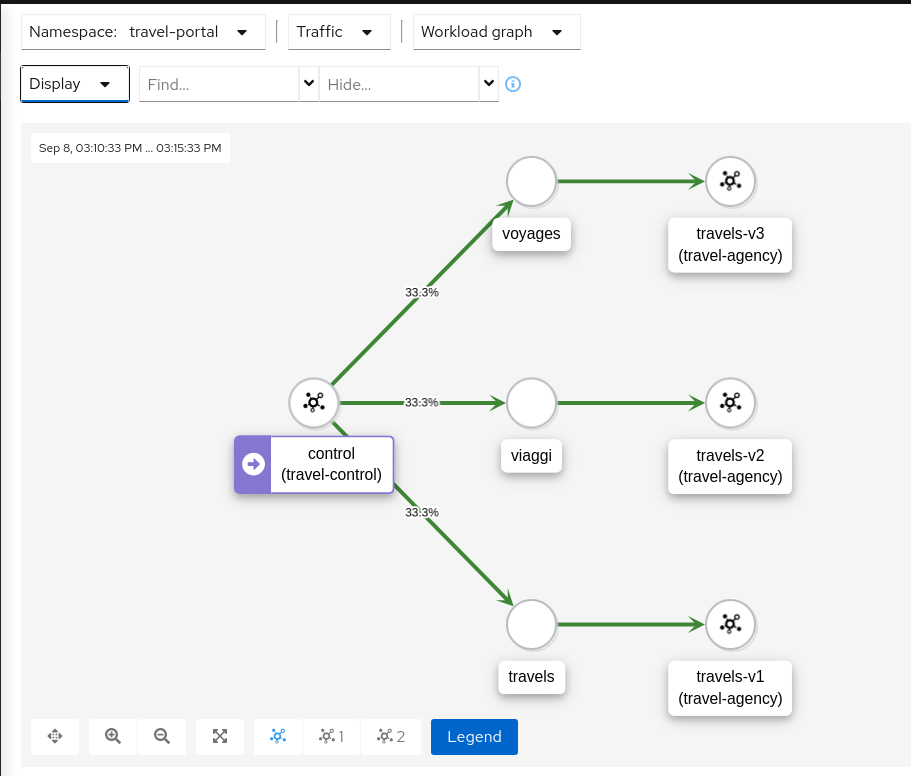
An edge without a distribution label implies 100% of traffic on that path.
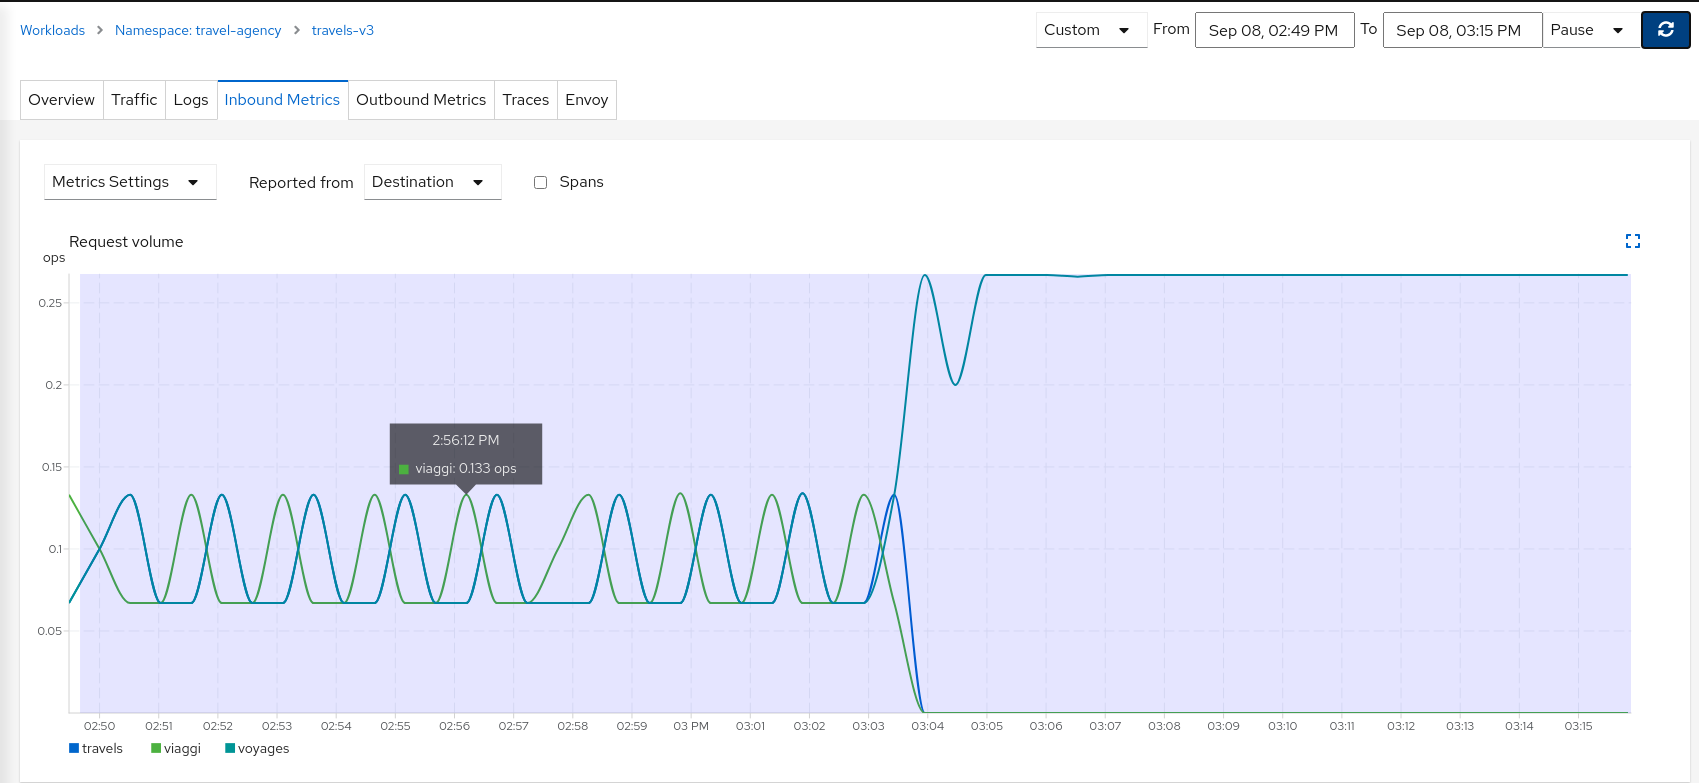
Navigate to any travels workload, open the Inbound Metrics tab, and expand the Request Volume chart for a similar view in the telemetry.
Increase the Duration to Last 30m (or use a custom time range) to show the time when our new routing was defined. We can see how the workload initially received traffic from all portals, then only from a single portal after request routing was applied.
Step 5
Update or delete Istio ConfigurationKiali wizards define high-level mesh scenarios and generate the Istio configuration needed to implement them (VirtualServices, DestinationRules, and related objects). Update or delete a scenario from the Actions menu on the service.
To experiment further, open the travels service and select Actions → Request Routing. When finished, use Actions to delete the generated Istio config.
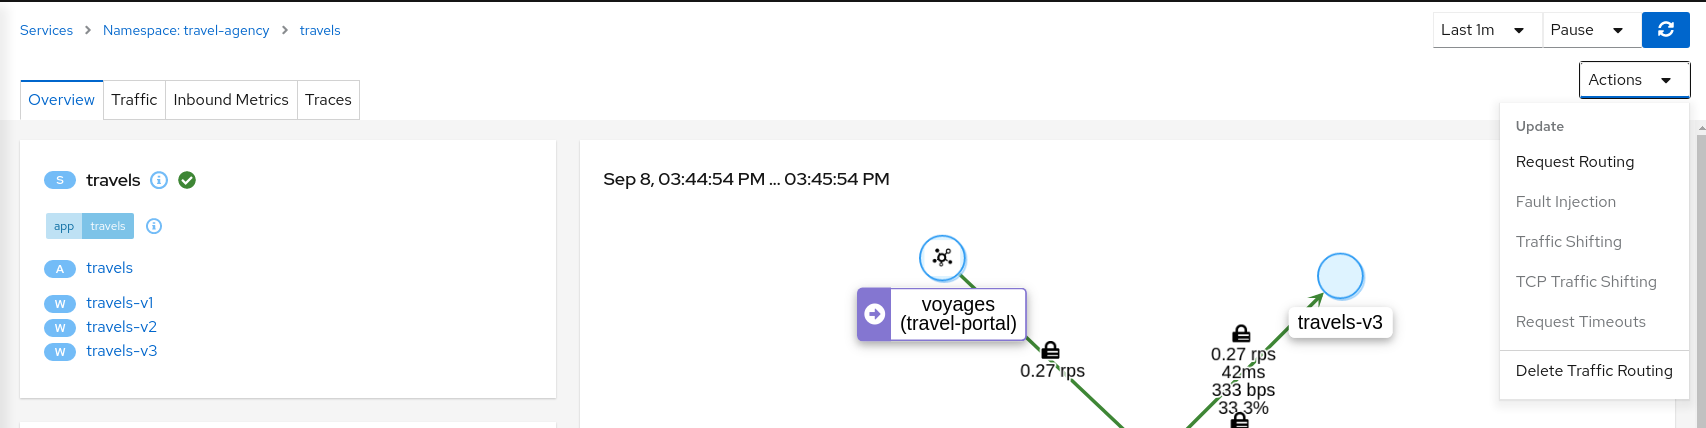
Fault Injection
The Observe the Mesh chapter identified that the hotels service has additional traffic compared with other services deployed in the travel-agency namespace.
Also, this service is critical in the main business logic. It is responsible for querying all available destinations, presenting them to the user, and getting a quote for the selected destination.
This also means that the hotels service may be one of the weakest points of the Travel Demo application.
This step will show how to test the resilience of the Travel Demo application by injecting faults into the hotels service and then observing how the application reacts to this scenario.
Step 1
Use the Fault Injection wizard on the hotels service to inject a delay- Open Services.
- Select the travel-agency namespace.
- Click the hotels service.
- Select Actions → Fault Injection.
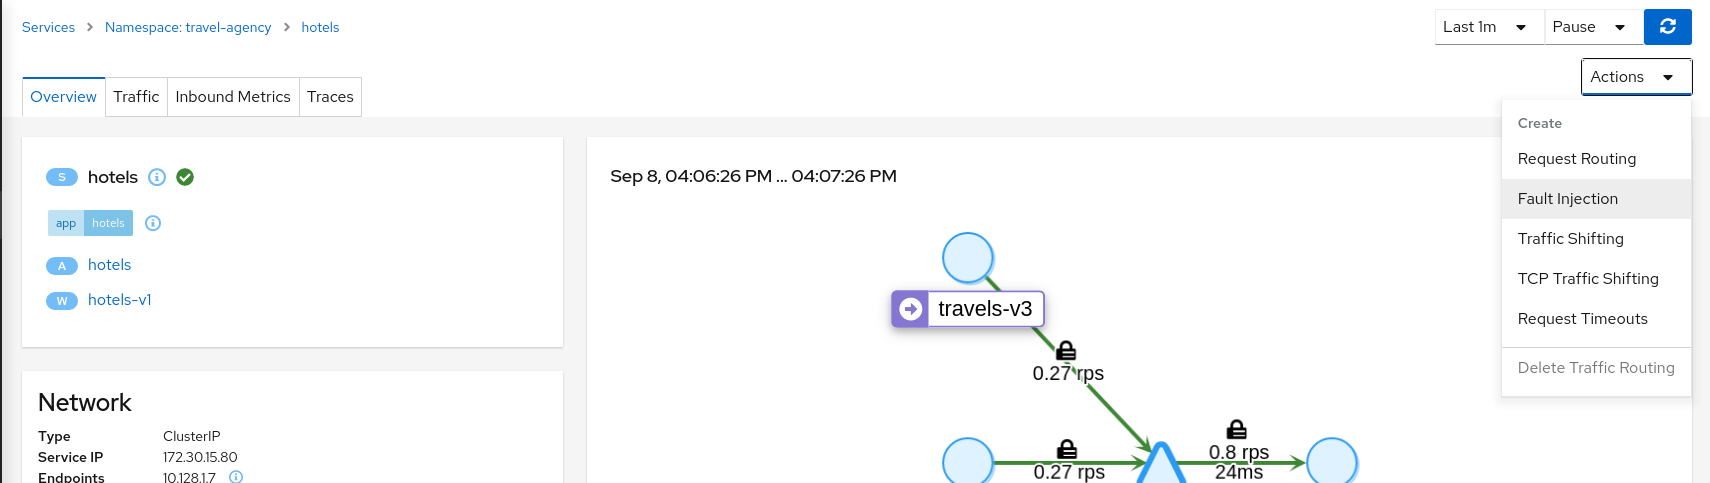
Select HTTP Delay and set Delay percentage and Fixed Delay to the defaults, which introduce a 5 second delay on 100% of requests.
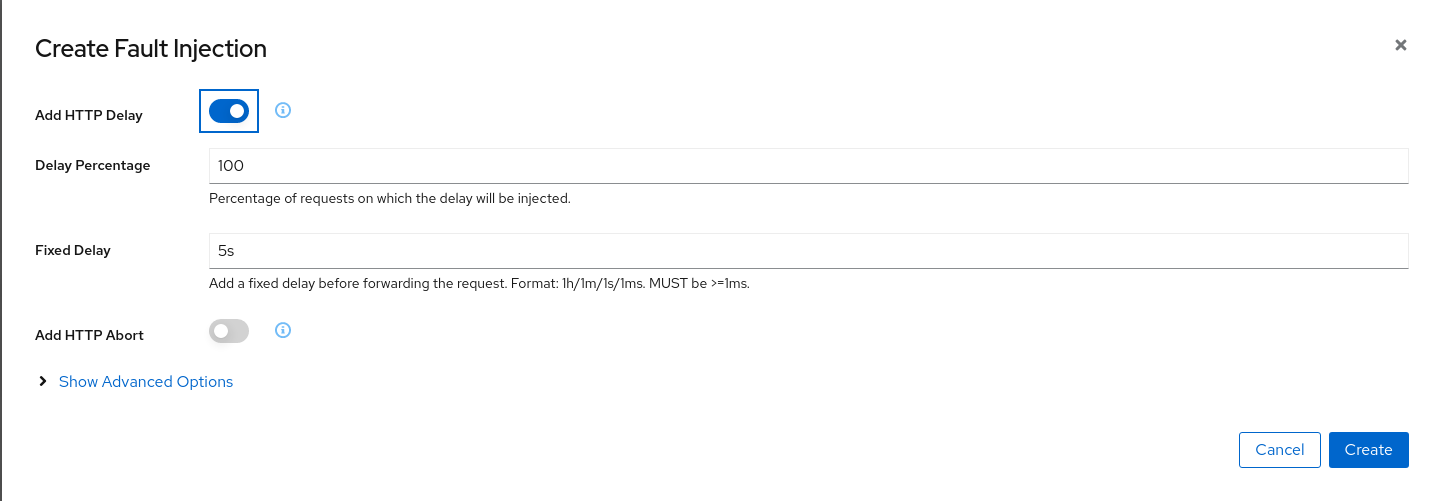
Create the HTTP Delay.
Step 2
Understanding source and destination metricsTelemetry is collected from proxies and it is labeled with information about the source and destination workloads.
In our example, let’s say that the travels service (“Service A” in the Istio diagram below) invokes the hotels service (“Service B” in the diagram). The travels workload is the “source” and hotels is the “destination” workload. The travels proxy will report telemetry from the source perspective and hotels proxy will report telemetry from the destination perspective. Let’s look at the latency reporting from both perspectives.
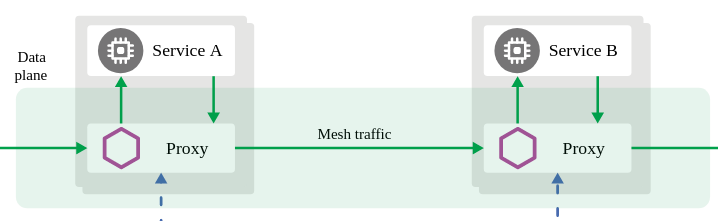
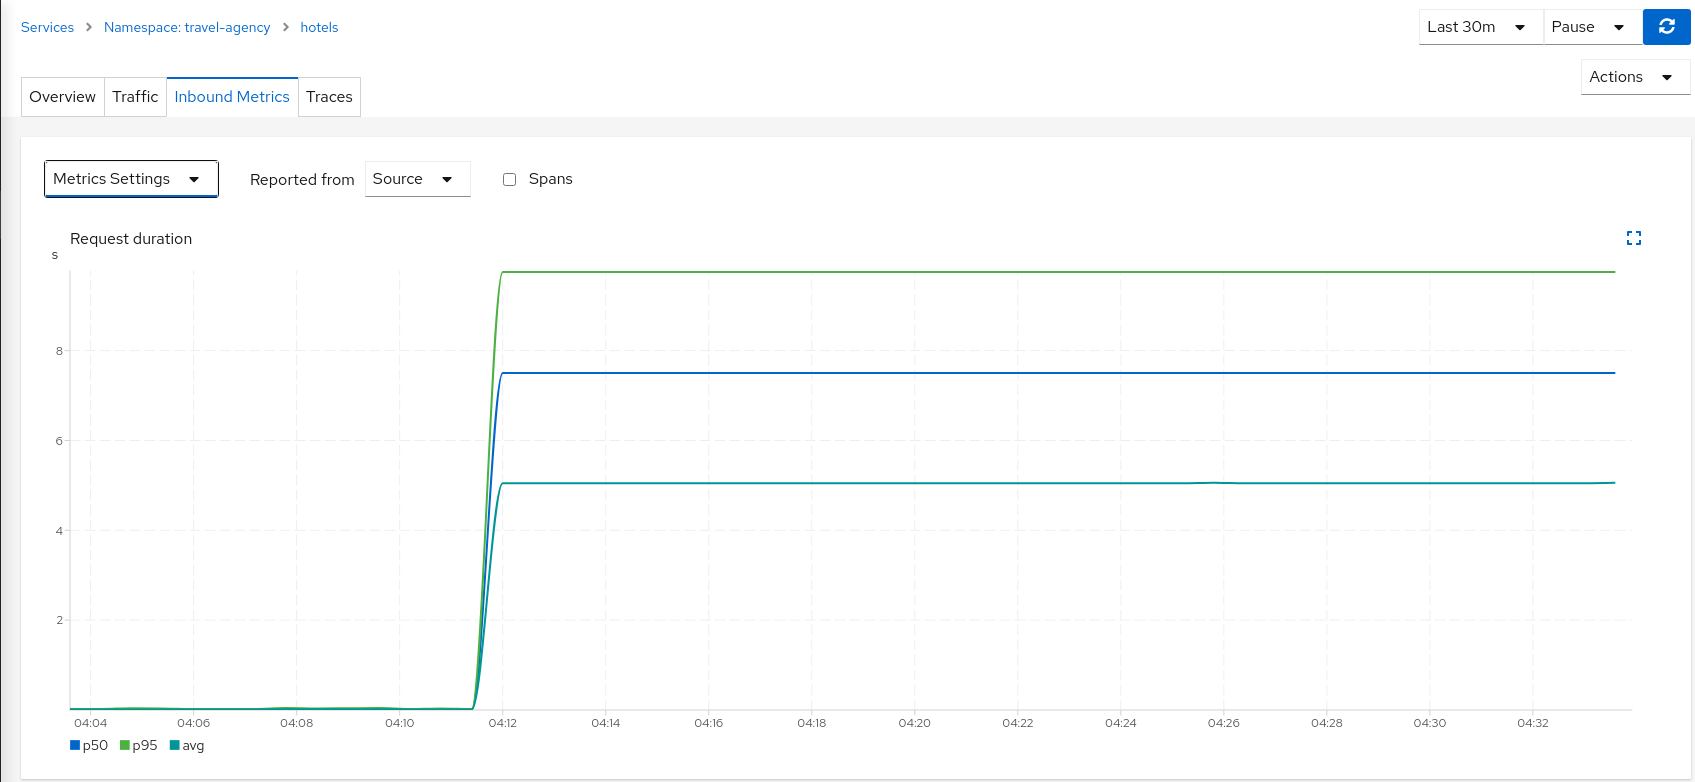
The travels workload proxy has the Fault Injection configuration so it will perform the call to the hotels service and will apply the delay on the travels workload side (this is reported as source telemetry).
We can see in the hotels telemetry reported by the source (the travels proxy) that there is a visible gap showing 5 second delay in the request duration.
Note
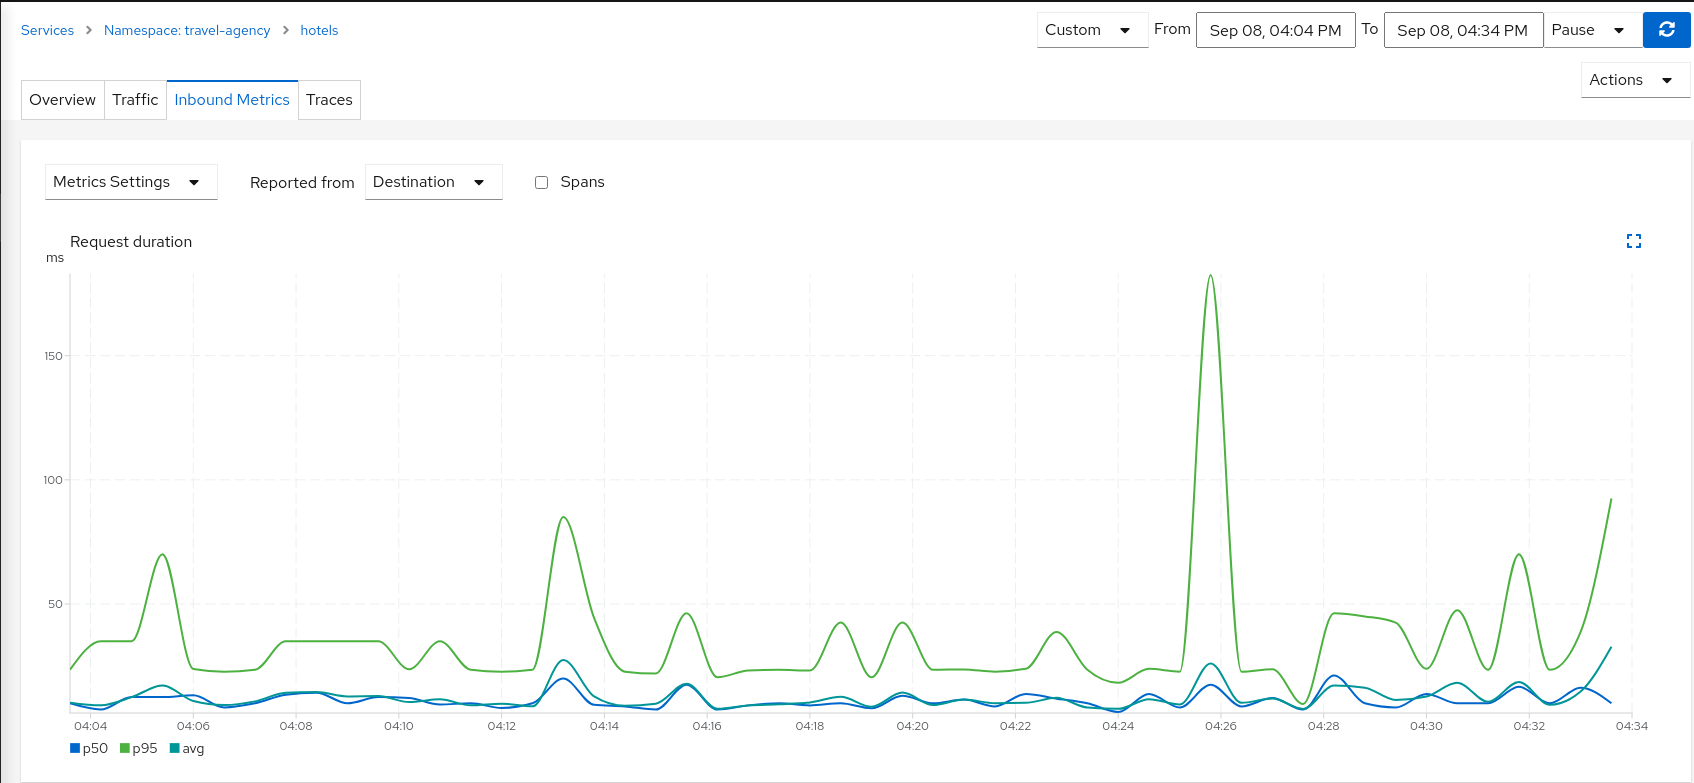
The avg line reflects the injected delay most accurately. p50 and p95 are estimated from Istio’s Prometheus histogram buckets, not from individual request timings. When latency clusters near a bucket boundary (as it does with a fixed delay), quantiles can read lower than the configured delay — for example, with a 5s delay you may see avg just above 5s while p50 reads closer to 3.7s. The same pattern appears at other delay values (try updating the scenario to 4s to compare).But as the Fault Injection delay is applied on the source proxy (travels), the destination proxy (hotels) is unaffected and its destination telemetry shows no delay.
Step 3
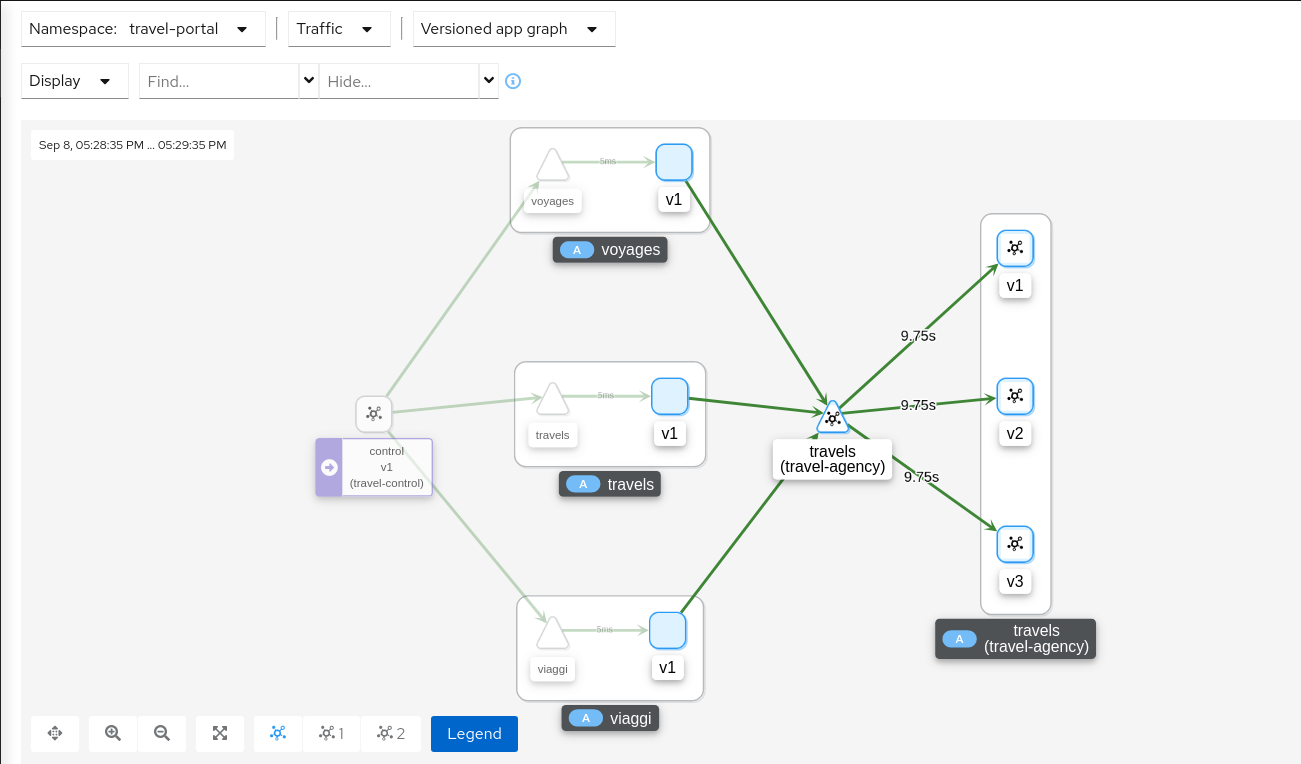
Study the impact of the travels service delayThe injected delay is propagated from the travels service to the downstream services deployed on travel-portal namespace, degrading the overall response time. But the downstream services are unaware, operate normally, and show a green status.
Step 4
Update or delete Istio ConfigurationAs part of this step you can update the Fault Injection scenario to test different delays. When finished, you can delete the generated Istio config for the hotels service.
Traffic Shifting
In the previous Request Routing step we deployed two new versions of the travels service using the travels-v2 and travels-v3 workloads.
That scenario showed how Istio can route specific requests to specific workloads. It was configured such that each portal deployed in the travel-portal namespace (travels.uk, viaggi.it and voyages.fr) was routed to a specific travels workload (travels-v1, travels-v2 and travels-v3).
This Traffic Shifting step will simulate a new scenario: the new travels-v2 and travels-v3 workloads will represent new improvements for the travels service that will be used by all requests.
These new improvements implemented in travels-v2 and travels-v3 represent two alternative ways to address a specific problem. Our goal is to test them before deciding which one to use as a next version.
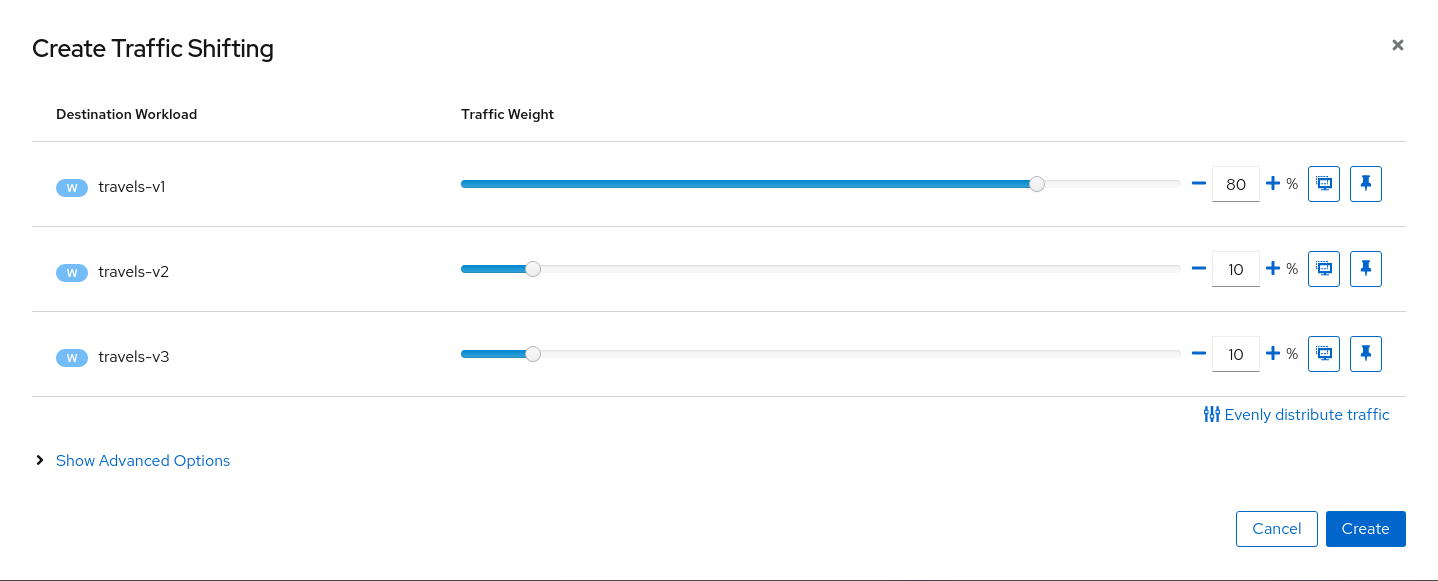
At the beginning we will send 80% of the traffic into the original travels-v1 workload, and split 10% of the traffic each to travels-v2 and travels-v3.
Step 1
Use the Traffic Shifting wizard on the travels service- Open Services → travel-agency → travels.
- Select Actions → Traffic Shifting.
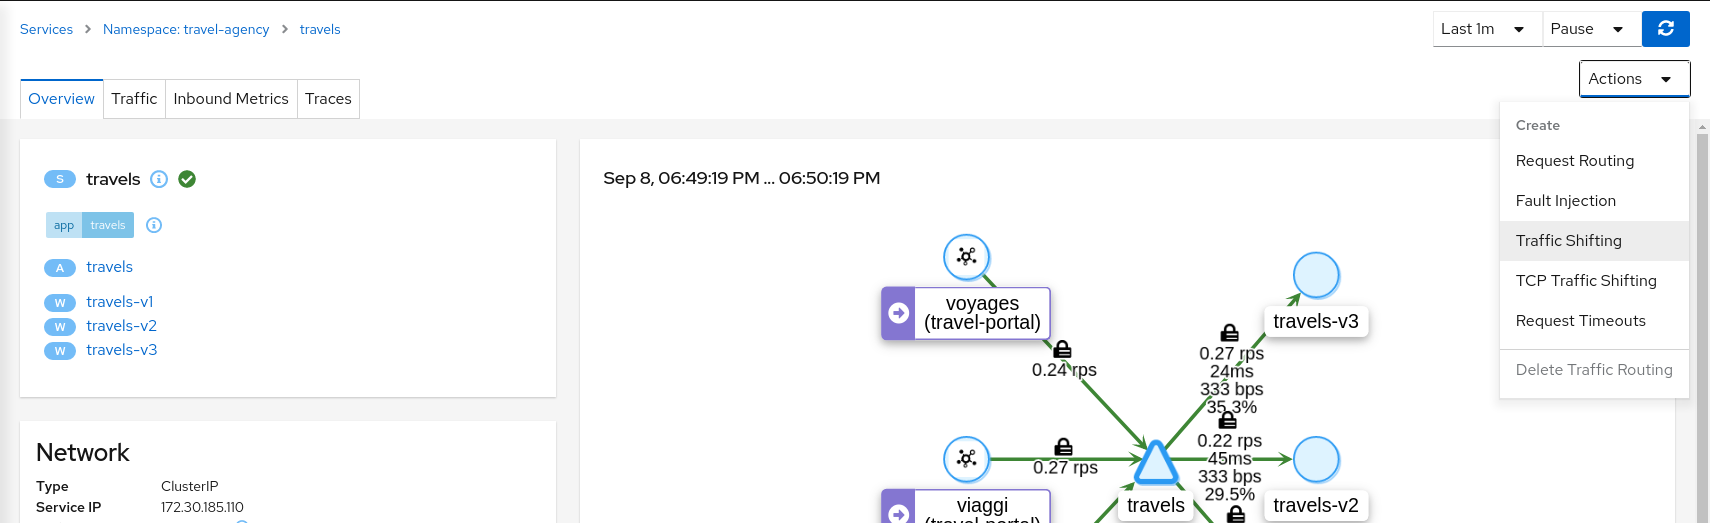
Create a scenario with 80% of traffic to travels-v1 and 10% each to travels-v2 and travels-v3.
Step 2
Examine Traffic Shifting distribution from the travel-agency travels service Node Graph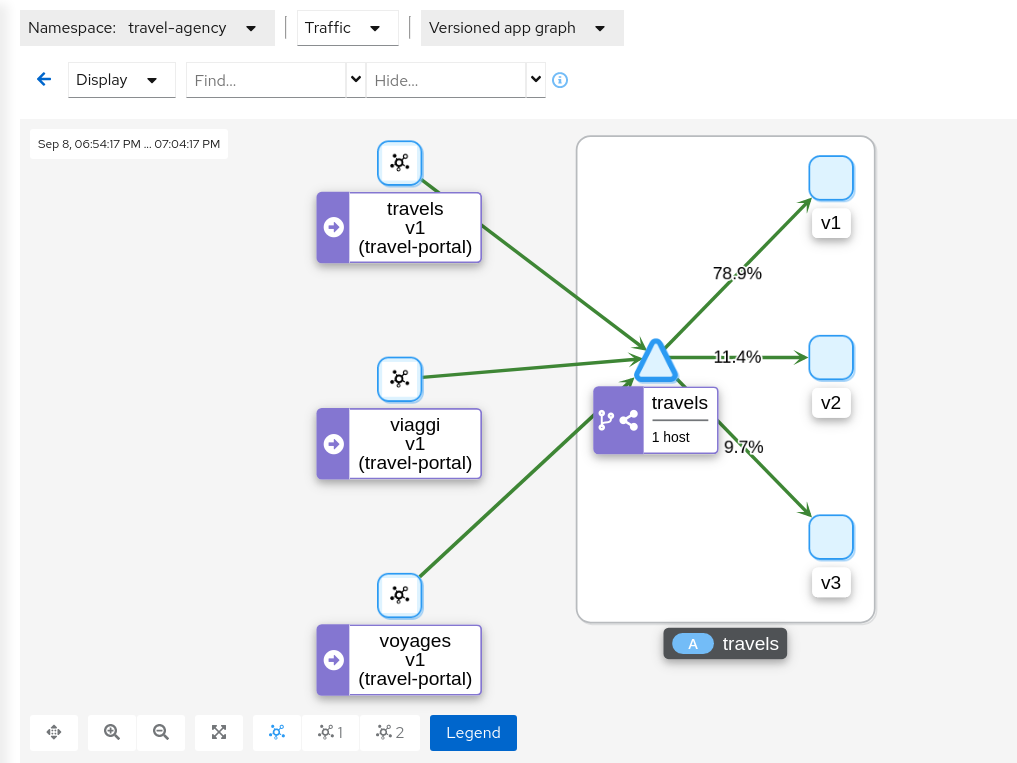
Step 3
Compare travels workload and assess new changes proposed in travels-v2 and travels-v3Istio Telemetry is grouped per logical application. That has the advantage of easily comparing different but related workloads, for one or more services.
In our example, we can use the “Inbound Metrics” and “Outbound Metrics” tabs in the travels application details, group by “Local version” and compare how travels-v2 and travels-v3 are working.
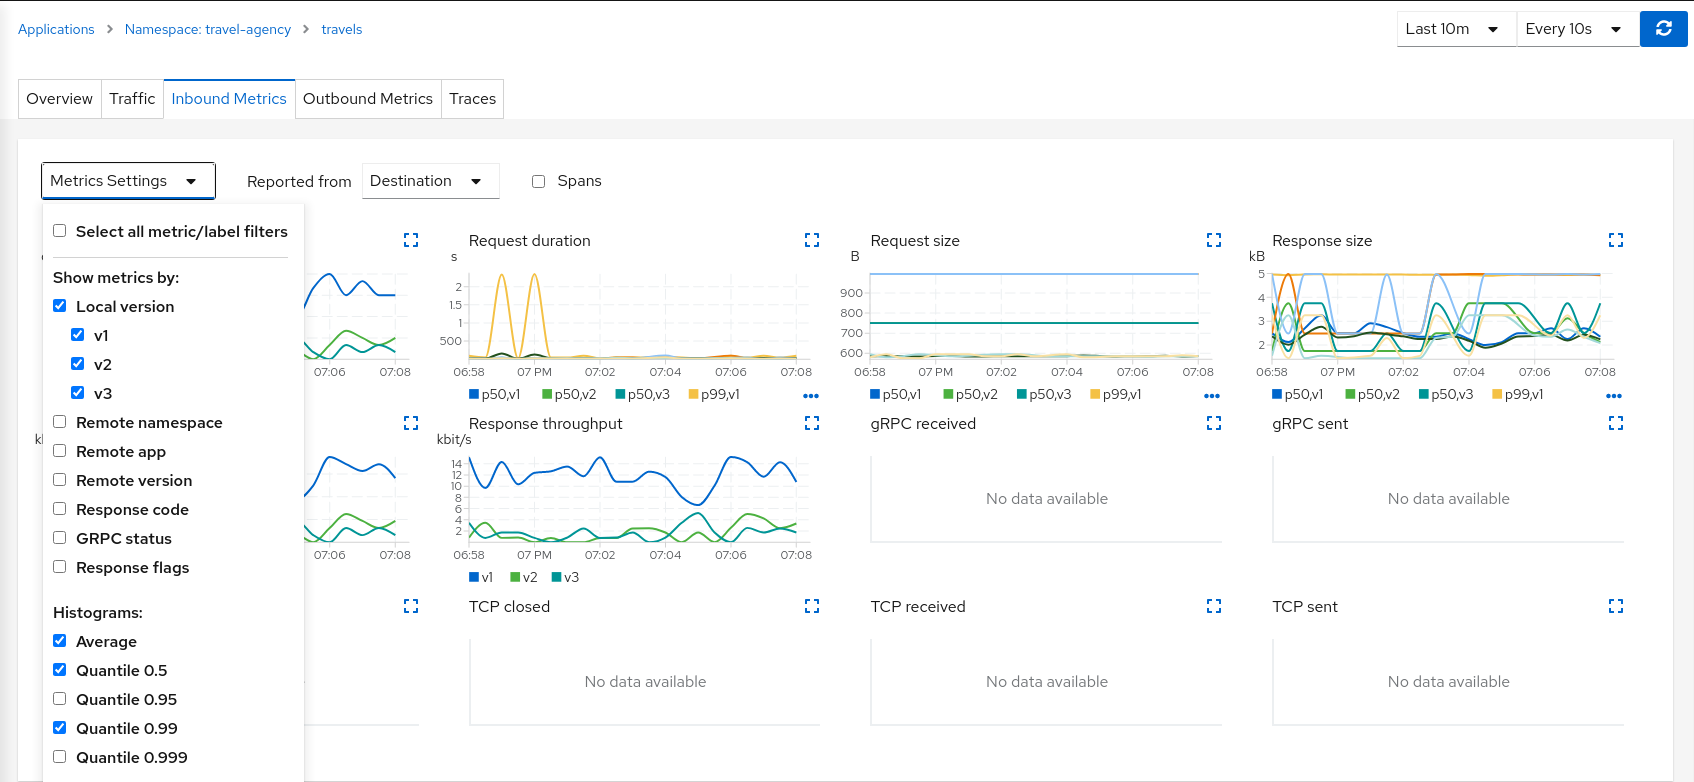
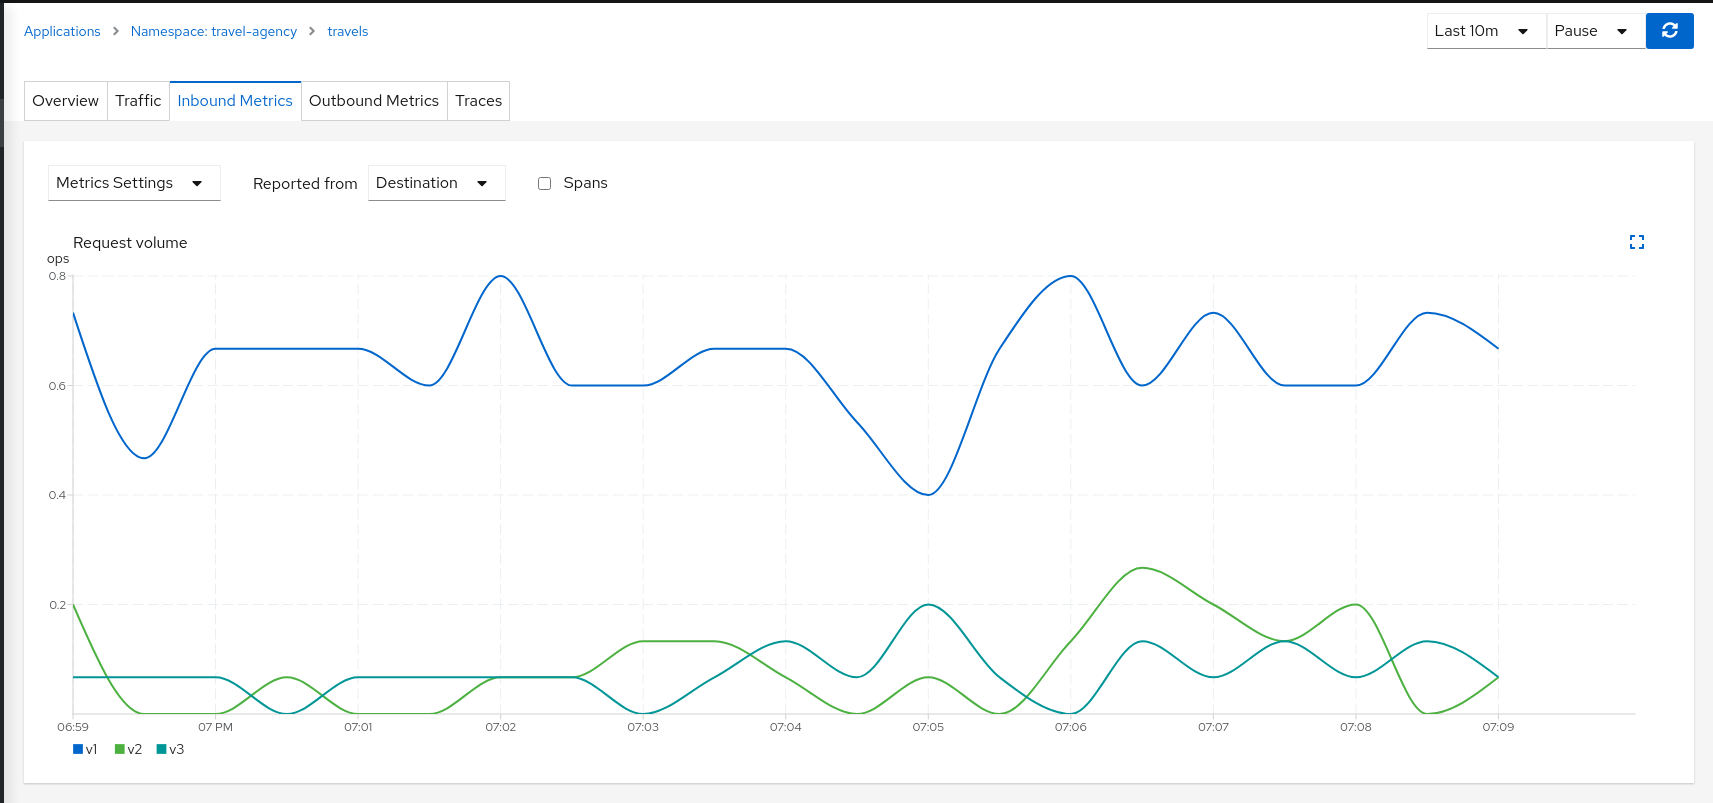
The charts show that the traffic distribution is working as expected and 80% is being distributed to the travels-v1 workload. They also show no big differences between travels-v2 and travels-v3 in terms of request duration.
Step 4
Update or delete Istio ConfigurationAs part of this step you can update the Traffic Shifting scenario to test different distributions. When finished, you can delete the generated Istio config for the travels service.
TCP Traffic Shifting
The Travel Demo application has a database service used by several services deployed in the travel-agency namespace.
At some point in the lifecycle of the application the telemetry shows that the database service degrades and starts to increase the average response time.
This is a common situation. In this case, a database specialist suggests an update of the original indexes due to data growth.
Our database specialist is suggesting two approaches and proposes to prepare two versions of the database service to test which may work better.
This step will show how the “Traffic Shifting” strategy can be applied to TCP services to test which new database indexing strategy works better.
Step 1
Deploy mysqldb-v2 and mysqldb-v3 workloadsTo deploy the new versions of the mysqldb service execute the commands:
kubectl apply -f <(curl -L https://raw.githubusercontent.com/kiali/demos/master/travels/mysql-v2.yaml) -n travel-agency
kubectl apply -f <(curl -L https://raw.githubusercontent.com/kiali/demos/master/travels/mysql-v3.yaml) -n travel-agency
Step 2
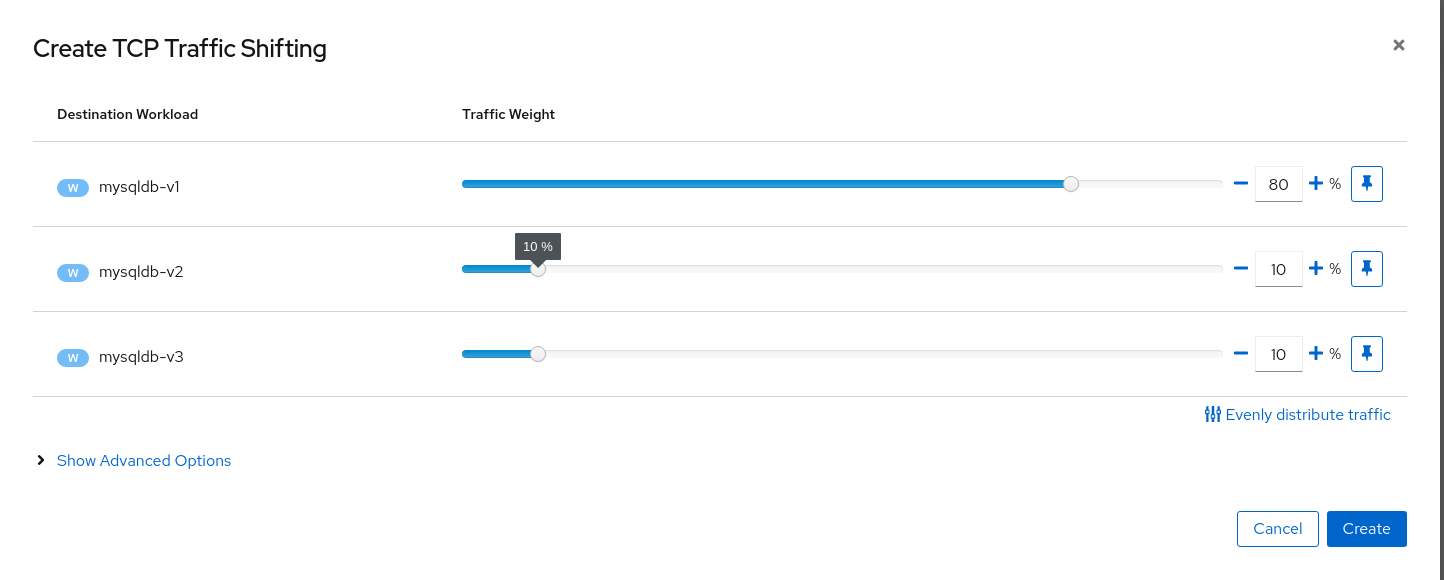
Use the TCP Traffic Shifting Wizard on mysqldb service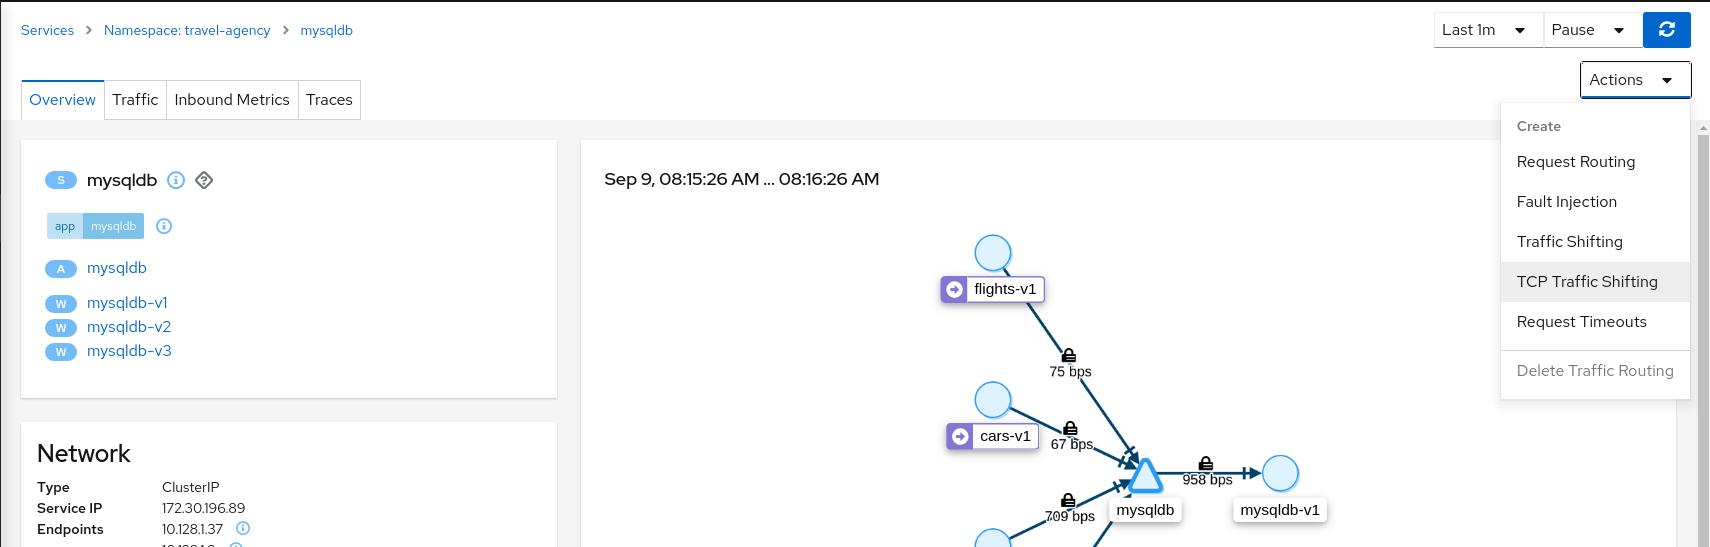
Create a scenario with 80% of the traffic distributed to mysqldb-v1 workload and 10% of the traffic distributed each to mysqldb-v2 and mysqldb-v3.
Step 3
Examine Traffic Shifting distribution from the travel-agency Graph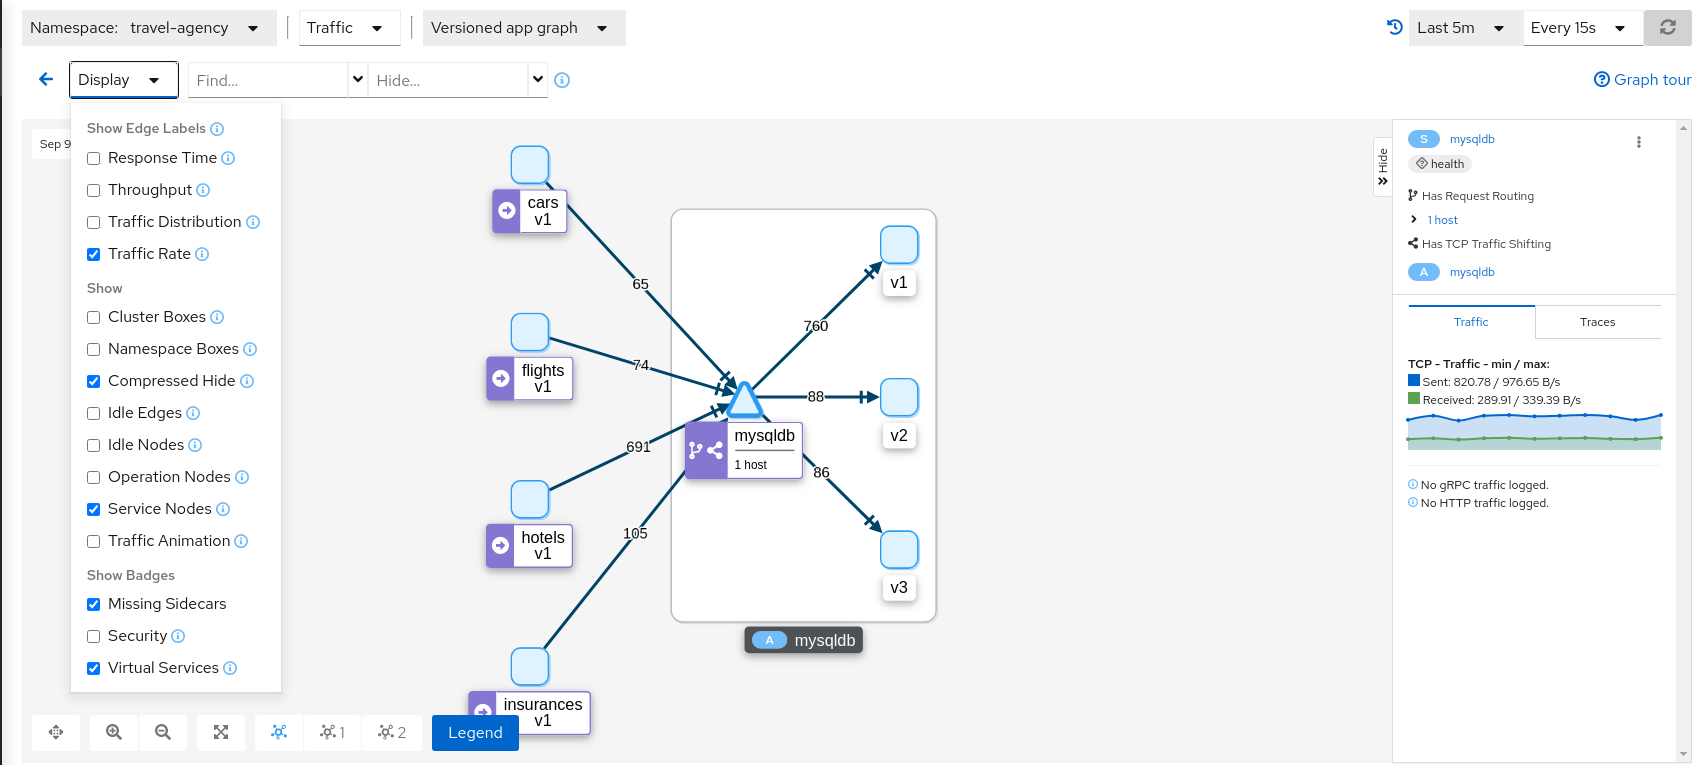
Note that TCP telemetry has different types of metrics. As “Traffic Distribution” is only available for HTTP/gRPC services, for this service we need to use “Traffic Rate” to evaluate the distribution of data (bytes-per-second) between mysqldb workloads.
Step 4
Compare mysqldb workloads and study new indexes proposed in mysqldb-v2 and mysqldb-v3TCP services have different telemetry but it’s still grouped by versions, allowing the user to compare and study pattern differences for mysqldb-v2 and mysqldb-v3.
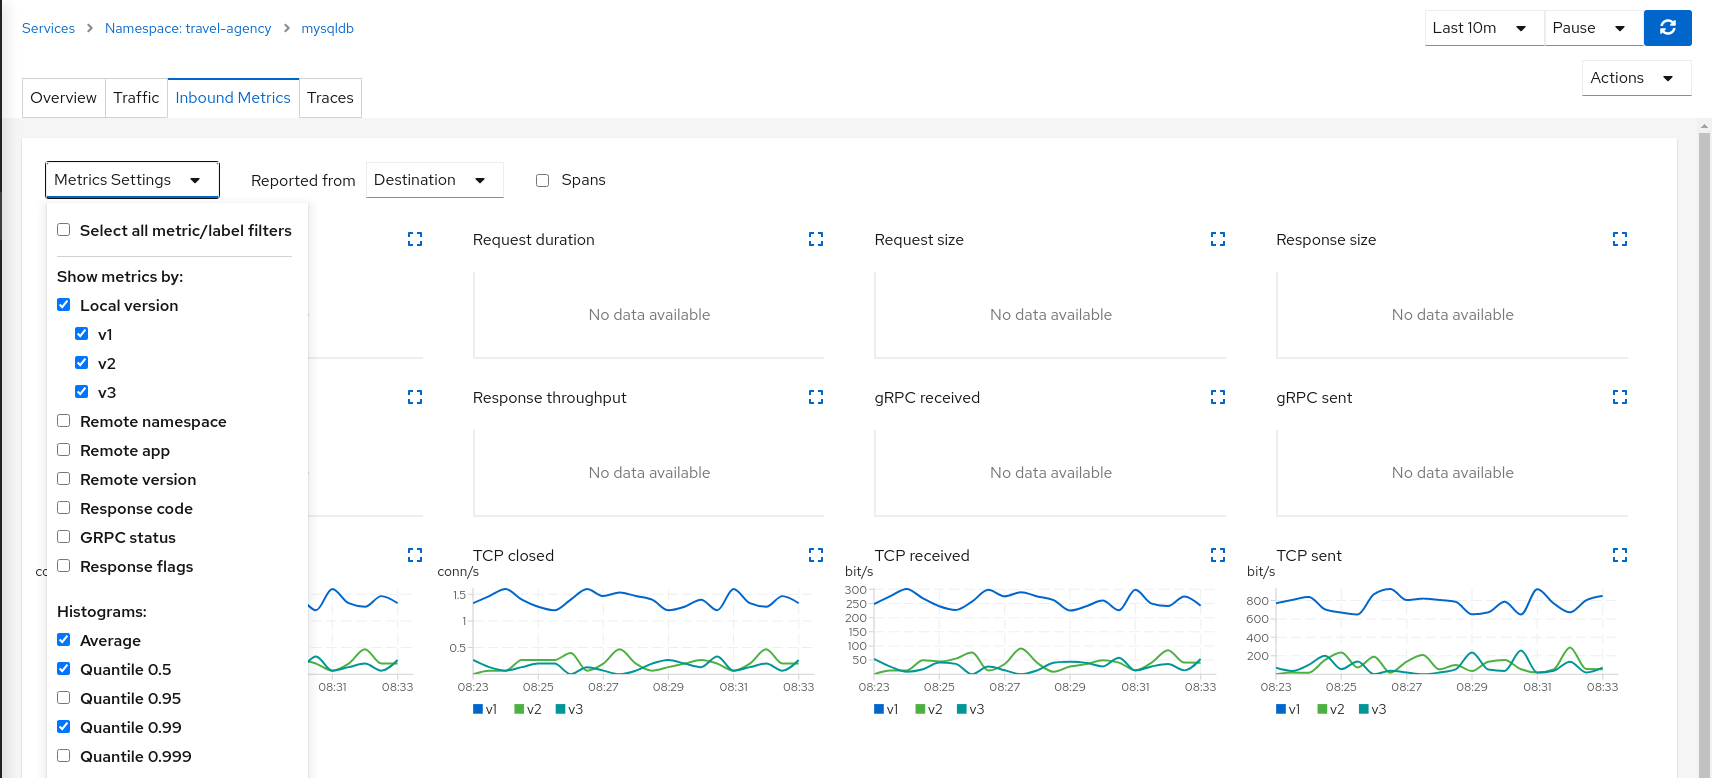
The charts show more peaks in mysqldb-v2 compared to mysqldb-v3 but overall a similar behavior, so it’s probably safe to choose either strategy to shift all traffic.
Step 5
Update or delete Istio ConfigurationAs part of this step you can update the TCP Traffic Shifting scenario to test a different distribution. When finished, you can delete the generated Istio config for the mysqldb service.
Request Timeouts
In the Fault Injection step we showed how we could introduce a delay in the critical hotels service and test the resilience of the application.
The delay was propagated across services and Kiali showed how services accepted the delay without creating errors on the system.
But in real scenarios delays may have important consequences. Services may prefer to fail sooner, and recover, rather than propagating a delay across services.
This step will show how to add a request timeout for one of the portals deployed in travel-portal namespace. The travels.uk and viaggi.it portals will accept delays but voyages.fr will timeout and fail.
Step 1
Use the Fault Injection Wizard on hotels service to inject a delayRepeat the Fault Injection step to add delay on hotels service.
Step 2
Use the Request Routing Wizard on travels service to add a route rule with delay for voyages.frAdd a request timeout only on requests coming from the voyages.fr portal. This requires two route rules:
Use the Request Matching tab to add a matching condition for the portal header with voyages.fr value.

Use the Request Timeouts tab to add an HTTP Timeout with default values.
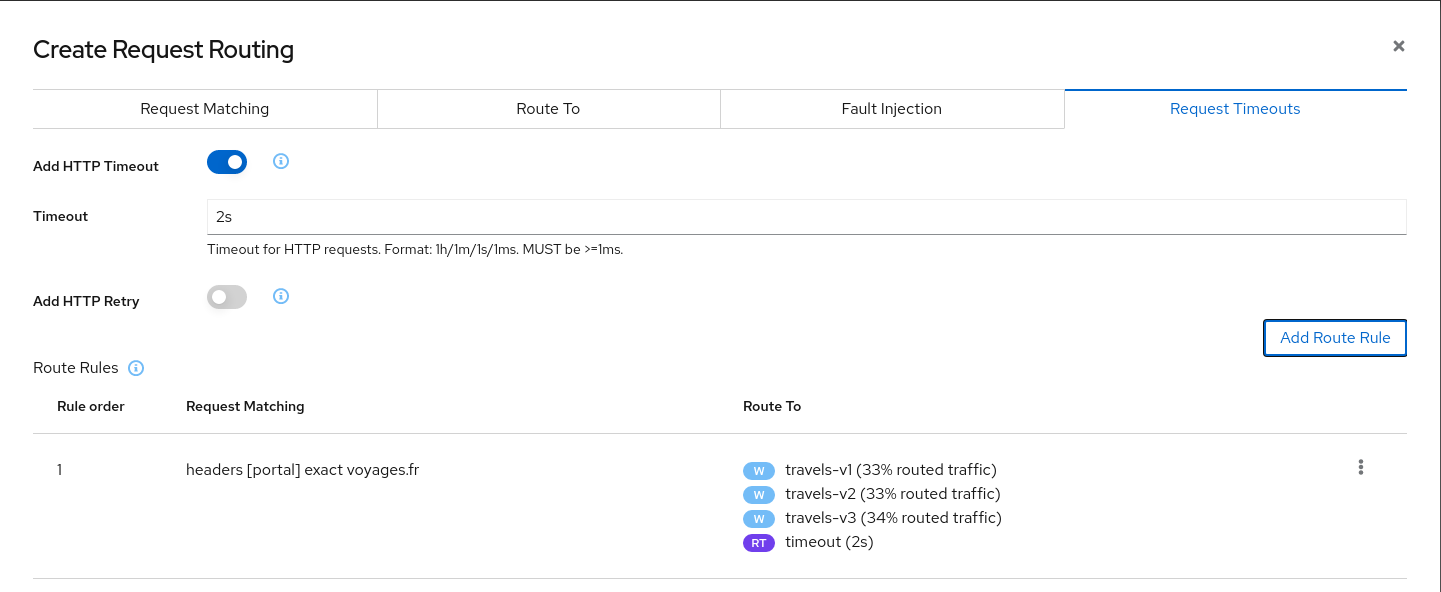
Add the first route rule to the scenario.
Add a second rule to match any request.
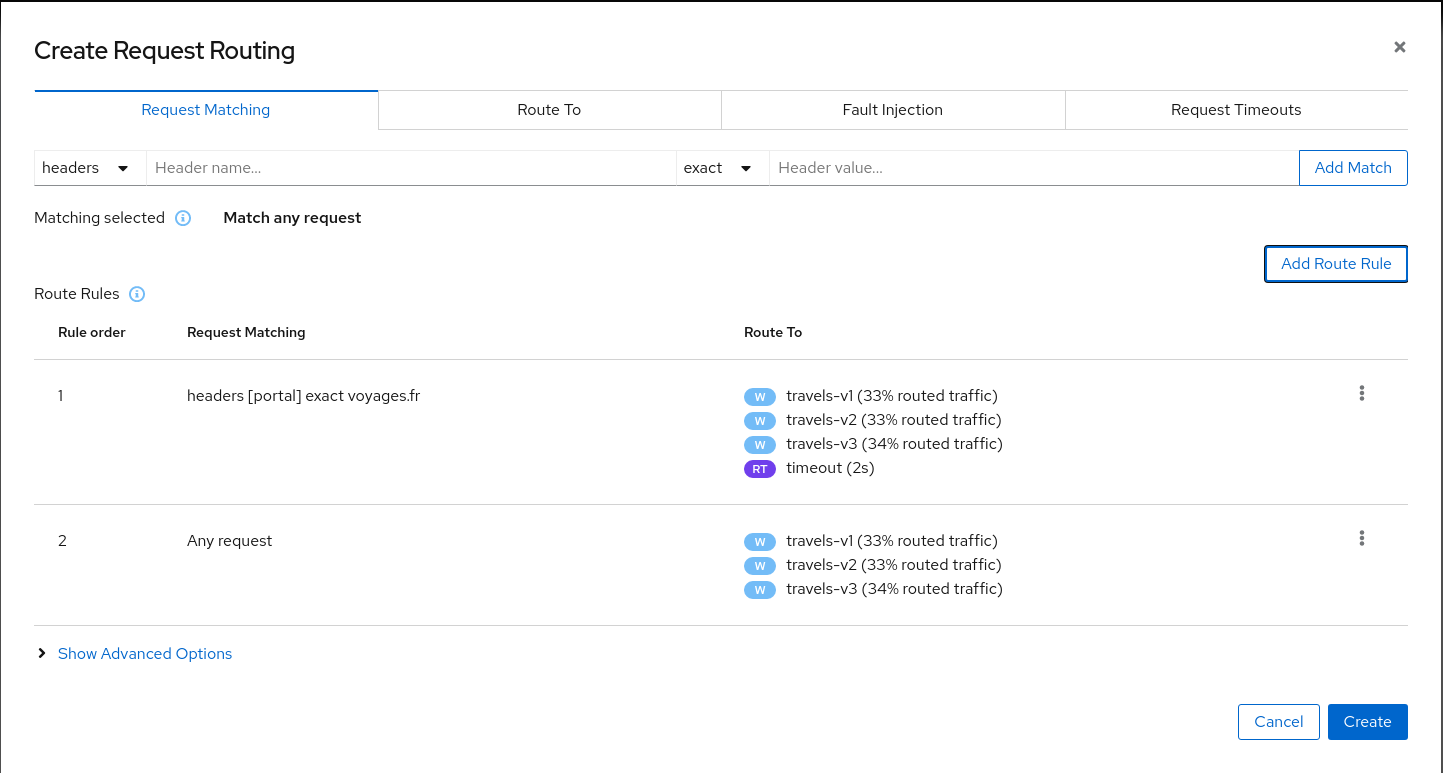
Create the request routing scenario. With this configuration, requests coming from voyages.fr will match the first rule and all others will match the second rule.
Step 3
Review the impact of the request timeout in the travels serviceCreate the rule. The Graph will show how requests coming from voyages.fr start to fail, due to the request timeout introduced.
Requests coming from other portals work without failures but are degraded by the hotels delay.
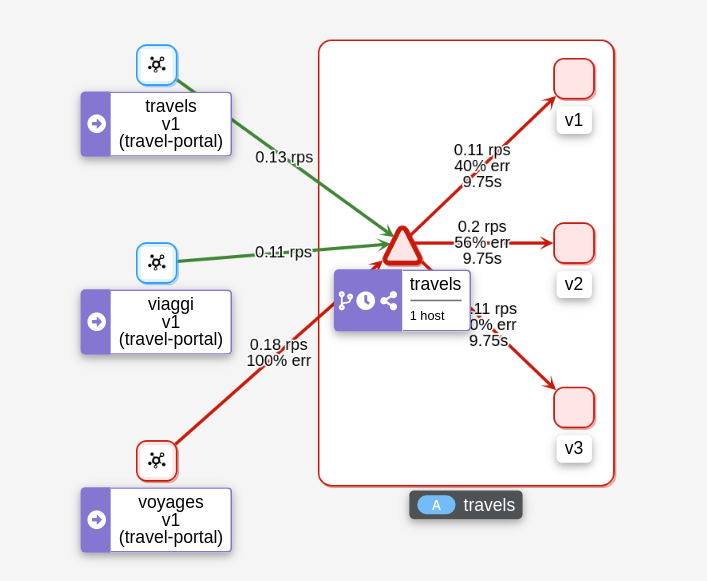
This scenario can be visualized in detail if we examine the “Inbound Metrics” and we group by “Remote app” and “Response code”.
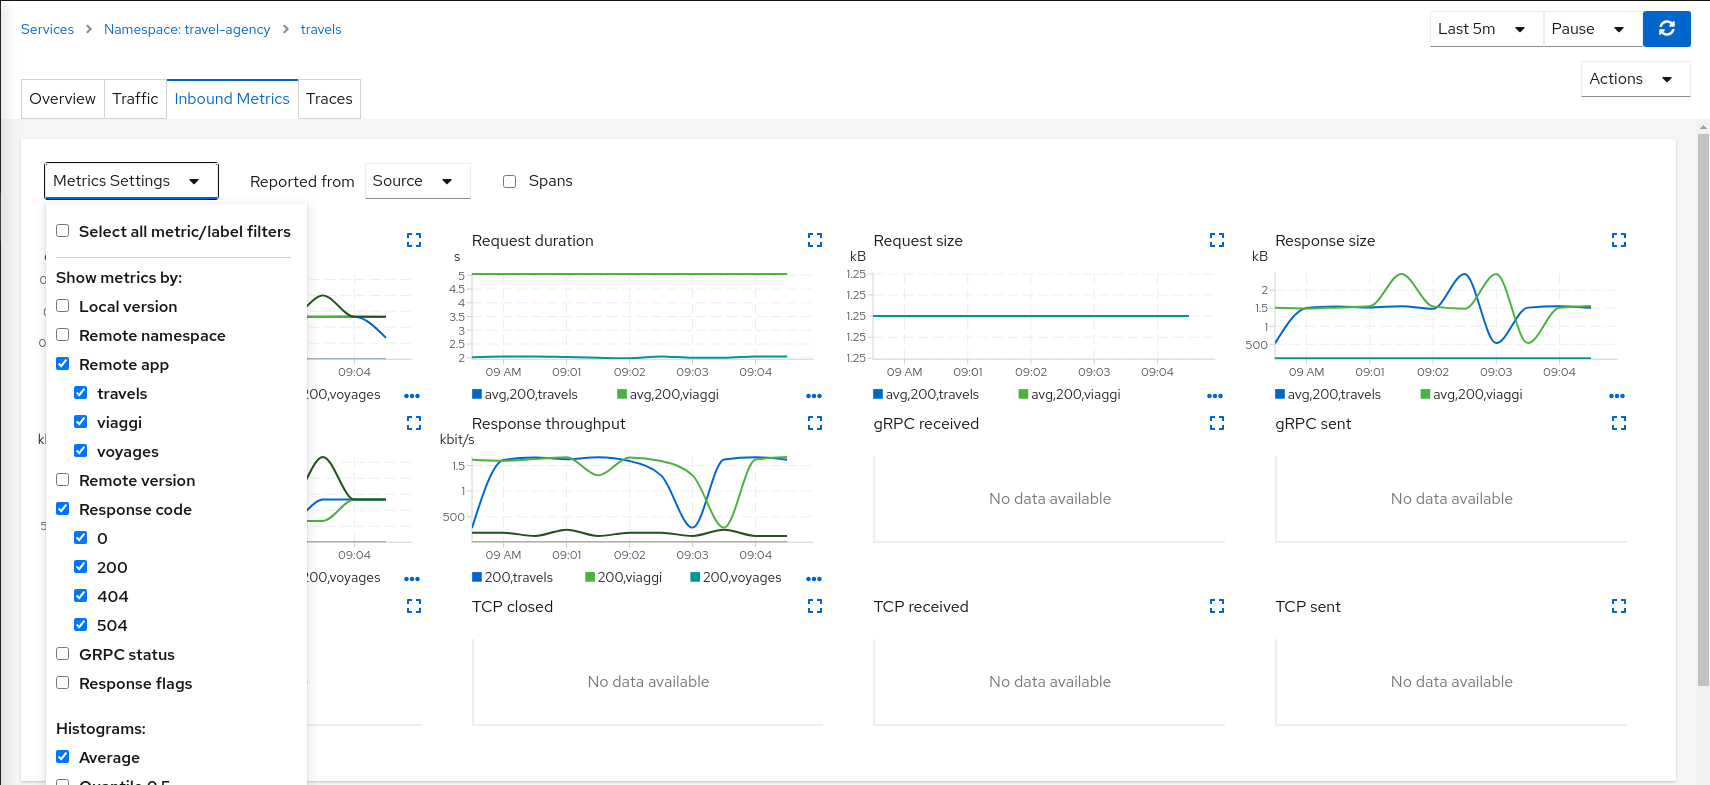
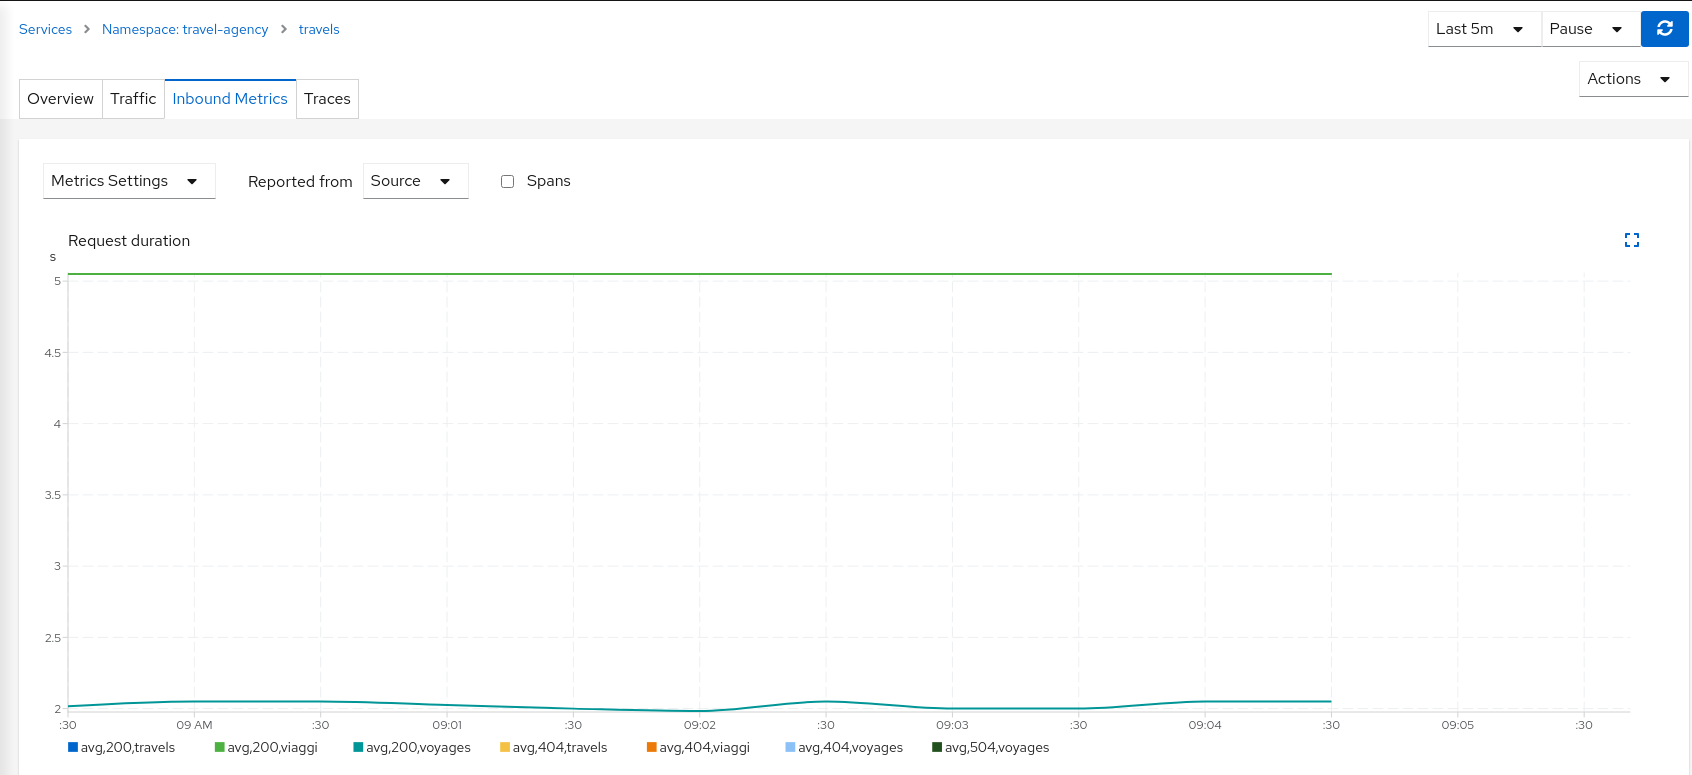
As expected, the requests coming from voyages.fr don’t propagate the delay and they fail in the 2 seconds range, while requests from other portals don’t fail but they propagate the delay introduced in the hotels service.
Step 4
Update or delete Istio ConfigurationAs part of this step you can update the scenarios defined around hotels and travels services to experiment with more conditions, or you can delete the generated Istio config in both services.
Circuit Breaking
Distributed systems will benefit from failing quickly and applying back pressure, as opposed to propagating delays and errors through the system.
Circuit breaking is an important technique used to limit the impact of failures, latency spikes, and other types of network problems.
This step will show how to apply a Circuit Breaker into the travels service in order to limit the number of concurrent requests and connections.
Step 1
Deploy a new loadtester portal in the travel-portal namespaceIn this example we are going to deploy a new workload that will simulate an important increase in the load of the system.
OpenShift
OpenShift users may also need to add the associated loadtester ServiceAccount to the necessary SecurityContextConstraints.kubectl apply -f <(curl -L https://raw.githubusercontent.com/kiali/demos/master/travels/travel_loadtester.yaml) -n travel-portal
The loadtester workload will try to create 50 concurrent connections to the travels service, adding considerable pressure to the travel-agency namespace.
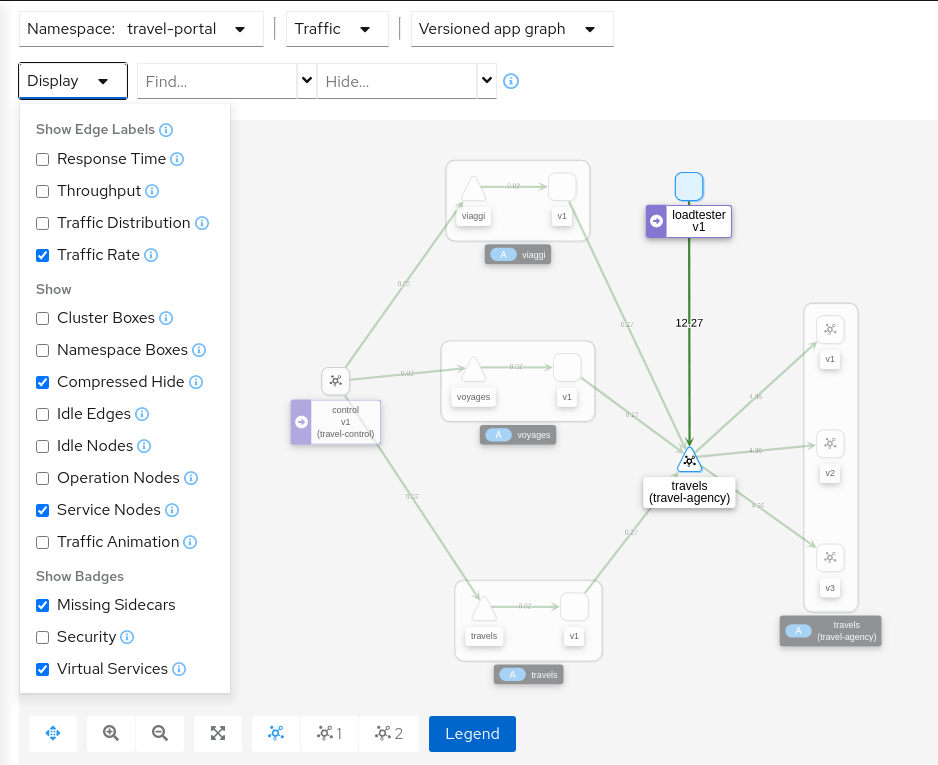
The Travel Demo application is capable of handling this load and at first glance it doesn’t show unhealthy status.
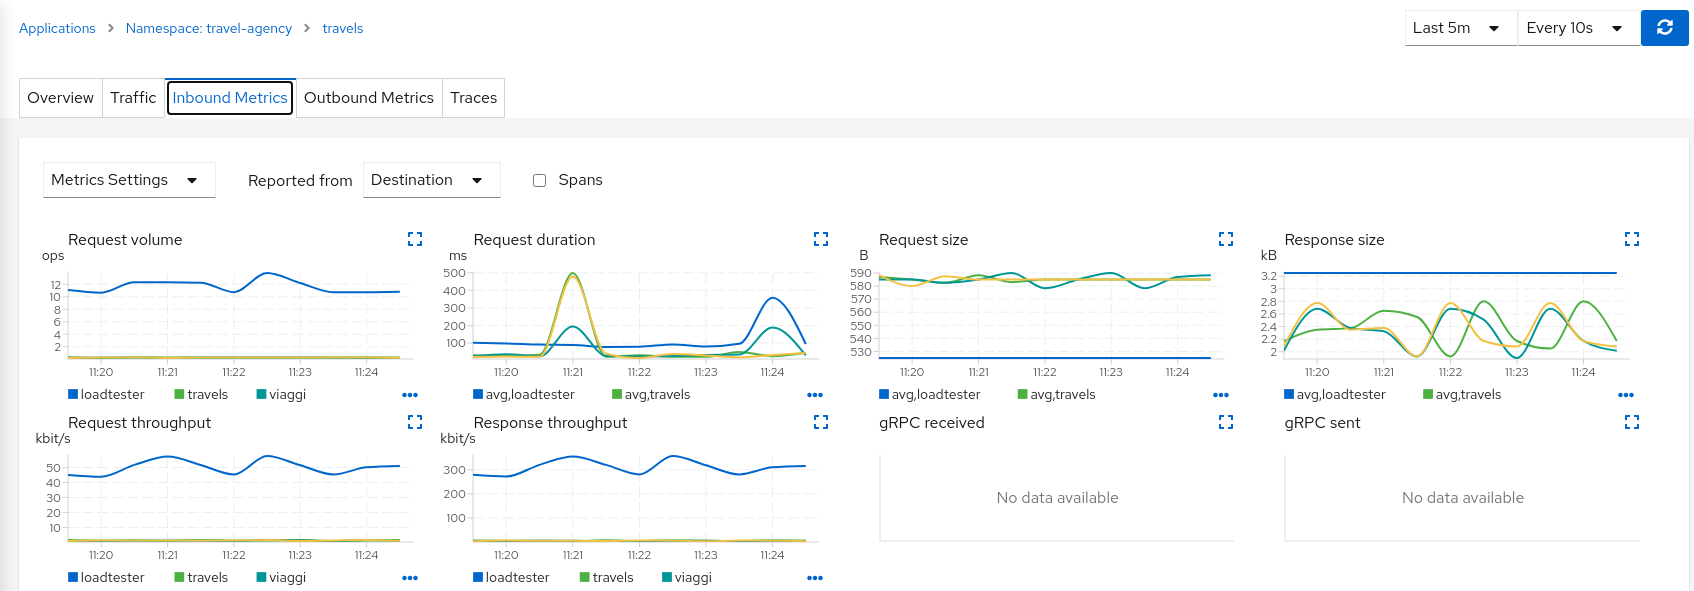
But in a real scenario an unexpected increase in the load of a service like this may have a significant impact on the overall system status.
Step 2
Use the Traffic Shifting Wizard on travels service to generate a traffic rule- Open travels service detail in the travel-agency namespace.
- Select Actions → Request Routing.
- Click Add Rule to distribute traffic (evenly) to the travels workloads.
- Click Advanced Options → Circuit Breaker tab.
- Enable Add Connection Pool and Add Outlier Detection with the default settings.
- Create the Circuit Breaker.
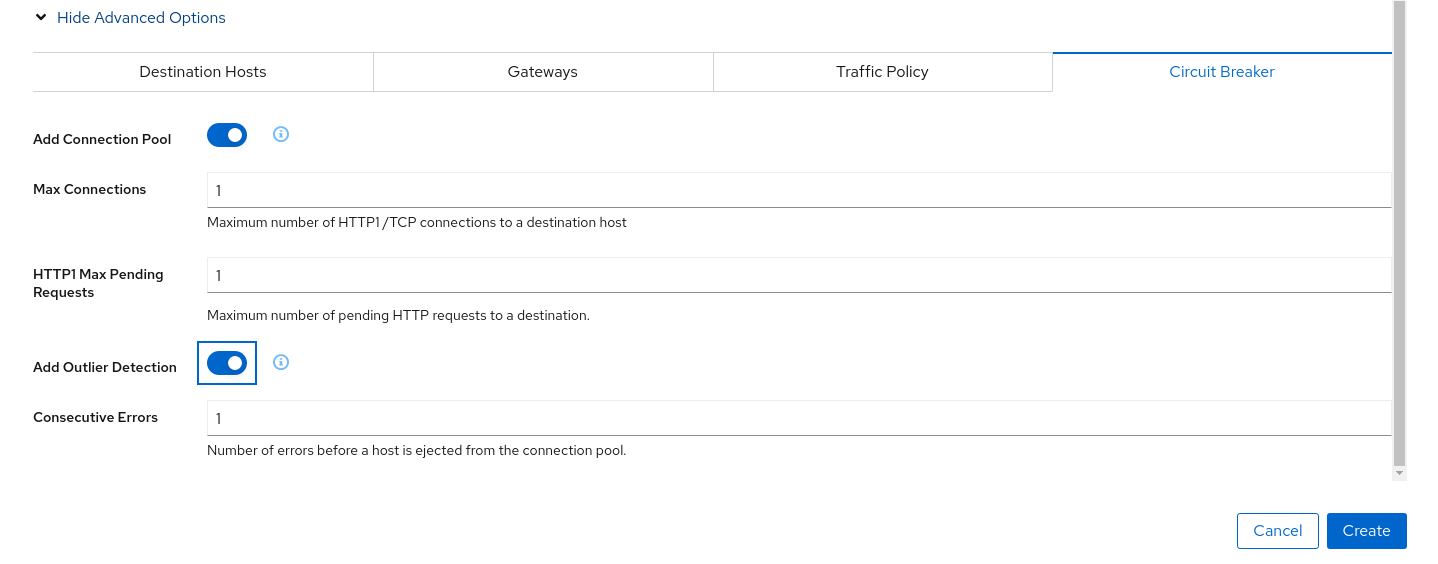
The “Connection Pool” settings will indicate that the proxy sidecar will reject requests when the number of concurrent connections and requests exceeds more than one.
The “Outlier Detection” will eject a host from the connection pool if there is more than one consecutive error.
Step 3
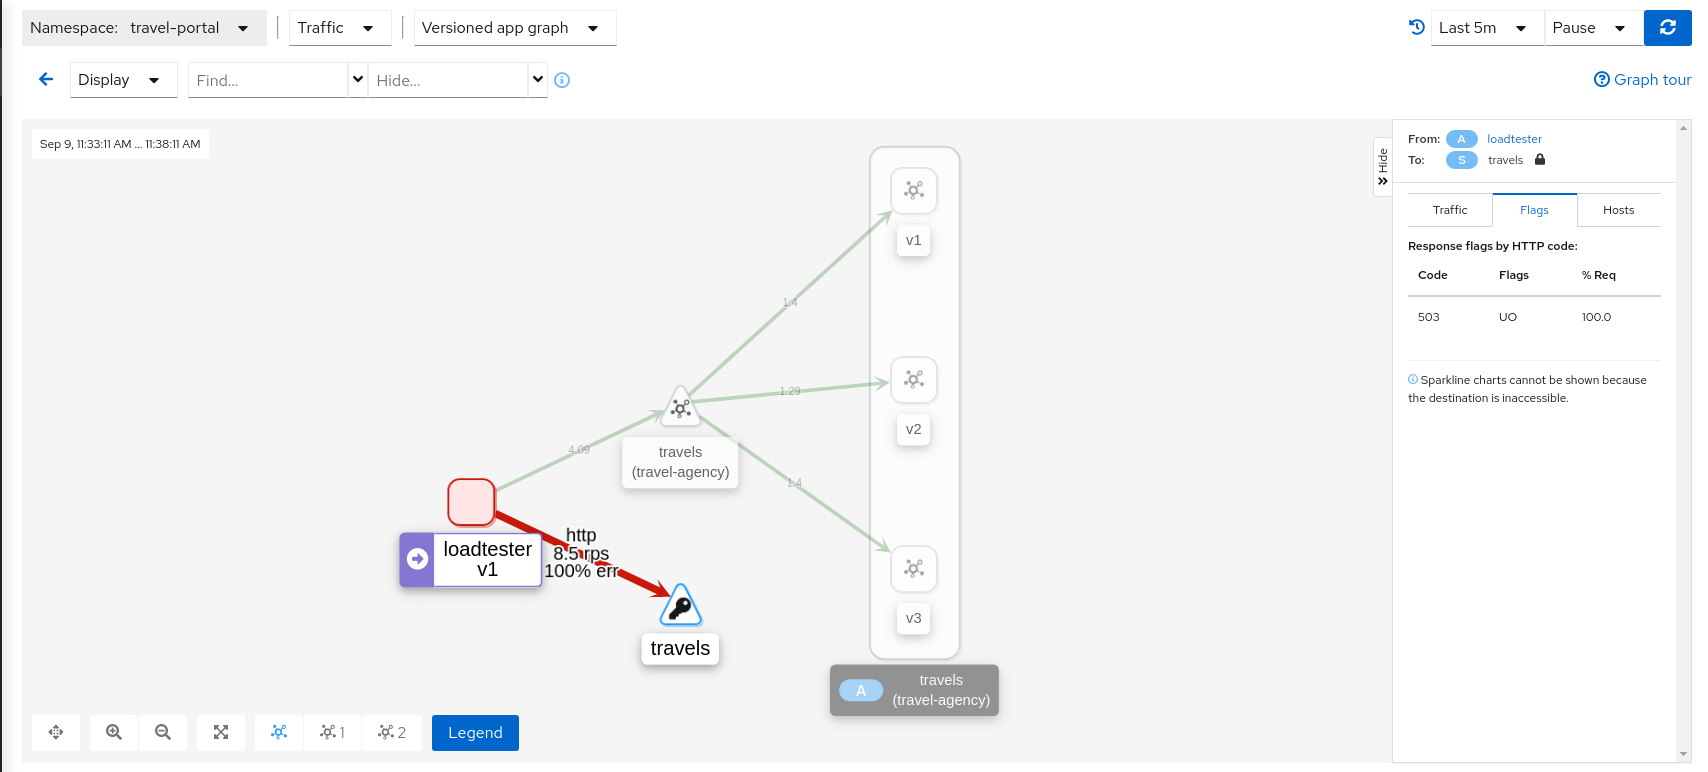
Study the behavior of the Circuit Breaker in the travels serviceIn the loadtester versioned-app Graph we can see that the travels service’s Circuit Breaker accepts some, but fails most, connections.
Remember that these connections are stopped by the proxy on the loadtester side. That “fail sooner” pattern prevents overloading the network.
Using the Graph we can select the failed edge, check the Flags tab, and see that those requests are closed by the Circuit breaker.
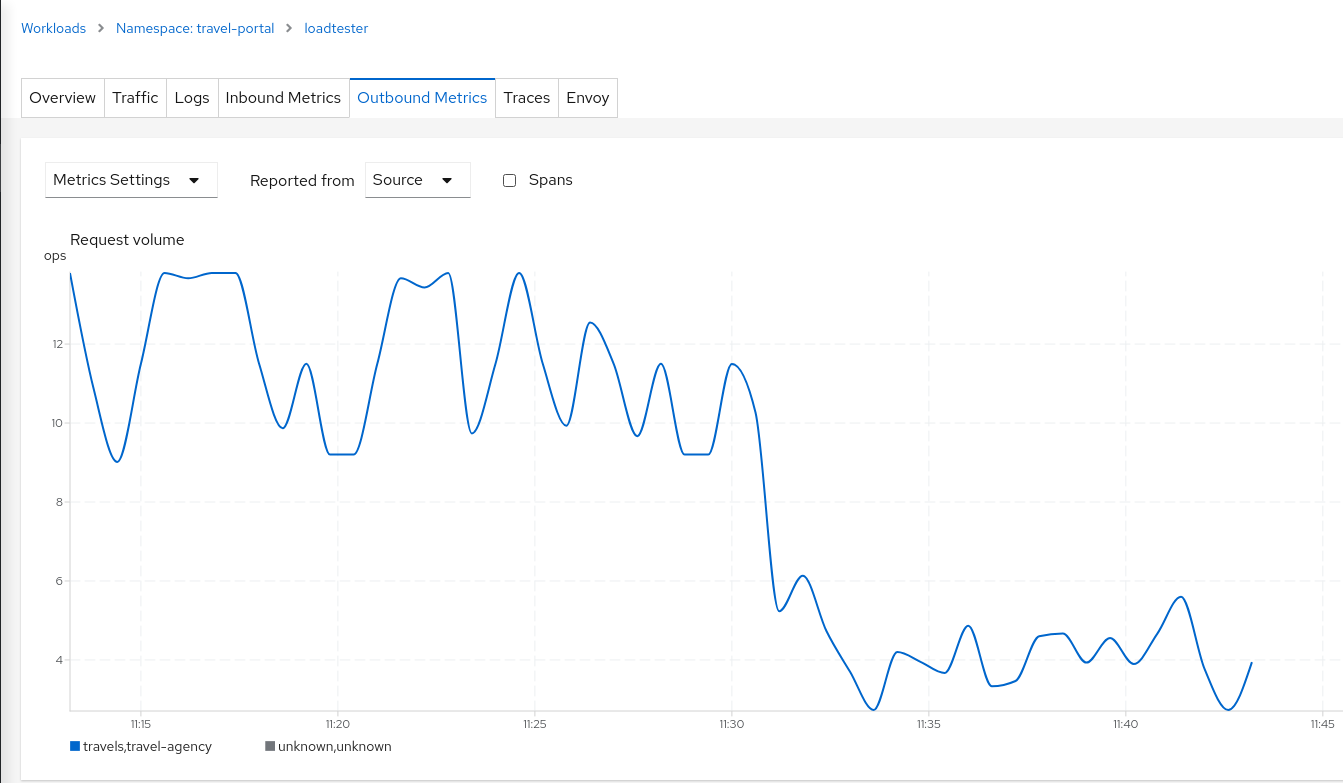
If we examine the “Request volume” metric from the “Outbound Metrics” tab we can see the evolution of the requests, and how the introduction of the Circuit Breaker made the proxy reduce the request volume.
Step 4
Update or delete Istio ConfigurationAs part of this step you can update the scenarios defined around the travels service to experiment with more Circuit Breaker settings, or you can delete the generated Istio config in the service.
Understanding what happened:
(iii) Connection Pool Settings
(iv) Envoy’s Circuit Breaking Architecture
Mirroring
This tutorial has shown several scenarios where Istio can route traffic to different versions in order to compare versions and evaluate which one works best.
The Traffic Shifting step was focused on the travels service adding new travels-v2 and travels-v3 workloads and the TCP Traffic Shifting showed how this scenario can be used on TCP services like the mysqldb service.
Mirroring (or shadowing) is a particular case of the Traffic Shifting scenario where the proxy sends a copy of live traffic to a mirrored service.
The mirrored traffic happens out of band of the primary request path. It allows for testing of alternate services, in production environments, with minimal risk.
Istio mirrored traffic is only supported for HTTP/gRPC protocols.
This step will show how to apply mirrored traffic into the travels service.
Step 1
Use the Traffic Shifting Wizard on travels serviceWe will simulate the following:
- travels-v1 is the original traffic and it will keep 80% of the traffic
- travels-v2 is the new version to deploy, it’s being evaluated and it will get 20% of the traffic to compare against travels-v1
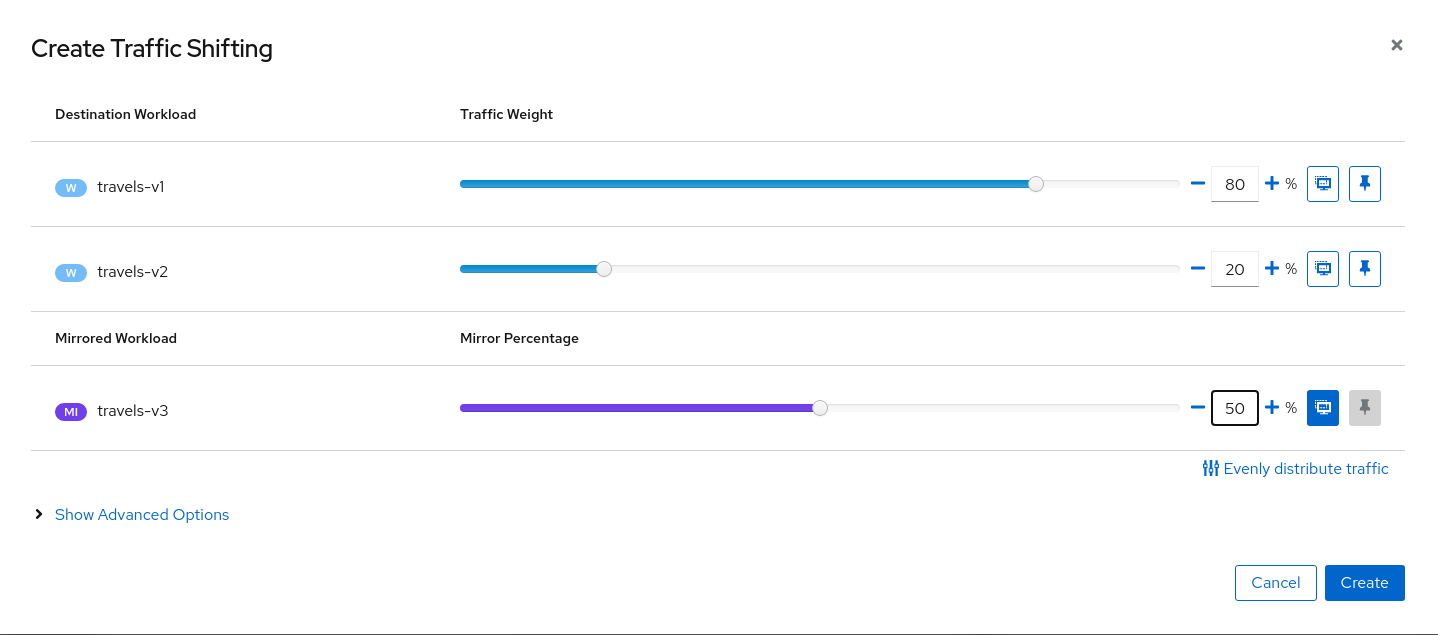
- But travels-v3 will be considered as a new, experimental version for testing outside of the regular request path. It will be defined as a mirrored workload on 50% of the original requests.
- Open travels service detail in the travel-agency namespace.
- Select Actions → Traffic Shifting.
- Set the 80%/20% loads for travels-v1 and travels-v2.
- Click the Mirroring icon for travels-v3.
- Set the 50% mirroring load.
- Create the Traffic Shifting with Mirroring.
Step 2
Examine Traffic Shifting distribution from the travel-agency GraphNote that Istio does not report mirrored traffic telemetry from the source proxy. It is reported from the destination proxy, although it is not flagged as mirrored, and therefore an edge from travels to the travels-v3 workload will appear in the graph. Note the traffic rates reflect the expected ratio of 80/20 between travels-v1 and travels-v2, with travels-v3 at about half of that total.
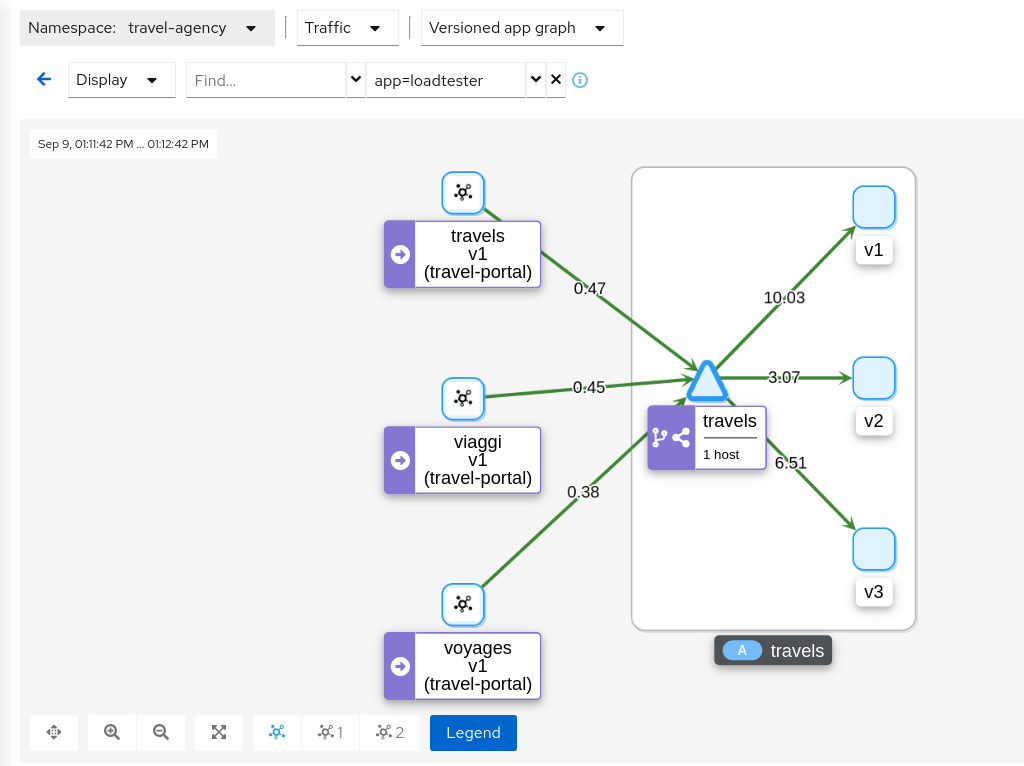
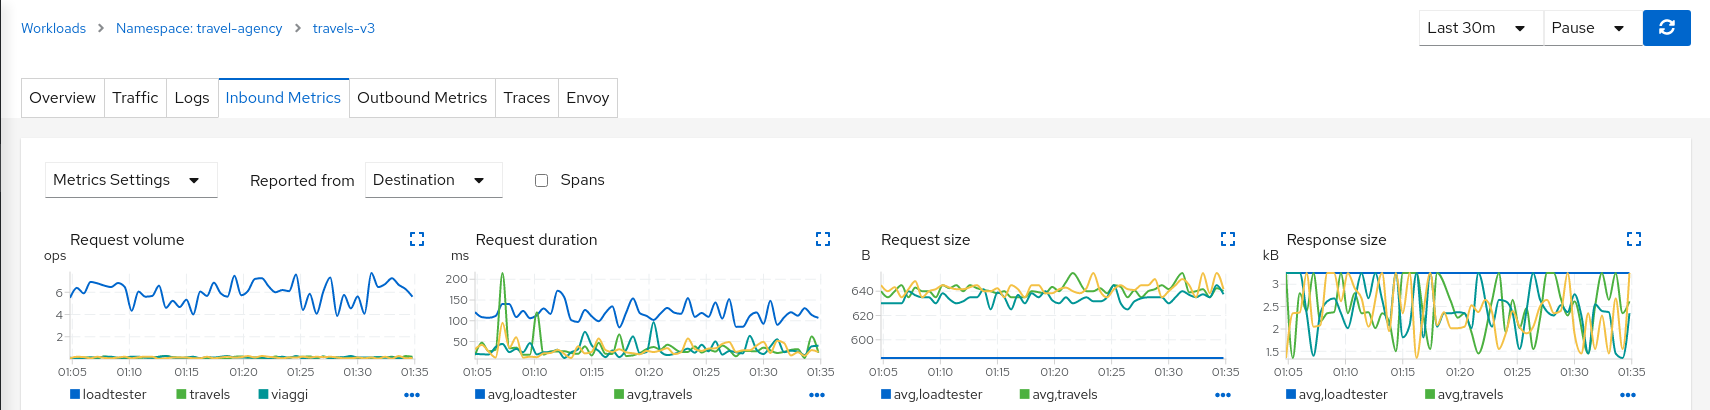
This can be examined better using the “Source” and “Destination” metrics from the “Inbound Metrics” tab.
The “Source” proxy, in this case the proxies injected into the workloads of travel-portal namespace, won’t report telemetry for travels-v3 mirrored workload.
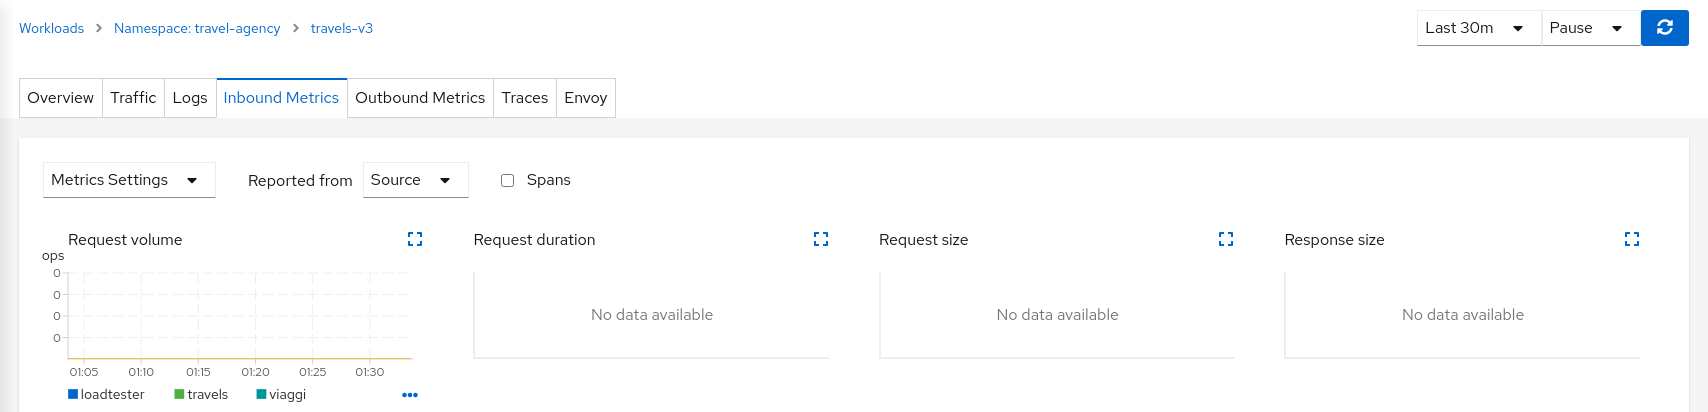
But the “Destination” proxy, in this case the proxy injected in the travels-v3 workload, will collect the telemetry from the mirrored traffic.
Step 3
Update or delete Istio ConfigurationAs part of this step you can update the Mirroring scenario to test different mirrored distributions.
When finished you can delete the generated Istio config for the travels service.
6 - Secure the Mesh
Using Kiali to configure and observe mesh security.
Authorization Policies and Sidecars
Security is one of Istio’s main pillars.
The Istio Security High Level Architecture provides a comprehensive solution to design and implement multiple security scenarios.
In this tutorial we will show how Kiali can use telemetry information to create security policies for the workloads deployed in a given namespace.
Istio telemetry aggregates the ServiceAccount information used in workload communication. This information can be used to define authorization policies that deny and allow actions based on observed live traffic.
Additionally, Istio sidecars can be created to limit the hosts with which a given workload can communicate. This improves traffic control, and also reduces the memory footprint of the proxies.
This step will show how we can define authorization policies for the travel-agency namespace, in the Travel Demo application, for all existing traffic in a given time period.
Once authorization policies are defined, a new workload will be rejected if it doesn’t match the security rules defined.
Step 1
Undeploy the loadtester workload from travel-portal namespaceIn this example we will use the loadtester workload as the “intruder” in our security rules.
If we have followed the previous tutorial steps, we need to undeploy it from the system.
kubectl delete -f <(curl -L https://raw.githubusercontent.com/kiali/demos/master/travels/travel_loadtester.yaml) -n travel-portal
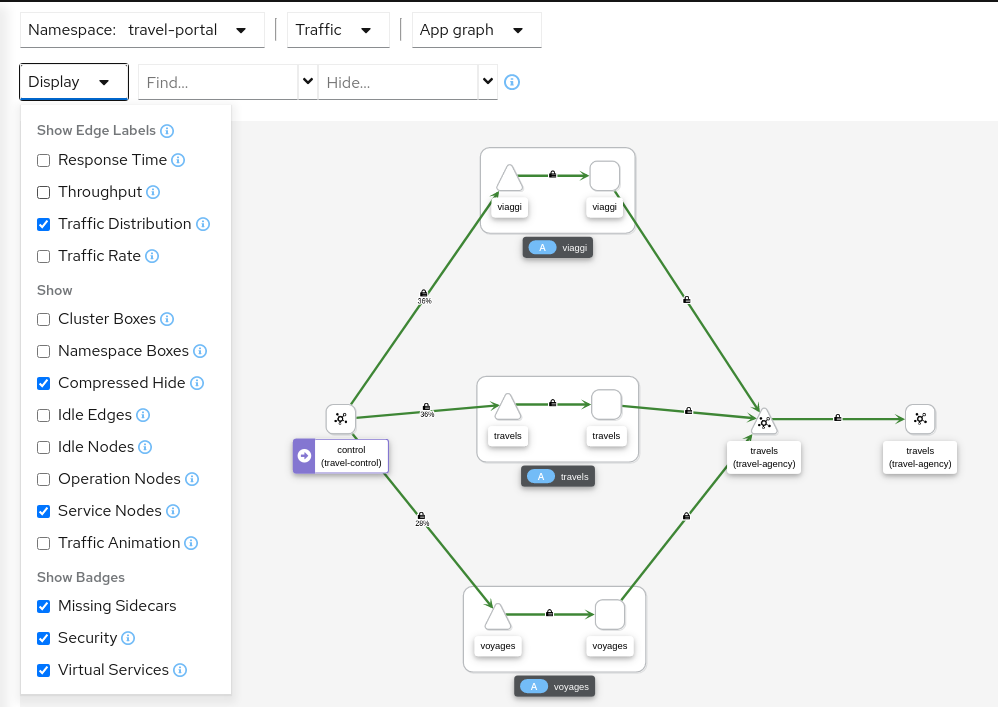
We should validate that telemetry has updated the travel-portal namespace and “Security” can be enabled in the Graph Display options.
Step 2
Create Authorization Policies, and Istio Sidecars, for current traffic for travel-agency namespaceEvery workload in the cluster uses a Service Account.
travels.uk, viaggi.it and voyages.fr workloads use the default cluster.local/ns/travel-portal/sa/default ServiceAccount defined automatically per namespace.
This information is propagated into the Istio Telemetry and Kiali can use it to define a set of AuthorizationPolicy rules, and Istio Sidecars.
The Sidecars restrict the list of hosts with which each workload can communicate, based on the current traffic.
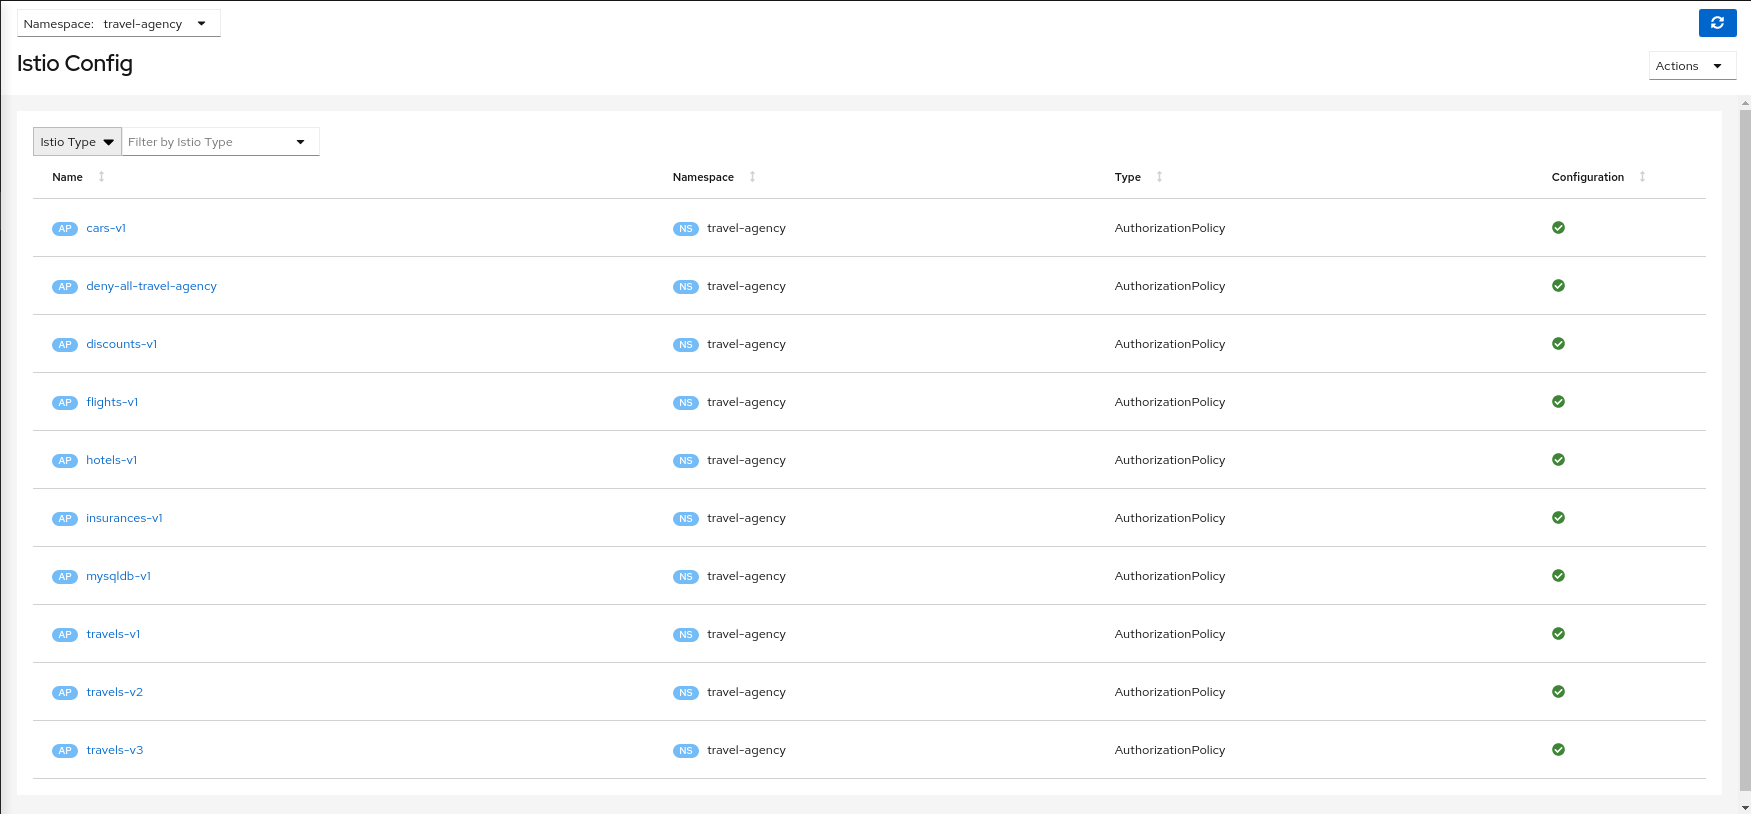
Open the travel-agency Namespace details page and use Actions → Create Traffic Policies.
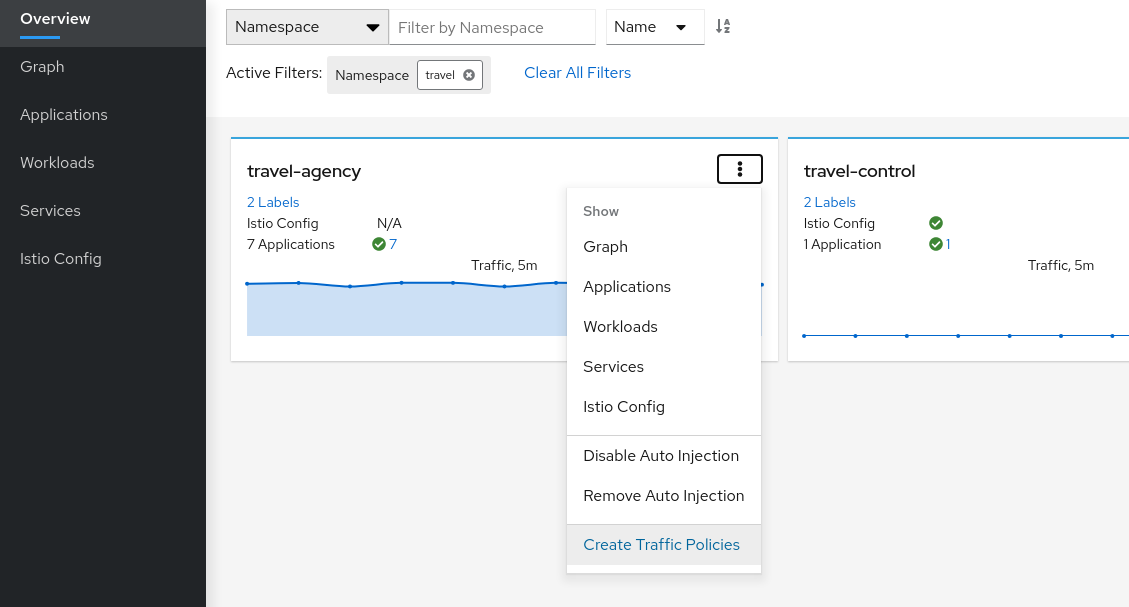
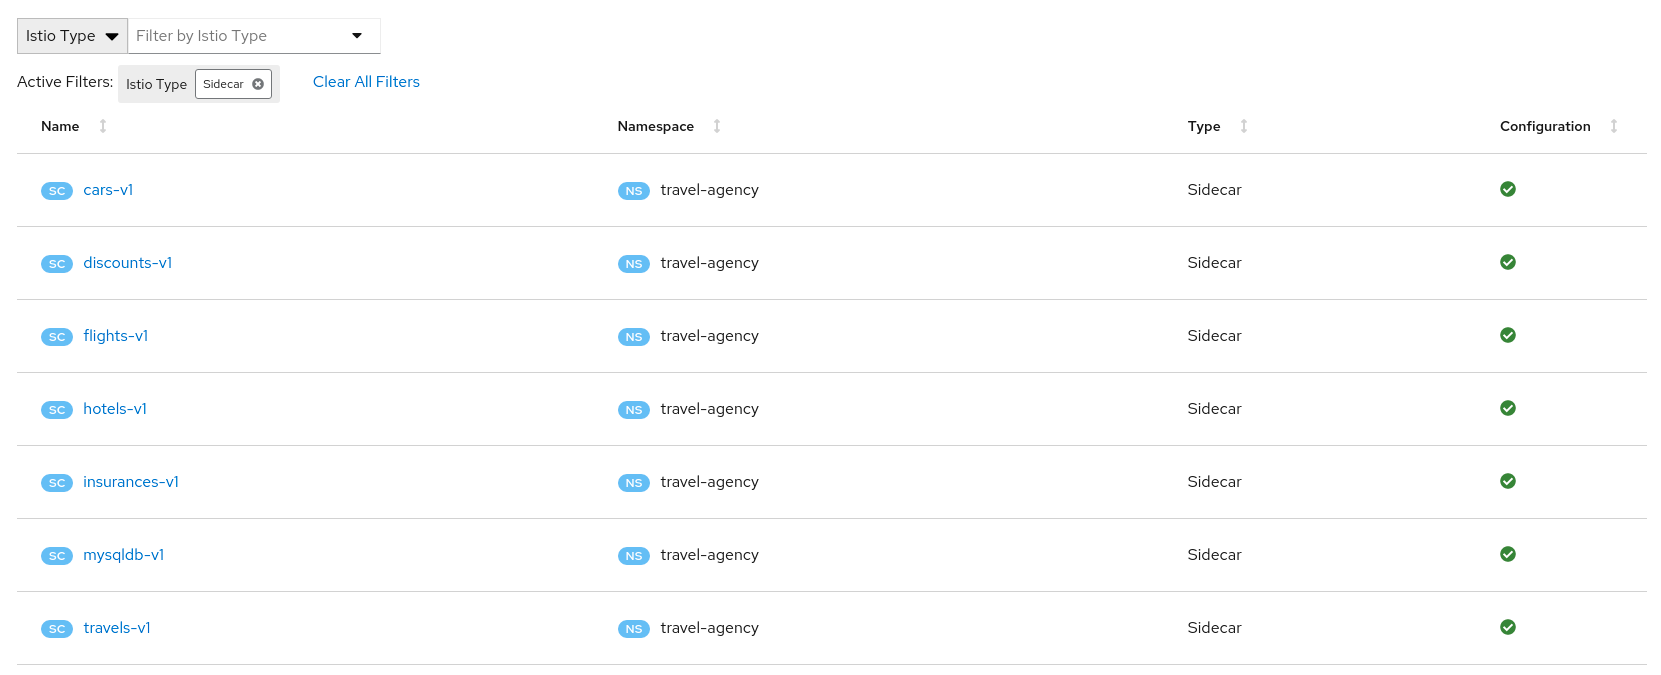
This will generate a main DENY ALL rule to protect the whole namespace, and an individual ALLOW rule per workload identified in the telemetry.
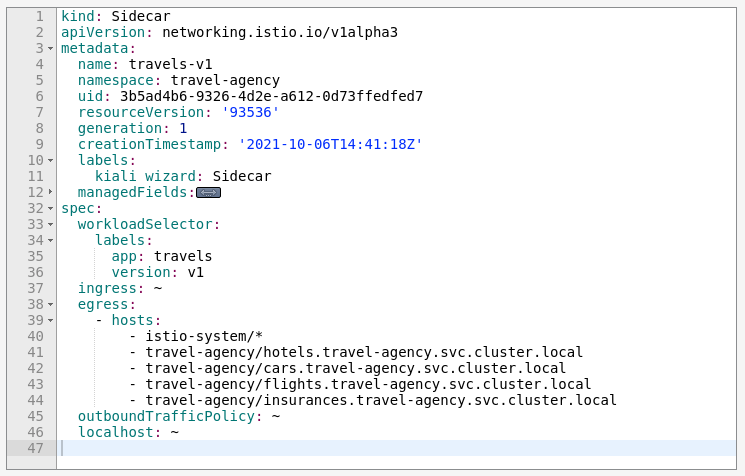
It will also create an individual Sidecar per workload, each of them containing the set of hosts.
As an example, we can see that for the travels-v1 workload, the following hosts are added to the sidecar.
Step 3
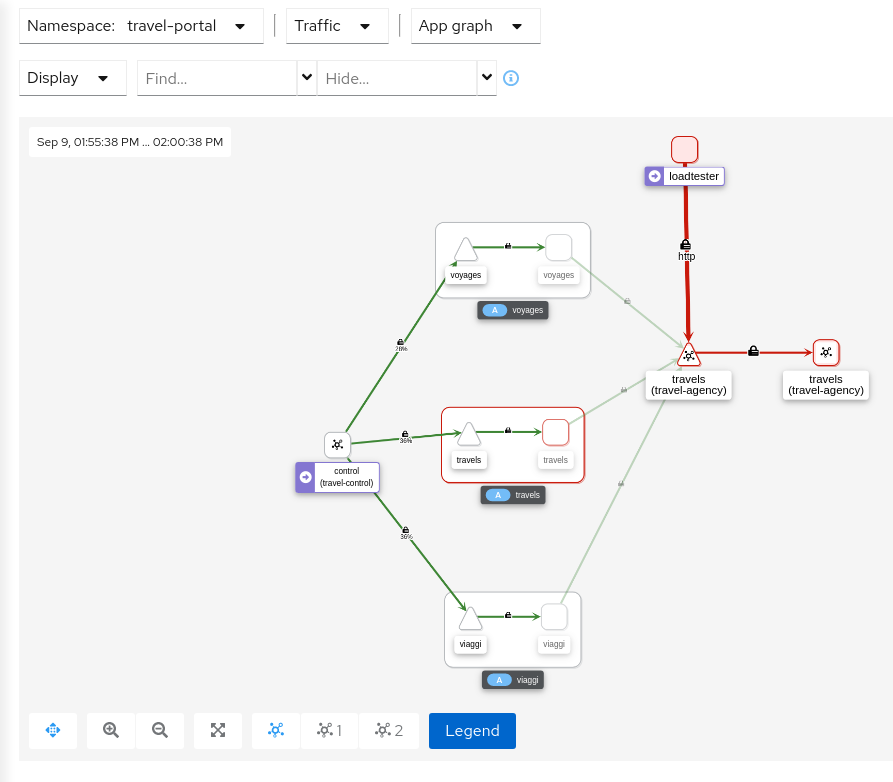
Deploy the loadtester portal in the travel-portal namespaceIf the loadtester workload uses a different ServiceAccount, then when it’s deployed it won’t comply with the AuthorizationPolicy rules defined in the previous step.
OpenShift
OpenShift users may also need to add the associated loadtester ServiceAccount to the necessary SecurityContextConstraints.kubectl apply -f <(curl -L https://raw.githubusercontent.com/kiali/demos/master/travels/travel_loadtester.yaml) -n travel-portal
Now, the travels workload will reject requests made by the loadtester workload and that situation will be reflected in Graph:
This can also be verified in the details page using the Outbound Metrics tab grouped by response code (only the 403 line is present).

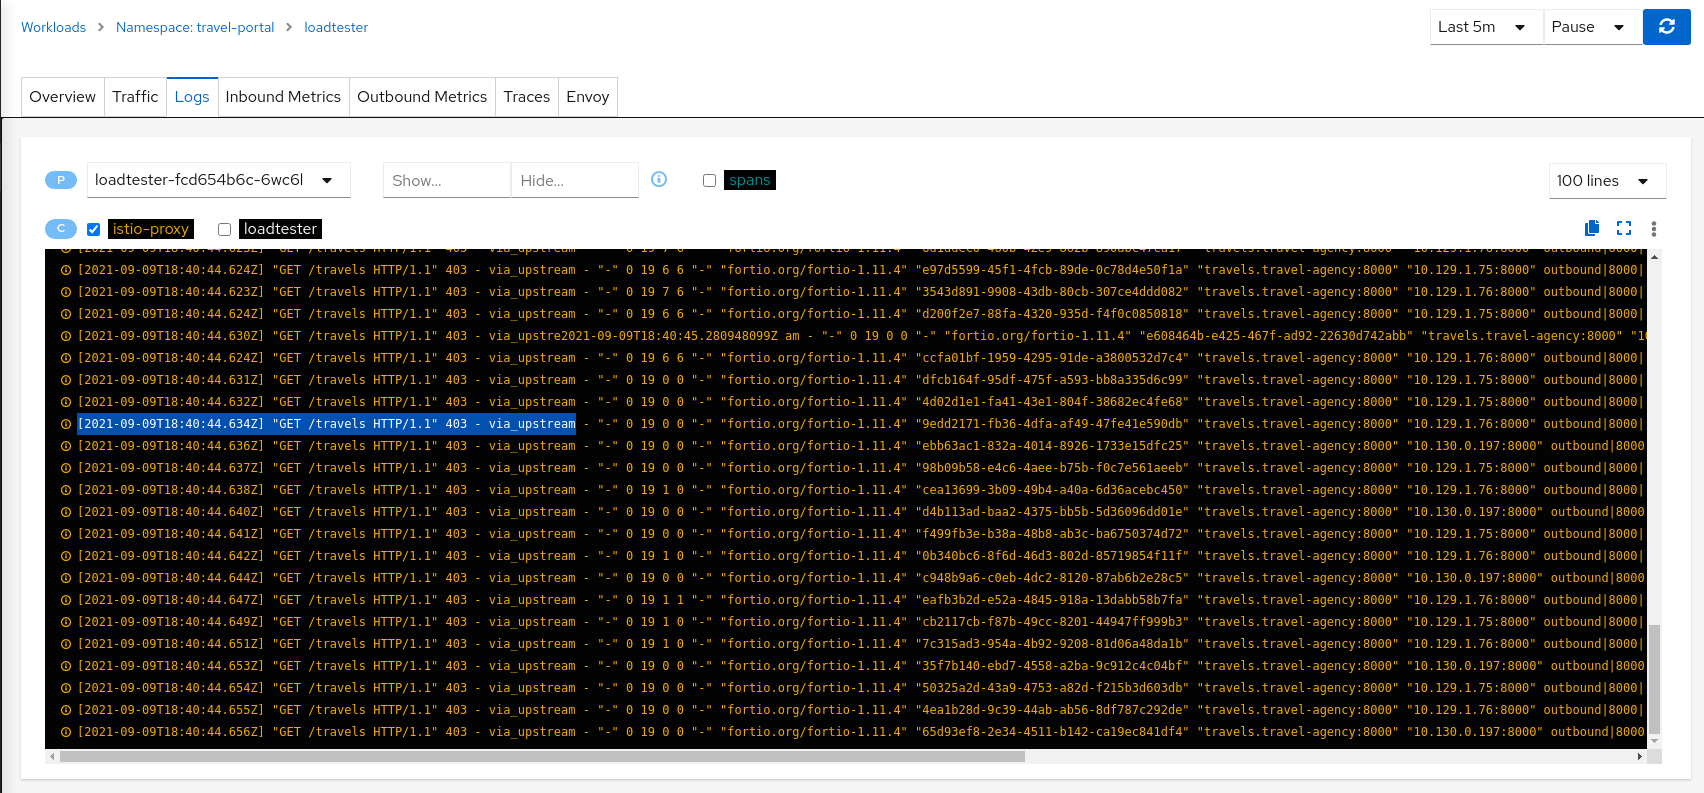
Inspecting the Logs tab confirms that loadtester workload is getting a HTTP 403 Forbidden response from travels workloads, as expected.
Step 4
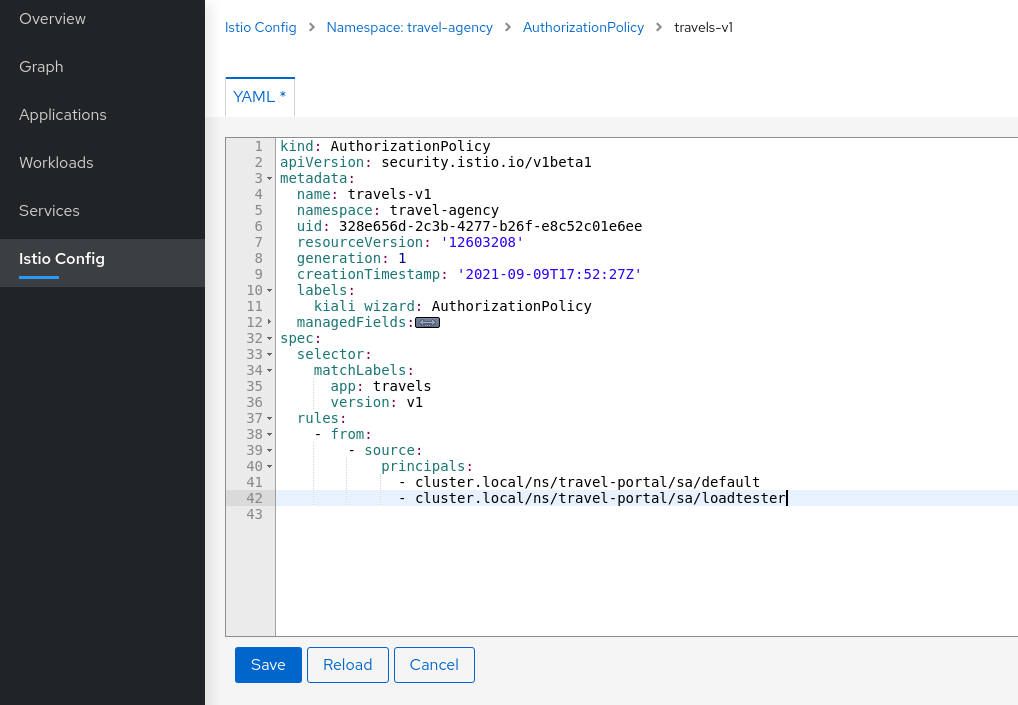
Update travels-v1 AuthorizationPolicy to allow loadtester ServiceAccountAuthorizationPolicy resources are defined per workload using matching selectors.
As part of the example, we can show how a ServiceAccount can be added into an existing rule to allow traffic from loadtester workload into the travels-v1 workload only.
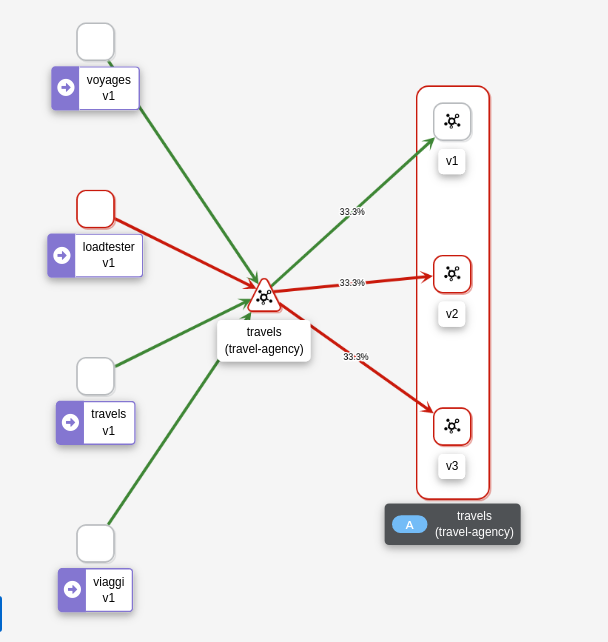
As expected, now we can see that the travels-v1 workload accepts requests from all travel-portal namespace workloads, but travels-v2 and travels-v3 continue to reject requests from the loadtester source.
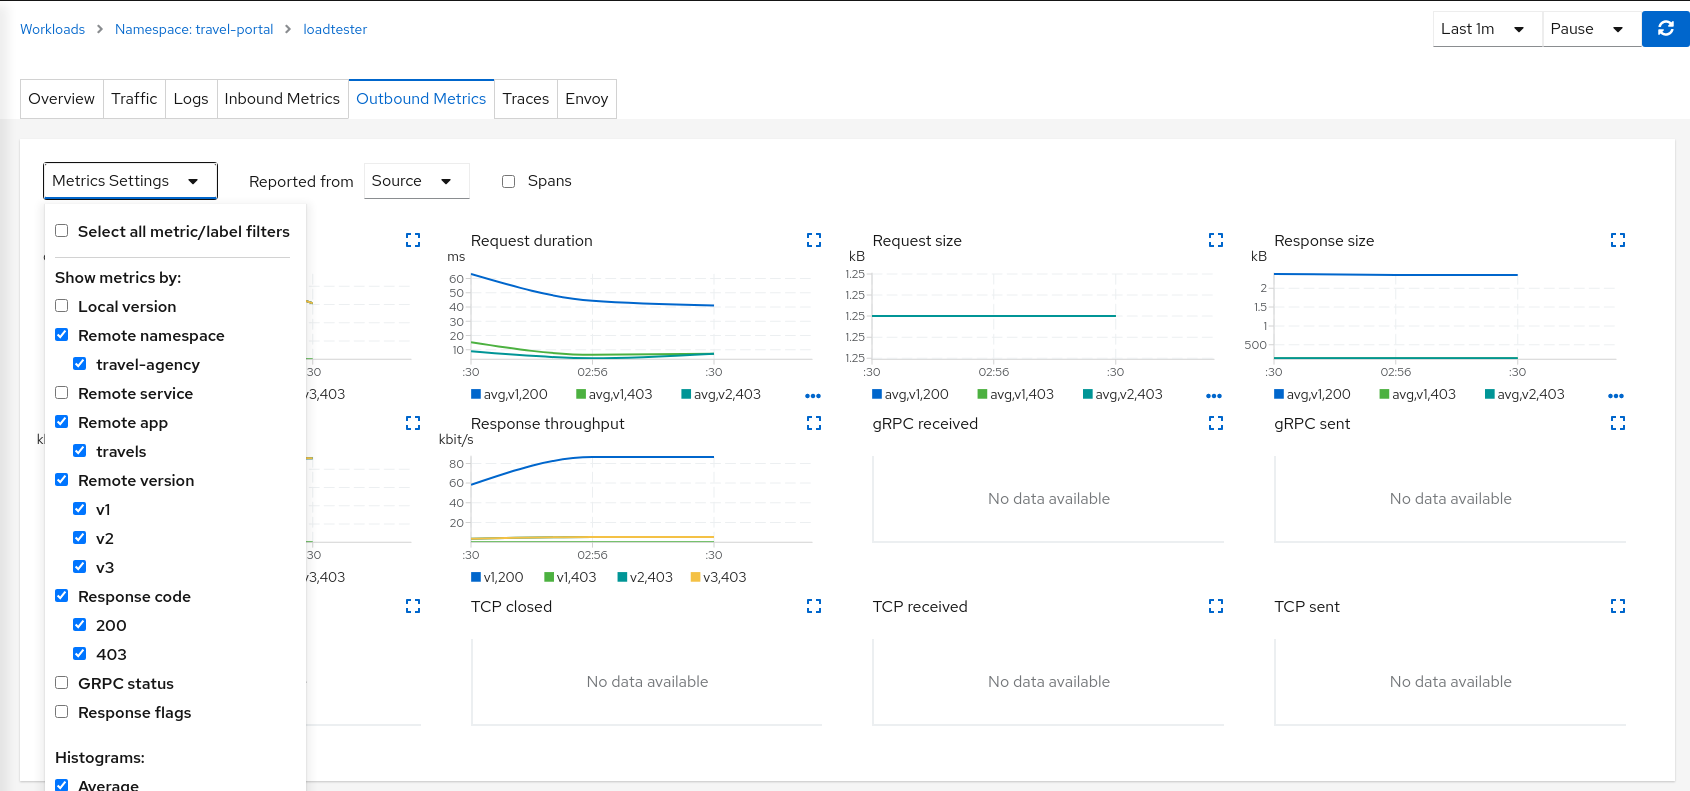
Using “Outbound Metrics” tab from the loadtester workload we can group per “Remote version” and “Response code” to get a detailed view of this AuthorizationPolicy change.
Step 5
Verify the proxies clusters list is limited by the SidecarsAccording to Istio Sidecar documentation, Istio configures all mesh sidecar proxies to reach every mesh workload. After the sidecars are created, the list of hosts is reduced according to the current traffic. To verify this, we can look for the clusters configured in each proxy.
As an example, looking into the cars-v1 workload, we can see that there is a reduced number of clusters with which the proxy can communicate.
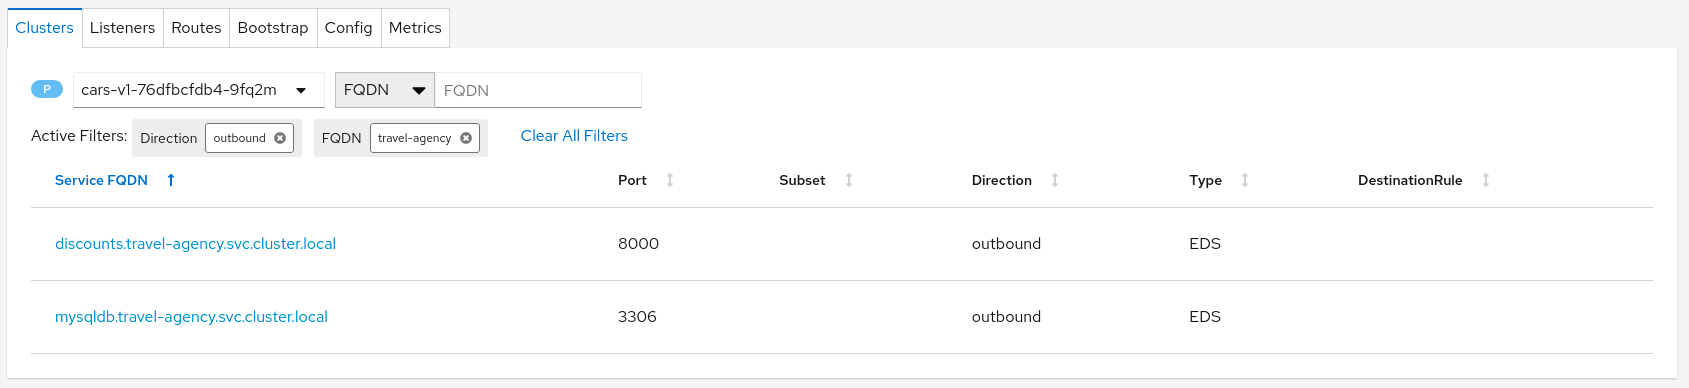
Step 6
Update or delete Istio ConfigurationAs part of this step, you can update the AuthorizationPolicies and Istio Sidecars generated for the travel-agency namespace, and experiment with more security rules. Or, you can delete the generated Istio config for the namespace.
7 - Uninstall Travel Demo
Wrap up the tutorial.
Remove components in reverse order of installation: the Travel Demo application, Kiali, Istio, and (on Kind) the cluster itself.
Uninstall the Travel Demo
Delete the demo namespaces:
kubectl delete namespace travel-agency
kubectl delete namespace travel-portal
kubectl delete namespace travel-control
Alternatively, delete the manifests first (this removes any Istio resources created in those namespaces during the tutorial):
kubectl delete -f <(curl -L https://raw.githubusercontent.com/kiali/demos/master/travels/travel_agency.yaml) -n travel-agency --ignore-not-found
kubectl delete -f <(curl -L https://raw.githubusercontent.com/kiali/demos/master/travels/travel_portal.yaml) -n travel-portal --ignore-not-found
kubectl delete -f <(curl -L https://raw.githubusercontent.com/kiali/demos/master/travels/travel_control.yaml) -n travel-control --ignore-not-found

kubectl delete namespace travel-agency
kubectl delete namespace travel-portal
kubectl delete namespace travel-control
OpenShift
If you used the Kiali Travel Demo install script, it can also remove OpenShift-specific resources (SecurityContextConstraints and NetworkAttachmentDefinitions):
./hack/istio/install-travel-agency-demo.sh -c oc -d true
Uninstall Kiali
Kind
helm uninstall --namespace istio-system kiali-server
OpenShift
Delete the Kiali CR first so the operator removes the Kiali server:
kubectl delete kiali kiali -n istio-system
Then uninstall the operator:
helm uninstall --namespace kiali-operator kiali-operator
kubectl delete crd kialis.kiali.io
You must delete all Kiali CRs before uninstalling the operator. See Uninstalling Helm installations if removal hangs.
If you installed the operator from OperatorHub, uninstall it from the OpenShift console using the same mechanism you used to install it.
Uninstall Istio
Kind
From the Kiali source repository:
./hack/istio/install-istio-via-istioctl.sh -c kubectl -di true
OpenShift
./hack/istio/install-istio-via-istioctl.sh -c oc -di true
Or use istioctl uninstall --purge -y and delete the istio-system namespace.
Delete the Kind cluster
If you created the cluster with hack/start-kind.sh, delete it when you are finished:
kind delete cluster --name travels-tutorial
This removes the Kind cluster and all resources running on it.